

Building with Mojo (Part 3): Python and Mojo
Converting a Python program to Mojo, and exploring how they interact.

This article is Part 3 of our ongoing series on the Mojo programming language. Part 1 introduced Mojo’s origins, design goals, and its promise to unify Pythonic ergonomics with systems-level performance.
Part 2 covered Mojo’s SIMD-first model in practice.


Mojo is created with a distinct Python flavor to bring unification to AI development and deployment.
Most AI LLMs today use Python as their main language. This means that MAX, the AI engine framework from Modular written in Mojo, must be able to talk to and use Python. Indeed, MAX has a Python API to work with Python AI models, as well as a Mojo and C API.
This article covers:
A comparison between Python and Mojo
How the integration between Mojo and Python works
Showing the advantages of Mojo calling out to Python
Working with useful Python functions and
PythonObjectsWorking with local Python modules
Applying functionality from modules in the Python ecosystem
Calling Mojo from Python!!!!
Python can still do many things Mojo isn’t yet able to do, such as working with classes or operating on big integers. In the 35+ years of its existence, people have built a gigantic infrastructure of thousands of modules—from numerical computation (NumPy, Matplotlib), data science (Pandas), and AI (PyTorch, TensorFlow) to graphics, gaming, and beyond. Although Mojo equivalents are being built right now, it will take time to make them as battle-tested and functionally complete as their Python counterparts. So, for the foreseeable future, Mojo and MAX will need to work smoothly with Python.
Mojo is a member of the Python family of languages. It’s no surprise, then, that as a developer, you’ll need basic Python skills. More important is learning to read the documentation of Python libraries to understand the API required to talk to Python—calling Python functions from Mojo. Using existing Python functionality will help you, as a Mojo developer, build a complete working project faster, enriching your portfolio or that of your company.
In this article, you’ll learn how to do just that. Afterwards, the Python parts can be slowly migrated to Mojo, further enhancing your project’s performance.
To follow along, first follow the instructions here to install pixi. Then use pixi to create a project called python_integration and cd into it. We’re going to let Mojo work together with Python, so we need a running Python environment inside the Mojo project. Add a recent Python version such as 3.12 to the project with the command:
$ pixi add “python==3.12”and start a magic shell.
To add the necessary Python libraries, run:
$ pixi add numpy matplotlibAll code examples used in this chapter can be found in the code repo here.
The code in this article uses Python integration and calculations at compile time. We’ll discuss these topics more in depth in later articles. All code has been tested in Mojo’s latest stable version 25.6.
A Comparison between Python and Mojo
We’ll start by converting a Python program to its Mojo equivalent step by step. The following section compares the same algorithm implemented in both Python and Mojo, and we compare the performance of both.
Compiling and executing a simple Mojo program
As a start, let’s do a Hello World! for the whole planet in Python (see hello_world_uni.py):
print(”Hello World from Python!”)
print(”Bonjour tout le monde!”)
print(”Hallo Wereld!”)
print(”¡Hola, mundo!”)
print(”Καλημέρα κόσμε!”)
print(”你好”)
print(”こんにちは 世界!”)
print(”ສະບາຍດີຊາວໂລກ”)
print(”👋🌍❗”)Run it with:
$ python3 hello_world_uni.pyOutput:
Hello World from Python!
Bonjour tout le monde!
Hallo Wereld!
¡Hola, mundo!
Καλημέρα κόσμε!
你好
こんにちは 世界!
ສະບາຍດີຊາວໂລກ
👋🌍❗Now write the Mojo equivalent (see hello_world_uni.mojo):
Listing 3.1 – A Unicode Hello World! program
def main():
print(”Hello World from Mojo!”)
print(”Bonjour tout le monde!”)
print(”Hallo Wereld!”)
print(”¡Hola, mundo!”)
print(”Καλημέρα κόσμε!”)
print(”你好”)
print(”こんにちは 世界!”)
print(”ສະບາຍດີຊາວໂລກ”)
print(”👋🌍❗”)For a change, let’s run it on the command line, outside of VS Code:
$ mojo hello_world_uni.mojo(This is short for: mojo run hello_world_uni.mojo.)
As expected, this displays the same “Hello World” messages as Python.
We see that Mojo is as friendly as Python and supports Unicode. You’ll notice that in Mojo all statements are enclosed in a block preceded by def main():
In Python you can write top-level code, but in Mojo this is not yet possible (except in the REPL or in a Jupyter notebook): all code must be enclosed in a function.
Moreover, the top-level code must be written in a main() function with no arguments and no return type. main() is automatically called as the starting point of execution in Mojo. It also envelops the complete program execution from start to end.
Looking at the Mojo version, you’ll see quite a lot of Python features:
defto declare a functionThe
:character to end a function or control statement, marking the start of an indented code blockSignificant whitespace and indentation
print() is a function that displays its argument to the terminal, including a newline.
Experiment:
Experiment with removing or adding spaces before the
The mojo command compiles to machine code and executes that in memory—it doesn’t produce an executable file.
Building the code into an executable
A typical production environment doesn’t have MAX or Mojo installed. This isn’t necessary, because a Mojo project compiles to a single executable file with the mojo build command.
This simplifies deployment tremendously: you just copy the executable to the target production machine and run it. Let’s try this:
$ mojo build hello_world_uni.mojoNow a binary file hello_world_uni is produced, which you can execute as ./hello_world_uni, displaying the same output as before.
Go ahead, do it. Copy it elsewhere on your machine and see that it runs.
Note: In development, the simple
mojocommand to run a program is just fine. You’ll need a build only when deploying into a test or production environment. It’s also important for benchmarking: an executable usually runs at higher speed because no JIT compilation is needed.
Converting Python programs to Mojo
In this section, we’ll see that there isn’t much difference between a simple Python program and its Mojo equivalent. Then we’ll look at a non-trivial Python program and convert it step by step to Mojo.
A simple example
Here is a Python program to add two integers (see adding.py):
def add(x, y):
    return x + y

z = add(3, 5)
print(z) # => 8
which we could rewrite as (see adding2.py):
def add(x, y):
    return x + y

def main():
    z = add(3, 5)
    print(z) # => 8

main()
Running both programs yields 8.
Now make a copy of this program and rename it to adding2.mojo. When compiling in VS Code, you’ll see the following error:
error: TODO: expressions are not yet supported at the file scope level
We get rid of this by removing the call to main(), which isn’t needed in Mojo. Then, in def add(x, y):, we see another error:
error: argument type must be specified
That’s right—even in a def function, the arguments and the return value must be typed. Because the values are integers, they have the type Int.
The resulting program is valid Mojo code:
def add(x: Int, y: Int) -> Int:
    return x + y

def main():
    z = add(3, 5)
    print(z) # => 8
Note that when running this code, Mojo does not use CPython or any Python interpreter. Mojo also has a more robust style using fn as the keyword for a function instead of def. In fn mode, it is mandatory to add a type to every function argument, and the function must be annotated with raises if an error can occur inside the function.
Why is argument typing important? First, with type info, the compiler can check whether the arguments passed to the function have the correct type. The wrong type will give a compile error, rather than crashing your program at runtime as Python can. The code becomes more robust; you don’t even have to run it to catch certain errors. Second, since the compiler knows the exact types, it can generate machine code specifically for those types. For example, code for integers will differ from code for floating-point numbers. Doing so, the machine code can be highly optimized, leading to a big performance increase.
Let’s make this change in the code (see adding.mojo):
fn add(x: Int, y: Int) -> Int:    #A
    return x + y

fn main():
    z = add(3, 5)
    print(z)  # => 8

#A Adding argument types for robustness and performance
def and fn
Now you might ask: what’s with def versus fn, and how do I choose which to use?
defis as if you said to the compiler, “I just want to code—stop bothering me; speed is not my concern.” It’s more Pythonic. Mojo assumes anydeffunction can raise an error. Functions are dynamic and types are optional for local variables.defis great for high-level programming and scripting but less suited to systems-level programming. Yes, you can use types withdefwhen declaring variables withvar, and this is mandatory for function arguments. But then, why not use anfnfunction?fnis as if you said to the compiler, “Let’s get fast—and show me everything that could go wrong.” It’s the Rust way: statically typed and aiming for higher performance.fnenforces strongly typed code and guarantees memory-safe behavior.
If the compiler thinks there is any chance of an error being raised inside the function, the function must be annotated explicitly with raises to indicate this.
Declaring the type with var is not required for variables inside an fn, but it’s considered best practice: with type info, the compiler can generate faster, safer code.
Both def and fn warn you when a variable is unused, to guard against misspellings or superfluous variables.
Experiment:
In the typed Mojo programadding.mojo, try to add two decimal numbers. Does it work? What message do you get? Do you get the message at compile time or when running the program?
An algorithmic example: binary search
Here we start with a non-trivial Python program and convert it step by step to Mojo (see search.py). What does this program do?
The code contains a binary search function that takes a sorted array arr and an element x. It searches whether x is present in this array, returning its index; otherwise it returns −1.
Note: The binary-search algorithm used here is widely known. If you need a refresher, see read this.
Listing 3.2 – A binary search Python program
def binary_search(arr, x):
    low = 0
    high = len(arr) - 1

    while low <= high:
        mid = (high + low) // 2

        if arr[mid] < x:
            low = mid + 1
        elif arr[mid] > x:
            high = mid - 1
        else:
            return mid

    return -1

# top-level code:
n = 1_000_000         #A
arr = []
for i in range(n):
    arr.append(i)     #B
results = []
for i in range(n):    #C
    results.append(binary_search(arr, n - i))
print(”Results: “, len(results))

# => Results:  1000000

#A The _ can be used in numbers to make it easier to read
#B First loop: populate array arr
#C Second loop: call binary search 1,000,000 times
The main code sets up the data structures. The first loop appends all numbers from 0 to 999,999 to the array. Then, in a second loop over the 1,000,000 numbers, it performs a binary search on each integer n – i, which must be present in the array. The // operator inside the function means floor division (for example, 5 // 2 gives 2). At the end, we display the length of the results array to verify we have found all numbers.
Let’s now convert this program to Mojo. First make a copy of search.py and rename it to search.mojo.
Immediately, the editor fills with (luckily all the same) errors:
TODO: expressions are not yet supported at the file scope level.
Tip: Put your cursor on the error line, then use F8 to enlarge the message or copy it.
We know how to handle this: just place a def main(): before the top-level code and indent the code.
The next error we see is:
cannot emit an empty list without a contextual type
for the arr and results variables. Like in Python, we want them to be dynamic lists.
The closest to this in Mojo is List, which is defined in the module collections but is automatically known.
Instead of declaring arr as an [], we must declare it with its List type: arr = List[Int32](), and do the same for results. They are both a List of 32-bit integers. The () at the end is a call to the List constructor. Basically, we have given the two variables a type, which makes the code more error-proof and speeds up the execution.
We still have an error on the def binary_search:
argument type must be specific
The arguments must be typed in both fn and def functions. Let’s fill in the concrete type: def binary_search(arr: List[Int32], x):.
While we’re at it, let’s type the search argument x as a 32-bit integer as well:def binary_search(arr: List[Int32], x: Int32):.
Now we see another error on the return lines:
cannot implicitly convert ‘Int’ value to ‘None’ in return value
The result of binary_search, which is the position of x in the array arr, is not indicated. This cannot be converted to an Int32, which is the element type of results and exactly what append expects.
Let’s specify the return type with -> Int32:def binary_search(arr: List[Int32], x: Int32) -> Int32:
(We get a warning on the line mid = 0; this line can be deleted because mid is initialized in the while loop.)
Finally, our Mojo code compiles and displays the same output as the Python code. Note that the code block of binary search is exactly the same in the Python and the Mojo version.
Since we clearly moved our code to a stricter version of Mojo with types, change def to fn for the two functions. The resulting code is shown below (see search.mojo).
Listing 3.3 – A binary search Mojo program
fn binary_search(arr: List[Int32], x: Int32) -> Int32:    #B
    low = 0
    high = len(arr) - 1

    while low <= high:
        mid = (high + low) // 2

        if arr[mid] < x:
            low = mid + 1
        elif arr[mid] > x:
            high = mid - 1
        else:
            return mid

    return -1

fn main():
    n = 1_000_000
    arr = List[Int32]()        #C
    for i in range(n):
        arr.append(i)
    results = List[Int32]()    #C

    for i in range(n):
        results.append(binary_search(arr, n - i))
    print(”Results: “, len(results))

# => Results:  1000000

#B Typed binary search function
#C Typing arr and results
With very little effort (changing three lines), we converted the Python code to Mojo. Let’s now see how they perform.
Comparing the speed of Python and Mojo in a simple algorithm
In the previous section, we used a binary-search algorithm and executed 1,000,000 calls to that function. We wrote both a Python and a Mojo version. Let’s now time the difference.
This is very simple:
Capture the time before the loop that calls binary search (call it
start) and after that loop (end). So(end - start)is the time difference.To work with time in Python, import it:
from time import time.The time is returned in seconds; to get milliseconds (ms) multiply by 1000.
To work with time in Mojo, use the
perf_counter_ns()function and import it from the moduletime:from time import perf_counter_ns.The time there is returned in nanoseconds; to get ms divide by 1,000,000.
We are not making a real benchmark here; we just want an idea of the difference between the two versions.
Comparing Python and Mojo, we show the Python version in Listing 3.4 (see search_timed.py; we leave out code common with Listing 3.2):
Listing 3.4 – Timed Python binary search
from time import time

def binary_search(arr, x):
                            #A

# top-level code:
                            #A
start = time()
for i in range(n):
    results.append(binary_search(arr, n - i))
end = time()
print((end - start) * 1000, “ms”)

# => 1290.342092514038 ms

#A Same code as in Listing 3.2
An average of 10 runs gives 1269 ms on my machine.
In the Mojo version, the variables and the binary_search function are typed.
Listing 3.5 – Timed Mojo binary search
from time import perf_counter_ns     #A
from collections import List         #A

fn binary_search(arr: List[Int32], x: Int32) -> Int32:
                          #B
fn main():
                          #B
    start = perf_counter_ns()
    for i in range(n):
        results.append(binary_search(arr, n - i))
    end = perf_counter_ns()
    print((end - start) / 1e6, “ms”)

# => 56.476036999999998 ms

#A Import perf_counter-ns and List from their modules time and collections
#B Same code as in Listing 3.3
An average of 10 runs gives 57 ms, which is 22.3× faster than the Python version! The algorithm and loops remain the same, and the code still looks very Pythonic.
Why use Python together with Mojo?
Mojo is a young language and currently doesn’t have many battle-tested libraries outside of stdlib. Python, by contrast, is decades old and has a vast ecosystem of well-tested libraries. It’s evident that Mojo projects would want to use these modules. Also, the gigantic amount of Python code that exists as modules in applications must be reusable in new Mojo projects.
As time goes by, Mojo equivalents for these Python libraries will appear and replace them. In the meantime, use Python for what it’s good at—for example, graph plotting or AI modeling with PyTorch—and for things that do not yet exist or are more difficult to rewrite in Mojo.
Why can you be confident that the Mojo ecosystem will grow rapidly? Because Mojo, being compiled, delivers far better performance (in the range 10–10000, and when fine-tuned even more) than Python, which is interpreted. With what we now know about Mojo, we can answer the following question in more depth.
Why is Mojo more performant?
With Mojo, there is no overhead associated with compiling to bytecode and running through an interpreter as Python does. Mojo compiles to native code, which runs inherently much faster.
Python works with references (a kind of pointer) for all variables, even for simple numbers. Mojo, on the other hand, always uses SIMD for numbers and math operations. Numbers (and other simple values) sit on the stack and can be passed straight into SIMD registers to be processed in bulk. We don’t need to look up these values on the heap via an address as in Python.
All the expensive allocations on the heap, garbage collection, and indirections (looking up values through references) that Python does are not required in Mojo.
The Mojo compiler can do huge optimizations because it knows the types of its variables. For example, knowing which numeric type is used in a piece of Mojo code can lead to highly optimized executable code. Because Python doesn’t know the type of its variables, it can’t do AOT (ahead-of-time) optimizations.
Two-way communication
Python–Mojo two-way communication is needed to get Python developers on board and to gradually migrate Python projects to Mojo.
What currently works very well is Mojo calling out to Python and getting results back. The other way around—Python calling into (much more performant) Mojo code—is also possible, but a bit more involved at the moment.
Conversion tool from Python to Mojo
An automated Python-to-Mojo code translation tool would be very helpful and will be provided by Modular. An open-source attempt, py2mojo by Manuel Saelices, can be found here.
Mojo’s long-term goal is to become a superset of Python. Then it will no longer use CPython. No intermediary solution will be necessary because Mojo’s compiler will process all code as Mojo code, including when it is written as pure Python.
Mojo calls Python – A simple example
If you are a Python developer, you probably have many favorite Python libraries and a bunch of self-written Python code for your projects. You don’t want to throw that away—you want to use that code from Mojo. And of course, you want to use modules across the Python ecosystem as well. We’ll show you how to do just that, starting with a simple example and later using well-known Python libraries, all with the same simple technique.
Suppose we have our own Python module compute.py containing some functions for calculations. To keep it simple, let’s start with multiplication and exponentiation:
def mul(n, m):
    return n * m

def pow(n, m):
    return n ** m
Let’s add this functionality to our Mojo program by importing the Python module. Python inside Mojo is a different execution environment, so Mojo braces against possible errors occurring in Python by using the raises keyword (see main.mojo):
Listing 3.6 – Mojo using a local Python module
from python import Python       #A

fn main() raises:               #E
    var i: Int = 42
    var j: Int = 7

    Python.add_to_path(”.”)      #B
    var calc = Python.import_module(”compute”)    #C

    var res1 = calc.mul(i, j)    #D
    var res2 = calc.pow(i, j)
    print(res1, res2)  # => 294 230539333248

    var np = Python.import_module(”numpy”)        #C
    var arr = np.arange(7)		                #D
    print(arr)  # => [0 1 2 3 4 5 6]

#A Import the python module.
#B Adds a directory to the Python path.
#C Import the specific Python module to use.
#D Call the Python functions.
#E Calling Python from Mojo always needs raises.
The python module (part of Mojo’s stdlib) is all that is needed for Python integration. The add_to_path() function tells Python where it can find the Python module to be used. compute.py lives in the current directory, which we include with “.”. If the Python module is stored elsewhere in your filesystem, change this to Python.add_to_path(”/path/to/module”).
Experiment: Using a module from another folder
Now yourcompute.pyis stored in a subfoldercalculations, which is itself in a subfoldermy_pythonunder the location ofmain.mojo. Changeadd_to_pathso that it works.
Python.import_module() does what it says (note that the .py extension is not needed). Just give it a name, then call the Python functions you need with the familiar dot notation, like calc.mul(i, j) or np.arange(7). Continue with their results in the Mojo code.
The Python struct imported and used in the code is only a collection of static methods (like add_to_path and import_module) that enable you to use Python code in Mojo. They are called static because they are called on the Python struct itself, like Python.import_module() (see Chapter 6).
Note
Code that uses Python in a Jupyter notebook must be preceded with%%python:%%python print(”The answer is”, 42) # => 42
Let’s explore a little more in depth how this all works. CPython is the standard Python interpreter, and the same interpreter is used by Mojo to process Python code. This ensures that Python works exactly the same as it does when running stand-alone.
When processing Python code in Mojo, CPython is called at compile time and communicates with the Mojo compiler. This means that all Python processing happens at comptime. Mojo knows only one type for communication with Python, called PythonObject, which is used to contain all Python data.
Tip: A Mojo executable that uses Python does not contain the Python environment. So, you must ensure the production environment has Python installed—for example, as we did with:
$ pixi add “python==3.12”.
Also, every Python module used must be separately installed in that environment. Pixi makes this easy. If a required Python module is not present, the Mojo program will crash. For example, if NumPy is needed, install it with:$ pixi add numpy.
To add modules not available through the conda repo, you can also access PyPI through a command like:$ pixi add --pypi “fastapi”, which adds the fastapi library.
Note: When you work with Python in a Mojo project, a folder
__pycache__is created, which contains.pycfiles created by CPython (in our example a filecompute.cpython-312.pyc). The next time the Python code is called, the bytecode compilation can be skipped.
Python calls Mojo
As said, this can already be used, but because this is a beta feature many changes will take place before it reaches maturity. You can find out more here.
Using functions from the python module
The following listing shows how to use the crucial import_module function, as well as the complementary add_to_path function. But the Python struct contains other useful functions, like eval and evaluate (see python_functions.mojo):
Listing 3.7 – Useful python functions
from python import Python
from memory import UnsafePointer

fn main() raises:
    var py = Python()            #A

    var x = py.eval(”if 108 >= 42: print(’ok’)”)  # => ok
    print(x)  # => True

    var t = py.eval(”108 < 42”)    #B
    print(t)  # => True

    print(py.eval(”108 >< 42”))
    # =>
    #   File “<string>”, line 1
    # 108 >< 42
    #      ^
    # SyntaxError: invalid syntax
    # False

    var y = py.evaluate(”42 * 7”)   #C
    print(y)  # => 294
    var pystr = py.evaluate(”’This string is built’ + ‘ inside Python’”)
    print(pystr)  # => This string is built inside Python
    var len_py = Python.evaluate(”len”)   #D
    print(len_py(”ABCDEFG”))  # => 7

    var w: Int = 42
    var pybt = Python.import_module(”builtins”)  #E
    pybt.print(”This uses the Python print function”)
    # => This uses the Python print function
    pybt.print(”The answer is”, w)  #F
    # => The answer is 42
    pybt.print(pybt.type(w))  # => <class ‘int’>    #G
    pybt.print(pybt.id(w))  # => 139804414609064    #G
    print(UnsafePointer(to=w))  # => 0x7ffcda444ea0

    var foods = Python.list()    #H
    foods.append(”carrot”)
    foods.append(”chicken”)
    print(foods)  # => [’carrot’, ‘chicken’]
    print(Python.type(foods))  # => <class ‘list’>

#A Make a shorthand for Python()
#B Using eval to check and run Python code, returns a Bool
#C Using evaluate to execute Python code, and return result
#D Taking the Python len function into Mojo
#E Import Python builtins to use its functions
#F Python can use Mojo’s variables
#G Using Python’s print, type and id functions
#H Creating a Python list
Python() creates an object of the Python struct (see Chapter 7), so we can give it a shorter name (here py) and call the various functions on it.
The eval function accepts a (reference to a) String and executes it if the string is valid Python code, returning True (even if the expression evaluated is false). If the code is not valid or raises an exception, it returns False.
The evaluate function also executes the first String argument as Python code, but it returns the result of the evaluation as a PythonObject, to be used in Mojo. You can even use it to access a built-in Python function like len, store it in a Mojo variable, and call it in Mojo.
Another way to do the same thing is to import the Python builtins module, give it a name, and start calling functions from this module, as in pybt.type (which gives you the dynamic type) and pybt.print().
Python can also use a Mojo variable (in this example w). From the addresses (id in Python, address_of in Mojo) we can see that Python takes a copy of the variable. That copy is of type Int (or a PythonObject constructed from an Int) for Mojo, and <class ‘int’> for Python.
The list() and dict() functions construct an empty Python list and dict, and you use pure Python to work with them. For Mojo, these variables remain of type PythonObject.
Working with PythonObject
We already stated that all interaction between the Python interpreter and the Mojo compiler happens at comptime. A single, versatile type called PythonObject forms the bridge between Python and Mojo:
All Python objects are viewed by Mojo as instances of
PythonObject(an instance is a concrete version of a struct or class).A
PythonObjectcan be constructed from a wide variety of Mojo types (SIMDtypes,String,StringRef,StringLiteral,Dict, and so on) and can be used with functions such asstr,int,len, and so forth.
Moreover, PythonObject is register-passable, meaning the value can pass as a whole into SIMD registers, so it can be processed quickly. The import_module function also returns a PythonObject, which is a reference to the imported Python module. We give it a name (e.g., calc), and you can call all module functions on that object, like calc.mul(i, j). The types of the results of these calls are then inferred by the Mojo compiler and further processed in Mojo.
Nearly every operation involving a PythonObject may raise a Python exception, so functions that use it must be marked raises and handle errors.
PythonObject can be used in powerful ways, as the following examples demonstrate (see python_object.mojo):
We can use all Python types in Mojo just by giving them an alias name, as §5.4.1 shows where we use Python exponentiation
**, or §5.4.2 where we call the Pythonhex()method on its float type.Another way to use Python types is by using the
Python.evaluate()function, as illustrated in §5.4.3. This can be used to construct aPythonObjectfrom a literal expression, likePython.evaluate(”[42, ‘cat’, 3.14159]”), which acts like a Python list object.
This is useful when Python has functionality that Mojo doesn’t (yet) have. Rather than writing it in Mojo yourself, you can quickly use the Python version to accomplish your goal. For example, at the moment Mojo doesn’t support lists (or dictionaries) with different item types, so you could use a Python list that can contain heterogeneous types. In the following example we create a Python list object py_list and dynamically add items of different types:
from python import Python

def main():
    py_list = Python.list()     #A
    py_list.append(7)           #B
    py_list.append(”forty_two”)
    py_list.append(2.718)
    py_list.append(True)
    print(py_list)  # => [7, ‘forty_two’, 2.718, True]  #C
#A Create a Python List
#B Append different type elements
Tip Beware that
PythonObjects are stored on the heap and must be garbage-collected; use them only when you can’t write pure Mojo code.
You can initialize a PythonObject in several ways:
from python import Python, PythonObject
alias py = PythonObject

var py: PythonObject = []    #A
var py = Python()
var py: PythonObject = {}    #B

#A Creates an empty Python list; you can append items and print the list as in the previous snippet
#B Creates an empty Python dictionary
Or we can extract Python types to use them in our Mojo code like this:
alias int = PythonObject
alias str = PythonObject
alias float = PythonObject
How to work with big integers in Mojo
Using Python’s int as PythonObject, we can benefit from arbitrary-precision integers:
    var x: int = 2 #A
    print(x**100)  # => 1267650600228229401496703205376
    var y: Int = 2 #B
    print(y**100)  # => 0

#A x is a Python int, giving arbitrary precision in operations
#B y is a Mojo Int, with limited precision, and overflow without warning
Python gives us the right answer here, while Mojo Int does not because it overflows.
Note: The community package
decimojohas aBigInttype, which works likeintin Python.
Using PythonObject for floats and strings
In the following snippet, f and s1 are Python objects of type float and str, showing the use of Python functions hex and upper:
    var f: float = 0.6
    print(f.hex())  # => 0x1.3333333333333p-1
    var s1: str = “xxbaaa”
    print(s1.upper())  # => XXBAAA
    var s2: String = String(s1)
    print(s2)  # => xxbaaa
The Python str s1 is translated to Mojo String s2 by calling the Mojo String constructor on it.
Iterating over Python collections
The for loop supports iterating over Python collection types. Each item retrieved by the loop is a PythonObject wrapper around the Python object, so you don’t need to dereference it like in Mojo collection for loops. The following snippet is a simple example of iterating over a mixed-type Python list and dict:
    var py_list = Python.evaluate(”[42, ‘cat’, 3.14159]”)
    for py_obj in py_list:
        print(py_obj, end=” / “)
    # => 42 / cat / 3.14159 /
    print()
    var py_dict = Python.evaluate(”{’a’: 1, ‘b’: 2.71828, ‘c’: ‘sushi’}”)
    for py_key in py_dict:
        print(py_key, py_dict[py_key], end=” / “)
    # => a 1 / b 2.71828 / c sushi /
Working with Python modules
In this section we’ll show some useful Python modules at work within Mojo. Before calling into them, ensure your Mojo program can find them.
Test if a Python module is installed
An error may occur when attempting to import a module that isn’t installed locally. In Mojo, handle errors with try to run the dangerous code and except to catch the error.
Suppose we need the pandas module to work with data frames. Use the following code to avoid crashing your program when pandas (or any other Python module you want to use) is not available (see importing_error.mojo):
from python import Python

fn main():
    try:
        var pd = Python.import_module(”pandas”)
        print(pd.DataFrame([1,2,3,4,5]))        #A
    except ImportError:
        print(’error importing pandas module’)  #B

#A Prints
    0
0  1
1  2
2  3
3  4
4  5
when pandas is available
#B Print ‘error importing pandas module’ when pandas is not available
To test this, execute it first with pandas not installed, and then make the library available with $ magic add pandas.
Making an HTTP request
We need the requests module, so install it with $ magic add requests. The following code using the Python requests module shows how easy it is to make an HTTP request (see http_request_from_py.mojo):
from python import Python

fn main() raises:
     var requests = Python.import_module(”requests”)
     var response = requests.get(”https://www.google.com/”)    #A
print(response.status_code)  # => 200
print(response.text)

# =>
<!doctype html><html itemscope=”“ itemtype=”http://schema.org/WebPage”   # lang=”pl”><head><meta content=”text/html; charset=UTF-8” http-           # equiv=”Content-Type”><meta …

response = requests.get(”https://api.github.com”)
print(response.json())    #B

# =>
‘current_user_url’: ‘https://api.github.com/user’, ‘current_user_authorizations_html_url’:
‘https://github.com/settings/connections/applications{/client_id}’, ‘authorizations_url’:
‘https://api.github.com/authorizations’,

#A The get function retrieves the raw HTMl from the website
#B Or if the content is JSON-formatted, get it in that format with the json() function
Note: If you want to work with a pure Mojo version, try out
Lightbug_http, which is a simple and small HTTP server made by the community.
Using NumPy and Matplotlib
Many projects in scientific computing, data analysis, and machine learning use NumPy, an open-source Python library for efficiently manipulating large multi-dimensional matrices. A similar Mojo library is in the works, called NuMojo, which is complementary to the Mojo stdlib.
When starting to migrate a Python project to Mojo—or if you’re a NumPy expert intent on using this library—you can call NumPy from Mojo. Let’s see it at work (see numpy_graph.mojo):
Listing 3.8 – Using numpy and matplotlib
from python import Python, PythonObject

alias np = PythonObject     #A
alias plot = PythonObject

fn use_numpy(np: PythonObject) raises:
    var arr1 = np.array([1, 2, 3])     #D
    print(arr1)  # => [1  2  3]

    var arr2 = np.ndarray([5])         #D
    print(arr2)
    # => [4.67092872e-310 0.00000000e+000 0.00000000e+000 4.67150278e-310 2.37151510e-322]
    arr2 = “this will work fine”       #E
    print(arr2)  # => this will work fine

    var arr3 = np.arange(15).reshape(3, 5)     #D
    print(arr3)
    # =>
    # [[ 0  1  2  3  4]
    # [ 5  6  7  8  9]
    # [10 11 12 13 14]]
    print(arr3.shape)  # => (3, 5)

fn use_matplotlib(np: PythonObject, plt: PythonObject) raises:
    var arr1 = np.array([1, 2, 3, 4])
    var arr2 = np.array([30, 20, 50, 60])
    plt.plot(arr1, arr2)    #F
    plt.show()              #F

fn main() raises:
    try:
        np = Python.import_module(”numpy”)    #B
        plot = Python.import_module(”matplotlib.pyplot”)
        use_numpy(np)
        use_matplotlib(np, plot)
    except ImportError:		            #C
        print(”Module numpy or matplotlib is not installed”)

#A Make references to the Python modules as aliases.
#B Import the two modules inside a try/except.
#C Show an error when a module cannot be found.
#D Use the numpy array, ndarray and reshape methods.
#E Python is loosely typed.
We applied the technique from the previous section to test for an error when importing the modules. In use_numpy, we showed the array and ndarray methods (used when more efficient processing is needed), and how to make matrices with reshape.
arr2 is clearly a Python variable: it can change its type from array to string, which is impossible for a pure Mojo variable.
Then we call use_matplotlib. There we make two arrays that form the X- and Y-axes of a graph, which is shown here:
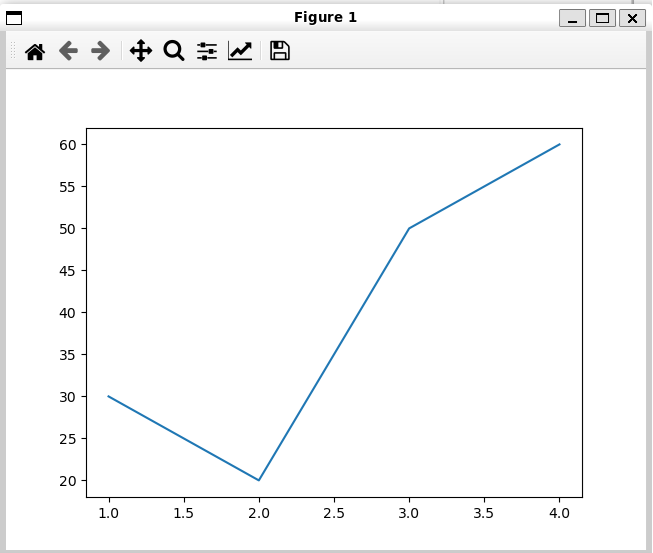
Figure 3.1 – Plotting a graph with matplotlib
Here is another example using the same pattern. After importing the necessary modules, it calculates a cosine graph and displays it with Matplotlib (see py_mojo_simd.mojo):
Listing 3.9 – Using numpy, matplotlib and SIMD
from python import Python, PythonObject
from math import math                            #H

alias np = PythonObject
alias plot = PythonObject
alias size = 256
alias element_type = DType.float64

fn use_python(np: PythonObject, plt: PythonObject) raises:
    var py_result = np.linspace(0, 255, 256)      #A
    # print(py_result)
    # =>
    # [  0.   1.   2.   3.   4.   5.   ...   253. 254. 255.]
    var simd_array = SIMD[element_type, size]()   #B
    for i in range(size):                         #C
        simd_array[i] = Float64(py_result[i])
    simd_array = math.cos(simd_array * (math.pi * 2.0 / 256.0))    #D
    # print(simd_array)
    # =>
    # [1.0, 0.9996988186962042, 0.9987954562051724, ...

    var graph = Python.list()         #E
    for i in range(size):             #F
        graph.append(simd_array[i])
    plt.plot(graph)  	           #G
    plt.show()

fn main() raises:
    try:
        np = Python.import_module(”numpy”)
        plot = Python.import_module(”matplotlib.pyplot”)
        use_python(np, plot)
    except ImportError:
        print(”Module numpy or matplotlib is not installed”)

#H This imports everything from the math module
#A Use linspace from numpy to get an evenly spaced array of 256 values from 0. to 255.
#B Create a Mojo SIMD vector with size 256.
#C Copy the Python array to the Mojo SIMD vector.
#D Calculate the cosine values using SIMD and Mojo math functions.
#E Make an empty Python list object.
#F Copy the SIMD vector into the Python list.
#G Display the graph using matplotlib from Python.
The curve is displayed in the following Figure 4.2:
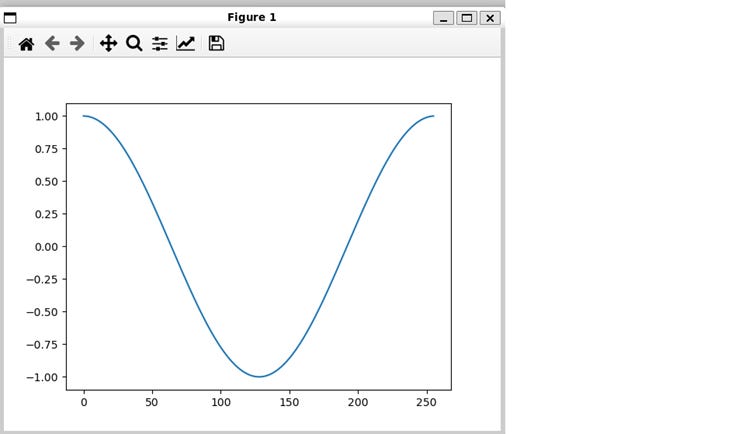
Figure 4.2 – A cosine curve, calculated using numpy and SIMD and displayed with matplotlib
Note that because Python always returns PythonObjects, we must use a float conversion float(py_result[i]) when copying the Python NumPy vector to the Mojo SIMD vector of size 256. The calculation is done on this SIMD vector, which is faster than doing it in NumPy.
You don’t believe me? Then try it yourself!
Experiment: Comparing a NumPy calculation and its SIMD equivalent
Take the code from Listing 3.4 and add a Python calculation that does the same calculation onpy_resultas we did onsimd_array. For this you’ll have to import the Python modulemath. The calculation itself must be done in aforloop.
Then time this calculation with the time module from Python, as we did in Chapter 3 §3.1.2.
Then also do the same for the Mojo SIMD calculation.
Results (on my machine): Python takes 2.48 ms, while Mojo takes 0.00328 ms, which is 756× faster!
Summary
Python code is processed at comptime by the CPython interpreter.
Python modules—local as well as from the ecosystem—can be used in Mojo through the
import_modulefunction.PythonObjectforms the bridge between Mojo and Python. Through it, all Python types likeint,str,List, and so on can be brought into Mojo code.While pure calculations are better executed in Mojo using SIMD and other features, Python modules like NumPy, Matplotlib, Pandas, and many others provide easy and quick access to specific functionality that may not yet exist in Mojo.
In the next part of the series, we will cover Compile-time metaprogramming in Mojo.
© 2025 Ivo Balbaert. All rights reserved.