

Using Contract Testing to Verify an API
An Excerpt from "Chapter 13: Using Contract Testing to Verify an API" in the book API Testing and Development with Postman, Second Edition by Dave Westerveld (Packt, June 2024)

In this chapter, we will learn how to set up and use contract tests in Postman, but before we do that, it’s important to make sure that you understand what they are and why you would use them. So, in this section, we will learn what contract testing is. We will also learn how to use contract testing and then discuss approaches to contract testing – that is, both consumer-driven and provider-driven contracts. To kick all this off, we are going to need to know what contract testing is. So, let’s dive into that.
What is contract testing?
…Contract testing is a way to make sure that two different software services can communicate with each other. Often, contracts are made between a client and a server. This is the typical place where an API sits, and in many ways, an API is a contract. It specifies the rules that the client must follow in order to use the underlying service. As I’ve mentioned already, contracts help make things run more smoothly. It’s one of the reasons we use APIs. We can expose data in a consistent way that we have contractually bound ourselves to. By doing this, we don’t need to deal with each user of our API on an individual basis and everyone gets a consistent experience.
However, one of the issues with an API being a contract is that we must change things. APIs will usually change and evolve over time, but if the API is the contract, you need to make sure that you are holding up your end of the contract. Users of your API will come to rely on it working in the way that you say it will, so you need to check that it continues to do so.
When I bought my home, I took the contract to a lawyer to have them check it over and make sure that everything was OK and that there would be no surprises. In a somewhat similar way, an API should have some checks to ensure that there are no surprises. We call these kinds of checks contract testing. An API is a contract, and contract testing is how we ensure that the contract is valid, but how exactly do you do that?
How to use contract testing
We will learn how to create and run contract tests in Postman shortly, but first, let’s look at how the process works. There are a couple of different ways that you could approach contract testing. One possible way is to create a collection of tests that exercise the API in all its configurations. You would then run that set of tests every time a change was made to the API to ensure that nothing has changed. Technically, when you are doing this, you are checking the contract, but this is not what we would call contract testing.
With contract testing, you want to check just the contract itself. You don’t want to run a full regression suite. Part of the value of contract testing is that it allows you to just verify that the contract is correct without needing to include full API calls. However, in order to do that, you need to be able to check the contract somehow. How do you do that?
The best way to do this is by having the contract documented somewhere. This is usually done with some kind of specification. In the previous couple of chapters, I’ve been showing you how to work with an OpenAPI Specification file. If you have a specification that defines all the actions that the API can perform, it will work well as the basis for your contract tests. In fact, in the previous chapter, you learned how to do one half of a contract test.
Mock servers are, in essence, contracts. They provide the frontend, or API consumer, with a contract that they can use. However, as we saw in the previous chapter, there are some limitations to this. Although the mock server tells the consumer what they can do, it doesn’t get used when you are working on the backend code. This means that the API might change without the API consumer knowing about it. This is because those who are working on the backend code don’t know what things the users or their API are relying on. They could read through various examples in the mock server and try and figure it out, but that would be a time-consuming and low-value process.
What contract testing does is create a set of tests that the API producer can run to verify that any changes they’ve made are not breaking any of the consumer’s needs. These contract tests give the API producer something they can run, without needing to worry about the details of the consumer implementations. Well, this has been a lot of words and might seem a bit abstract, so let’s take a look at a more concrete example of what this might look like.
A typical test for an endpoint might look kind of like this:
pm.test("Check the name", function () {
    var jsonData = pm.response.json();
    pm.expect(jsonData.name).to.eql("Bob");
});
In this case, we are checking that the response gave back the expected value of “Bob" for the name, but in a contract test, we aren’t worried about what specific values we get back – we understand that people will use this API for many different names – rather, we are concerned with checking that we have the right kind of data. So, rather than checking if the name is “Bob", we would check things like ensuring that the data is a string and doesn’t have any numbers. Or we might check that the name field is a top-level object and not somewhere else in the response.
We will get into more concrete examples of contract testing soon, but before we do, we need to discuss who gets to define the contracts. There are always at least two parties involved in a contract, and with APIs, those two parties are usually known as the provider and the consumer. Which one of them gets to define the contract? Well, let’s look at that next.
Who creates the contracts?
Before we get into the details of setting this all up in Postman, there is one more thing we need to discuss. Who creates these contracts? Should the consumer of the API be the one creating the contract, or should it be the provider? Much like a real-life contract, there is probably going to be some need for negotiation and the ability to reject a contract proposal, but somebody has to put the contract forward in the first place. There are two main approaches to this: you can either have consumer-driven contracts or you can have provider-driven contracts. Let’s look at each one in more detail.
Consumer-driven contracts
Consumer-driven contracts are contracts that the consumer makes. In this case, the consumer defines what their needs are from the API and provides contract tests that show the ways in which they will be using this API. These can be defined directly up-front in a design-driven manner, where the consumer needs to define the details of how the API gets designed in the first place. Alternatively, they can be provided for existing APIs by showing them which part of it this particular consumer relies on.
There are several advantages to consumer-driven contracts. The whole point of an API is to provide value to those who consume it. By letting the consumers define what the API does, you are helping to ensure that you are delivering information that is valuable to the users of your API. Another advantage is that it can help the API provider understand the different ways that consumers are using the API.
There is a “law” known as Hyrum’s Law, which observes the following:
“With a sufficient number of users of an API, it does not matter what you promise in the contract: all observable behaviors of your system will be depended on by somebody.”
– https://www.hyrumslaw.com/
This means that your system will get used in ways that you did not anticipate it would when you were designing it. However, if the users provide you with contracts that show you how they are using it, you can learn from that and not make changes that break workflows in unintended ways.
There are some downsides to this, though. If you have a lot of people consuming your API, you will have to run contract tests for each of them every time you make changes. There will probably be a lot of overlap between these tests, which leads to redundancy and inefficiency in your testing. Another concern is that, sometimes, the consumers tend to do some unexpected things that can really constrain future development. For example, I recently saw a case where a client was using an API that contained some information about another domain in it. The client wanted this information, so they got it from the API we had provided. However, we wanted to change the API so that it no longer returned the data and, instead, returned it from the correct domain. The problem was that the client had come to depend on the data being in the “wrong” spot, which made it much harder for us to change the API to work the way we wanted it to. If you have some feature in your API that you put there because of a consumer contract, it might be a lot harder to change in the future. The consumer can point to the contract they provided and point out that you had earlier agreed to do things this way. You don’t want to be in a situation where one client’s use case prevents you from creating useful value for others.
Provider-driven contracts
Instead of having the contract primarily driven by the consumers, you could have the API producer be the one providing the contract. In this case, the team creating the API would create a contract that defines what data that API provides and what format that data will be in when clients request it. Consumers could then use that contract to build mock servers that they could use for testing and development.
This approach has some benefits. First, it allows API providers to set out a standard set of actions and data that are supported. According to Hyrum’s Law, users will still end up using things in ways that are not defined by the contract, but then at least the API provider can explicitly say that those are not the supported ways to use this API, and they don’t have to worry too much about breaking those workflows. Another benefit of this is that it is much more scalable. It doesn’t really matter if you have two users or two million users. You have the same number of contract tests to run as the API provider.
The biggest downside of provider-driven contracts is the missing feedback loop. In this case, it is much harder for API providers to discover the interesting or unusual ways in which clients are using their APIs. This also means that since those configurations are less understood, they will be easier to break. Even if the provider can point to the contract and let the consumer know that they were using unsupported functionality, it is still never nice to break things that your customers depend on. You can use things like telemetry tools to help you understand this, but as with everything in software development, things come with trade-offs. Generally, I would recommend provider-driven contracts, but it is good to be aware of the trade-offs you are making when you take this approach.
Now that you have a good grasp of what contract testing is and how it works, let’s look at how to set up contract tests in Postman.
Setting up contract tests in Postman
Creating contract tests is similar to creating any other API test: you need to create a collection and then make requests in that collection with tests in them. But what kind of tests do you create when you perform contract testing?
The idea of contract tests is to describe all the different parts of the API that you need, but not to do things such as look at how to use them in a workflow or other aspects of testing. Contract tests are a good way to set the minimum bar for what needs to be working, but you will need to do additional testing beyond them for it to be effective. Of course, as with any other testing that’s done in Postman, you will need to create a collection for your contract tests.
Creating a contract testing collection
Any collection can be used for contract testing, but if you start from an API specification, Postman provides some nice shortcuts for you. In Chapter 3, we made an OpenAPI specification file and imported it into Postman. If you have not yet worked through that content, you can use the file provided in the Chapter13 folder of the GitHub repository for this course (https://github.com/PacktPublishing/API-Testing-and-Development-with-Postman-Second-Edition/tree/master/Chapter13). …you will need to import the OpenAPI Specification file using the following steps:
Choose the Import button at the top left of the application.
In the file browser, navigate to where you saved the
budgeting.yamlspecification file and click Open.On the resulting dialog, select the OpenAPI with a Postman Collection option and then click on View Import Settings.
Ensure that the Parameter generation option is set to Schema and then go back to the import dialog.
Click on Import. This will automatically import the API and create a collection.
Once the import has completed, go to the API section in the navigation tree, expand Budgeting API and then Definition, and click on
budgeting.yamlto see the raw definition file that you just imported.
You will also need a mock server to make requests against. Once again, you may have already created this in Chapter 3, but if not, you can go to the Collections tab and click on the ellipsis menu beside the Budgeting API collection. Choose the Mock collection option and Postman should create a mock server for you.
Now that you have a collection associated with the open API specification, let’s look at what happens if you change the specification:
Click on budgeting.yaml in the API navigation tree.
Change the first path from
itemstochangedItemsand save the file.Click on the API at the top level of the navigation tree.
Under the Collections section, click on the ellipsis menu and choose Enable update suggestions from definition.
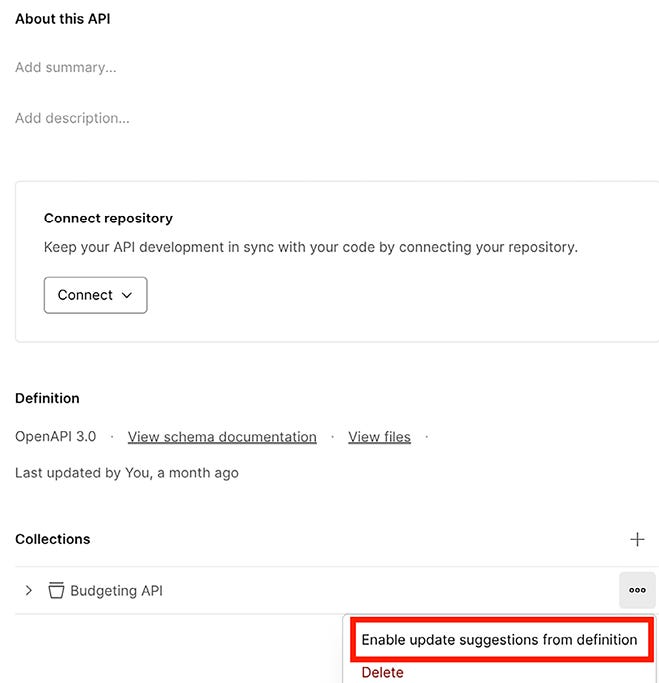
Figure 13.1: Enabling update suggestions
Now go to the Budgeting API collection on the APIs tab and you should see a refresh icon indicating that the collection can be updated in response to the change made in the specification.

Figure 13.2: Refresh icon
Click on this button to preview the changes that are going to be applied.
If you wanted to, you could update the collection. If you do this, make sure to select the checkboxes beside the requests in the Remove requests section and then click the Update Collection button to update the collection.
You can then change the specification back to what it was (so change the path back to
/items) and refresh and update the collection so that it is back to where it was.


This makes it easy to keep the collection and the API definition in sync with each other, but Postman will also validate things from the other direction as well. It will check any requests that you create in a collection that are associated with a specification to ensure that they are properly conforming to the specification. You can see how this works with the following steps:
Click on the Successful Operation example under the Get the list of budget line items request.
This example should have a couple of example transactions. Change the amount field of one of them to have a value of
wronginstead of a number.Save the changes.
When you do this, you should see little orange dots appear, and a note that there is an issue. These indicate that you have an example that does not match up with what the specification expects.

Figure 13.3: Wrong example
If you click on the 1 Issue note it will tell you what the issue is.
Change the value back to a number and save the example again, and the error notifications should go away.

You can see that linking a collection with an API specification gives you a lot of built-in validation that helps you ensure that you are not violating the contract.
You can also update your specification if necessary. For example, if you change the amount field in one of the transactions in the Successful Operation example to something like 12.1, you will notice that you get an error. This is because, in the specification, we have said that this field needs to be an integer.
However, we now realize that it should be a number type instead since amounts can be decimals. We can update it:
Click on budgeting.yaml in the navigation tree.
Scroll down to the schemas section at the bottom of the file and, under properties, find the amount section.
Change the type from integer to number and save the definition file.
If you now look at the example, there should no longer be any issues reported when you are using decimal numbers for the amounts.
Adding tests to a contract test collection
You already have a lot of built-in validation, but you aren’t quite done yet. Postman has automatically created the structure and details of the request, but you still need to define the actual tests that you want this collection to run. This is the point at which understanding the theory of contract testing becomes helpful. What kind of tests should you add to this collection?
With contract tests, we want to make sure that the API is fulfilling the needs that we have as a consumer. We don’t want to create a comprehensive set of tests that checks everything this API can do. We just want to add tests that verify that it provides the data we are interested in. In this case, we are pretending that we have a budgeting application, so we would only want to add tests that verify data for the kinds of requests that our application is running. We would then create tests that check that those specific calls give us back the data that we need.
We could manually create some tests like this, but Postman has a nice validation collection that they’ve made, which we can copy into our project. You can do that with the following steps:
Go to the search bar at the top of Postman and search for contract test generator.

Figure 13.4: Searching for contract test generator
Select the (Generator) Contract Tests – OAS3 collection.
On the menu beside the (Generator) Contract Tests – OAS3 collection, select the Create a fork option.

Figure 13.5: Creating a fork
Name your fork, and make sure you have selected the workspace that you are currently using as the destination in which the copy of the collection will be created.
Click on Fork Collection.
If necessary, choose to make your profile public and, after a moment, you should see a forked copy of the collection appear in your workspace.
Use the search in Postman to return to the Contract Test Generator workspace.
Go to the Environments tab and on the menu beside the Contract Test Environment, choose the Create a fork option.
Name the fork that you are creating and, once again, make sure that you have the correct workspace selected to copy it into and click on Fork Collection.
Find the
env-servervariable in the environment that you just copied. This variable needs to be set to the server URL that you have specified in your OpenAPI Specification file. If you look in the file, you can see that this ishttp://localhost:5000/budgeting/api.Set the Current value of the
env-servervariable tohttp://localhost:5000/budgeting/api.You will also need a Postman API key.
Click on your profile option at the top right and choose the Settings option.
This will take you to your account page in the web browser. Choose the API keys option.
If you don’t yet have an API key, you can create one using the Generate API Key button. Otherwise, you can use an API key that you have already generated.
Back in Postman, find the
env-apiKeyvariable in the Contract Test Environment, set the type of it to secret, and paste in the API key.One last thing we will need to set this up is a workspace key.
In order to find the workspace key, click on the name of your workspace on the top-left side of Postman.
On the far-right side, click on the ellipsis menu and choose the Workspace info option.

Figure 13.6: Workspace info settings
From there, you can copy the workspace ID and paste it into the Current value field of the
env-workspaceIdvariable in the environment.Make sure to save the environment and make sure that it is set as the active environment.


Running contract tests
Now you are ready to run this collection. Go to the (Generator) Contract Tests – OAS3 collection and run it. This collection will verify that the schema is set up correctly. When you run it, you will see some failures.

Figure 13.7: Contract test failures
One of the things these tests check is that you are using best practices in your schemas. You can see that the first error expects that schema property names will begin with capital letters. You can update the property names in the schemas section of the definition to start with capital letters:
Go to the APIs section and click on budgeting.yaml.
Scroll down to the components section at the bottom of the file and, in the schemas section, update
item,itemId, anditemsso they all start with capital letters.Once you have done that, you will also need to update the
pathsandcomponentswhere you reference those schemas. These will be spots that look like this:$ref: "#/components/schemas/item"You will need to update the
itemat the end to beItem. You will also need to do the same things for the references toitemsanditemId.Once you have found and updated all references, be sure to save the specification.
There are also some errors about how the schema properties need to have descriptions and examples, so let’s add them:

Figure 13.8: Adding examples and descriptions
After you have updated the schema, you can run the collection again and you should see all the tests passing.
As you can see, this collection provides a lot of powerful checking. In the background, it is creating a lot of tests and running them. It doesn’t save those tests, but you can rerun this collection any time you want, and it will recreate and rerun those tests based on the latest changes to your specification. This is a great way to make sure that what you are doing in your collection matches up with what you have defined in your specification. It also helps to ensure that your schema is properly defined and follows all the rules of the OpenAPI schema.
It is important to have this if you want to use your OpenAPI specification for other things like generating code.
Using Postman Interceptor
When creating contract tests, you want to create tests that demonstrate the actual needs of your application. Postman has a tool called Interceptor that allows you to do this. When it is running, it will capture all the requests that your application makes, allowing you to see the actual requests that you need for your contract test. You can set up Interceptor in Postman by following these steps:
First, you will need to have Chrome installed on your computer. I would also recommend that you close all tabs except one so that you don’t get too much unwanted data. You can then install Postman Interceptor by downloading it from the Chrome web store. You can download it directly from this link: https://go.pstmn.io/interceptor-download.
Click on Add to Chrome and choose Add extension on the verification prompt to install the extension.
Once the extension has been installed, click on the extension to open it.
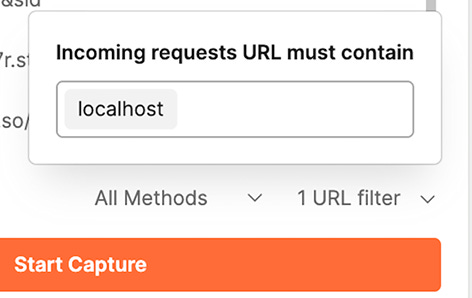
At the bottom of the extension flyout, type a url (you can use
localhostif you have a local server running) into the URL filter and hit Enter.
Figure 13.9: Filter Postman Interceptor
Click the Start Capture button.
In your web browser address bar type in the URL of the site that you set the URL filter for.
Open the Interceptor extension again and click the Stop Capture button.
Chrome will prompt you to open the Postman app. Select to do so.
Postman will open with the requests loaded. You can see the details of a request by clicking on that row in the table and Postman will show you the details of what data was sent and received with that request.
You can then save the requests to a collection:
Click on the checkbox beside all the requests that you want to save.
Click on Save Requests.
At the bottom of the popup, choose the New collection link to make a new collection.
Name that collection
InterceptedRequestsand create it.Choose to organize the requests by Endpoints and save.
You can now go to the collection and see that all the requests have been added along with any data that had been set up for them. As you can see, this allows you to easily add the requests that your application sends to your contract testing collection. You will still need to create tests to check that the data and data structures are correct, but this can help you figure out what requests to send for contract tests.
I’m not going to walk you through a step-by-step process for creating tests for these requests, but now that you know what requests to include and what kinds of parameters they need to have, you should be able to go through this and fill in the test’s details. However, in order to understand this a bit better, let’s take a look at what you would do in broad terms.
You would want to use Interceptor in situations where you do not have an already defined schema for the API that you can create contract tests against. In that situation, you can use Interceptor to help you “reverse-engineer” how the API works and what things it provides. So, in this example, we could look at the results given back by a couple of different actions in the user interface and use that information to figure out what settings the API needs.
Using that information, we could build out a schema that describes the rules for these fields and then use that to create contract tests. However, even after that is done, you will still need to ensure that these tests are available for everyone who has agreed to use this contract. Everyone involved needs to be able to run and fix these tests; otherwise, they are just ordinary API tests.
To learn how Postman reports contract test failures, how to debug mismatches, and how to integrate contract validation into CI workflows—check out API Testing and Development with Postman, Second Edition by Dave Westerveld, available from Packt.

Here is what some readers have said:


 | A guest post by
|