

Understanding DevOps Principles and CI/CD
The complete “Chapter 8: Understanding DevOps Principles and CI/CD” from the book Software Architecture with C# 12 and .NET 8 by Gabriel Baptista and Francesco Abbruzzese (Packt, February 2024).


Although many people define DevOps as a process, the more you work with it, the better you understand it as a philosophy. This chapter will cover the main concepts, principles, and tools you need to develop and deliver your software with DevOps.
By considering the DevOps philosophy, this chapter will focus on service design thinking, that is, keeping in mind that the software you design is a service offered to an organization or part of an organization. The main takeaway of this approach is that the highest priority is the value your software gives to the target organization. Moreover, you are not just offering working code and an agreement to fix bugs but also a solution for all the needs that your software was conceived for. In other words, your job includes everything it needs to satisfy those needs, such as monitoring users’ satisfaction and quickly adapting the software when the user needs change, due to issues or new requirements.
Service design thinking is strictly tied to the Software as a Service (SaaS) model, which is discussed in Chapter 10, Deciding on the Best Cloud-Based Solution. In fact, the simplest way to offer solutions based on web services is to offer the usage of web services as a service, instead of selling the software that implements them.
Continuous Integration (CI) and Continuous Delivery (CD) are sometimes stated as prerequisites for DevOps. So, the purpose of this chapter is also to discuss how to enable CI/CD in a real scenario, considering the challenges that you, as a software architect, will need to deal with.
The following topics will be covered in this chapter:
Understanding DevOps principles: CI, CD, and continuous feedback
Understanding how to implement DevOps using Azure DevOps and GitHub
Understanding the risks and challenges when using CI/CD
The WWTravelClub project case, presented in Chapter 21, Case Study, will be discussed during these topics, giving you the opportunity to understand how the DevOps philosophy can be implemented. All the screenshots exemplifying the DevOps principles come from the main use case of the book, so you will be able to understand the DevOps principles easily.
By the end of this chapter, you will be able to design software according to service design thinking principles and use Azure Pipelines to deploy your application. You will be able to decide whether to use CI/CD in your project environment. Additionally, you will be able to define the tools needed for the successful use of this approach.
Technical requirements
This chapter requires Visual Studio 2022 Community Edition or better, with all the Azure tools installed. You may also need an Azure DevOps account, as described in Chapter 3, Managing Requirements. It requires a free Azure account too. If you have not already created one, the Creating an Azure account subsection of Chapter 1, Understanding the Importance of Software Architecture, explains how to do so. This chapter uses the same code as Chapter 9, Testing Your Enterprise Application.
Describing DevOps
DevOps is a term that is derived from the combination of the words Development and Operations, and the DevOps process simply unifies actions in these two areas. However, when you start to study a little bit more about it, you will realize that just connecting these two areas is not enough to achieve the true goals of this philosophy.
We can also say that DevOps is the process that answers the current needs of people, regarding software delivery.
Donovan Brown has a spectacular definition of what DevOps is: DevOps is the union of people, process, and products to enable continuous delivery of value to our end users (http://donovanbrown.com/post/what-is-devops).
A way to deliver value continuously to our end users, using processes, people, and products: this is the best description of the DevOps philosophy. We need to develop and deliver customer-oriented software. As soon as all areas of a company understand that the key point is the end user, your task as a software architect is to present the technology that will facilitate the process of delivery.
All the content in this book is connected to this approach. It is never a matter of knowing a bunch of tools and technologies. As a software architect, you must understand that there is always a way to bring faster solutions to your end user easily, linked to their real needs. For this reason, you need to learn the DevOps principles, which will be discussed in this chapter.
Understanding DevOps principles
Considering DevOps as a philosophy, there are some principles that enable the process to work well in your team. These principles are CI, CD, and continuous feedback.
Microsoft has a specific web page for defining the DevOps overview, culture, practices, tools, and its relation to the cloud. Please check this out at https://azure.microsoft.com/en-us/overview/what-is-devops/.
DevOps is represented by the symbol of infinity in many books and technical articles. This represents the necessity for a continuous approach in the software development life cycle. During the cycle, you will need to plan, build, continuously integrate, deploy, operate, and get feedback, and then start all over again. The process must be a collaborative one since everybody has the same focus—to deliver value to the end user. Together with these principles, you “as a software architect” will need to decide on the best software development process that fits this approach. We discussed these processes in Chapter 1, Understanding the Importance of Software Architecture.
CI
When you start building enterprise solutions, collaboration is the key to getting things done faster and meeting the users’ needs. Version control systems, as we discussed in Chapter 4, Best Practices in Coding C# 12, are essential for this process, but these tools do not do the job by themselves, especially if they are not well configured.
As a software architect, you must know that CI will help you to adopt a concrete approach to software development collaboration. When you implement it, as soon as a developer commits their code, the main code is automatically compiled and tested, according to unit and functional tests available in the project.
The good thing when you apply CI is that you can motivate developers to merge their changes as fast as they can to minimize merge conflicts. They can also share unit tests, which will improve the quality of software. This will make your master branch stable and safe after every commit from your team.
The key point of CI is the ability to identify problems faster. You will have this opportunity when you allow code to be tested and analyzed by others. The only thing the DevOps approach helps with is making sure this happens as quickly as possible.
CD
Once every single commit of your application is built and this code is tested with both unit tests and functional tests, you may also want to enable CD. Doing this is not just a matter of configuring the tool. As a software architect, you need to be sure that the team and the process are ready to go to this step.
The CD approach needs to guarantee that the production environment will be kept safe in each new deployment. To do so, a multi-stage pipeline is a great practice to be adopted.
The following screenshot shows an approach with common stages, using this book’s use case, WWTravelClub, as a demonstration:

Figure 8.1: Release stages using Azure DevOps
As you can see, these stages were configured using the Azure DevOps release pipeline, which will be explained soon. Each stage has its own purpose, which will affect the quality of the product ultimately delivered. Let’s look at the stages:
Development/tests: This stage is used by developers and testers to build new functionality. This environment will certainly be the one that is most exposed to bugs and incomplete functions.
Staging: This environment gives a brief version of new functionalities to areas of the team not related to development and tests. Program managers, marketing, vendors, and others can use it as an area of study, validation, and even preproduction. Additionally, quality assurance teams can guarantee that the new releases are correctly deployed, considering both functionality and infrastructure.
Production: This is the stage where customers have their solution running. The goal for a good production environment, according to CD, is to have it updated as quickly as possible. The frequency will vary according to team size, but there are some approaches where this process happens more than once a day.
The adoption of these three stages of deploying your application will positively impact the quality of the solution. It will also enable the team to have a safer deployment process, with fewer risks and better product stability. This approach may look a bit expensive at first sight, but without it, the results of bad deployment will generally be more expensive than this investment.
Risks and challenges when using CI/CD
Now that we have an idea of how useful CI/CD is, it would be nice to think about the risks and challenges you may encounter while implementing it. The goal of this section is to help you, as a software architect, mitigate the risks and find a better way to overcome the challenges, using good processes and techniques.
The list of risks and challenges that will be discussed in this section are as follows:
Continuous production deployment
Incomplete features in production
Unstable solutions for testing
Once you have the techniques and the processes defined to deal with them, there is no reason not to use CI/CD.
Remember that DevOps does not depend on CI/CD. You can use a process where code integration and software deployment are human-based. However, CI/CD does make DevOps work more smoothly.
Now, let us have a look at them.
Disabling continuous production deployment
Continuous production deployment is a process where, after a commit of a new piece of code and some pipeline steps, you will have this code in the production environment. This is not impossible, but it is hard and expensive to do. Besides, you need to have well-established, sophisticated processes, as well as a team with substantial experience and expertise to enable it. The problem is that most of the demos and samples you will find on the internet presenting CI/CD will show you a fast track to deploying code. The demonstrations of CI/CD make it look so simple! This simplicity might suggest that you should implement it as soon as possible. However, if you think a little more, this scenario can be dangerous if you deploy directly into production! In a solution that needs to be available 24 hours a day, 7 days a week, this is impractical. So you will need to worry about that and think of different solutions.
The first one is the use of a multi-stage scenario, as we described before. The multi-stage scenario can bring more security to the ecosystem of the deployment you are building. Besides, you will get more options to avoid incorrect deployments into production, such as pre-deployment approvals,
You can build a deployment pipeline where all your code and software structure will be updated by this tool. However, if you have something outside of this scenario, such as database scripts and environment configurations, an incorrect publication into production may cause damage to end users. Besides, the decision of when the production environment will be updated needs to be planned, and in many scenarios, all the platform users need to be notified of the upcoming change. It is worth mentioning that, in these hard-to-decide cases, it is a good idea to use a change management procedure, based on the Information Technology Infrastructure Library (ITIL) or ISO 20000.
So the challenge of delivering code to production will make you think about a schedule to do so. It does not matter whether your cycle is monthly, daily, or even at each commit. The key point here is that you need to create a process and a pipeline that guarantees that only good and approved software is at the production stage. It is worth noting, however, that the longer you leave deployments, the scarier they are, as the deviation between the previously deployed version and the new one will be greater, and more changes will be pushed out in one go. The more frequently you can deploy, the better.
Incomplete features
While a developer of your team is creating a new feature or fixing a bug, you will probably consider generating a branch, which means they can avoid the use of the branch designed for CD. A branch can be considered a feature available in code repositories to enable the creation of an independent line of development, since it isolates code.
As you can see in the following screenshot, creating a branch for wwtravelclub using Visual Studio is quite simple:

Figure 8.2: Creating a branch in Visual Studio
This seems to be a good approach, but let us suppose that the developer has considered the implementation ready for deployment and has just merged the code into the master branch, although this is also considered a bad practice. What if this feature is not ready yet, just because a requirement was omitted? What if the bug has caused incorrect behavior? The result could be a release with an incomplete feature or an incorrect fix.
One of the good practices to avoid broken features and even incorrect fixes in the master branch is the use of Pull Requests (PRs). PRs will let other team developers know that the code you developed is ready to be merged. The following screenshot shows how you can use the Azure DevOps WWTravelClub repository to create a New pull request for a change you have made.

Figure 8.3: Creating a PR
Once the PR is created and the reviewers are defined, each reviewer will be able to analyze the code and decide whether it is healthy enough to be in the master branch.
The following screenshot shows a way to check the code, by using the compare tool to analyze the change in the WWTravelClub code:

Figure 8.4: Analyzing the PR
Once all approvals are done, you will be able to safely merge the code to the master branch, as you can see in the following screenshot. To merge the code, you will need to click on Complete merge. It is important to mention that you can also do this in Visual Studio, which has a better user interface. If the CI trigger is enabled in the WWTravelClub project, as we will show in this chapter, Azure DevOps will start a build pipeline:

Figure 8.5: Merging the PR
Without a process like this, there is a great chance of having a master branch with a lot of bad code, and this code being deployed there may cause damage together with CD. A code review is an excellent practice in CI/CD scenarios, and it is considered a wonderful practice to create good quality software in general.
The challenge that you need to focus on here is guaranteeing that only entire features will appear to your end users. You can use the feature flag principle to solve this, which is a technique that makes sure only features that are ready are presented to end users.
In the Feature Flag or Feature Toggle technique, you must create a solution that has, in each feature, the possibility to test it in a setup to see whether it is enabled or not. According to this, all the functionalities will be presented to the user.
It is worth mentioning that to control feature availability in an environment, feature flags are much safer than using branching/PRs. Both have their place, but PRs are about controlling the quality of code at the CI stage, and feature flags are for controlling feature availability at the CD stage.
Again, we are not talking about CI/CD as a tool but as a process, to be defined and used every single time you need to deliver code for production.
An unstable solution for testing
If you have already mitigated the two other risks presented in this section, you may find it uncommon to have bad code after CI/CD. It is true that the worries presented earlier will certainly reduce if you work with a multi-stage scenario and PRs before pushing to the final stage. But the risk of having unstable code, especially when it comes to business logic rules, remains even if you apply all the recommendations we will discuss later.
But is there a way to accelerate the evaluation of a release while being sure that this new release is ready for your stakeholders’ tests? Yes, there is! Technically, the way you can do so is by automating unit and functional testing. This technique is explained in more detail in Chapter 9, Testing Your Enterprise Application.
However, it is worth saying that it is impracticable to automate every single part of a piece of software, considering the efforts needed to do so. Besides, the maintenance of automation can be more expensive in scenarios where the user interface or the business rules change a lot. Although this is a tough decision, as a software architect, you must always incentivize the usage of automated testing.
To exemplify it, let us have a look at the following screenshot, which shows the unit and functional test samples for WWTravelClub, created by an Azure DevOps project template:

Figure 8.6: Unit and functional tests projects
There are some architectural patterns, such as SOLID, presented in Chapter 6, and quality assurance approaches, such as peer review, that will give you better results than software testing. However, these approaches do not invalidate automation practice. The truth is that all of them will be useful for getting a stable solution, especially when you run a CI scenario. In this environment, the best thing you can do is to detect errors and incorrect behaviors as fast as you can. Both unit and functional tests, as shown earlier, will help you with this.
Unit tests will help you a lot in discovering business logic errors before deployment, during the build pipeline. For instance, in the following screenshot from the WWTravelClub build process, you will find a simulated error that canceled the build, since the unit test did not pass:
Certain free services on Azure may be deactivated due to the possibility of misuse. However, you have the option to request the reactivation of these services by submitting a request.

Figure 8.7: Unit test result
The way to get this error is quite simple. You need to code something that does not respond according to what the unit tests are checking. Once you commit it, assuming you have the trigger for CD on, you will build the code in the pipeline. So after the build of the code, the unit tests will run. If the code does not match the tests anymore, you will get an error.
The following screenshot shows an error during the functional tests in the Development/Tests stage of the WWTravelClub project. In this instance, the Development/Tests environment has a bug that was rapidly detected by functional tests:

Figure 8.8: Functional test result
But this is not the only good thing about applying functional tests during CI/CD. Let us look at the following screenshot from the Releases pipeline interface in Azure DevOps. If you look at Release-9, you will realize that, since this error happened after the publication in the Development/Tests environment, the multi-stage environment will protect the other stages of the wrong deployment, especially the WWTravelClub production stage:

Figure 8.9: Multi-stage environment protection
The key point for success in the CI process is to think about it as a useful tool to accelerate the delivery of software and to not forget that a team always needs to deliver value to its end users. With this approach, the techniques presented earlier will provide incredible ways to achieve the results that your team aims for.
Continuous feedback
Once you have a solution that runs perfectly in the deployment scenario described in the previous section, feedback will be essential for your team to understand the results of the release and how the version works for customers. To get this feedback, there are some tools that can help both developers and customers, bringing them together to fast-track the process of feedback.
The main purpose of continuous feedback is to enable developers to get information about the application running in production, enabling the team to improve the infrastructure of the environment deployed and, at the same time, detect improvements that can be made in the source code and user interface.
Tools to facilitate DevOps implementation
Considering that DevOps is a philosophy, there are many tools that can be used to help you with its implementation. The following topics will present some of the most-used ones in a Microsoft environment.
Azure DevOps
As soon as you start working with a platform such as Azure DevOps, enabling CI/CD will be easy when it comes to clicking on the options to do so. So technology is not the Achilles’ heel for implementing this process.
The following screenshot shows an example of how easy it is to turn on CI/CD using the Azure DevOps WWTravelClub pipeline. By clicking in the Pipelines and editing it, you will be able to set a trigger that enables CI/CD after some clicks:

Figure 8.10: Enabling the CI trigger
CI/CD will help you solve some problems. For instance, it will force you to test your code, since you will need to commit the changes faster so that other developers can make use of the code you are programming.
Conversely, you will not do CI/CD just by enabling a CI build in Azure DevOps. For sure, you will turn on the possibility of starting a build as soon as you get a commit done and the code is complete, but this is far from saying you have CI/CD available in your solution.
The reason you, as a software architect, need to worry a bit more about it is related to a real understanding of what DevOps is. The need to deliver value to the end user will always be a good way to decide how the development life cycle will work. So even if turning on CI/CD is easy, what is the real business impact of this feature being enabled for your end users? Once you have all the answers to this question and you know how to reduce the risks of its implementation, then you will be able to say that you have a CI/CD process implemented.
CI/CD is a principle that will make DevOps work better and faster. However, DevOps can live without it, if you are not sure if your process is mature enough to enable code to be continuously delivered.
Moreover, if you turn on CI/CD in a team that is not mature enough to deal with its complexity, you will probably cause a bad understanding of DevOps, since you will start incurring some risks while deploying your solution. The point is that CI/CD is not a prerequisite for DevOps.
When you have CI/CD enabled, you can make things faster in DevOps. However, you can practice DevOps without it.
Deployments and other release artifacts are added to different pipelines, called release pipelines, to decouple them from build-related artifacts. With Release Pipelines, you cannot edit a .yaml file, but you will work with a graphic interface, as follows:
Click the Releases left menu tab to create a new Release Pipeline. As soon as you click Add a new pipeline, you will be prompted to add the first task of the first pipeline stage. In fact, the whole release pipeline is composed of different stages, each grouping sequences of tasks. While each stage is just a sequence of tasks, the stages diagram can branch, and we can add several branches after each stage. This way, we can deploy to different platforms that each require different tasks. In our simple example, we will use a single stage.
Select the Azure App Service Deployment task. As soon as you add this task, you will be prompted to fill in the missing information.
Select your subscription, and then, if an Authorization button appears, click it to authorize Azure Pipelines to access your subscription. Then, select Windows as the deployment platform, and finally, select the app service you created from the App service name drop-down list. Task settings are automatically saved while you write them, so you just need to click the Save button for the whole pipeline.
Now, we need to connect this pipeline to a source artifact. Click the Add Artifact button and then select Build as the source type, because we need to connect the new release pipeline with the ZIP file created by our build pipeline. A settings window appears:

Figure 8.11: Defining the artifact to publish
Select our previous build pipeline from the drop-down list, and keep Latest as the version. Accept the suggested name under Source alias.
Our release pipeline is ready and can be used as-is. The image of the source artifact you just added contains a trigger icon in its top-right corner, as follows:
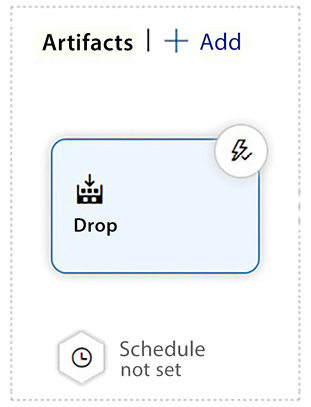
Figure 8.12: Artifact ready to publish
If you click on the trigger icon, you are given the option to automatically trigger the release pipeline as soon as a new build is available:

Figure 8.13: Enabling the continuous deployment trigger
Keep it disabled; we can enable it after we have completed and manually tested the release pipeline.
As we mentioned earlier, in preparation for an automatic trigger, we need to add a human approval task before the application is deployed. Let’s add it with the following steps:
Click the three dots on the right of the Stage 1 header:

Figure 8.14: Adding human approval to a stage
Then, select Add an agentless job. Once the agentless job has been added, click the Add button and add a Manual intervention task. The following screenshot shows the Manual intervention settings:

Figure 8.15: Configuring human approval for a stage
Add instructions for the operator, and select your account in the Notify users field.
Now, drag the whole Agentless job with the mouse, and place it before the application deployment task. It should look like this:

Figure 8.16: Setting the human approval deployment tasks list
Finished! Click the Save button in the top-left corner to save the pipeline.
Now, everything is ready to create our first automatic release. And to do so, a new release can be prepared and deployed as follows:
Click the Create release button to start the creation of a new release, as shown in the following screenshot:

Figure 8.17: Creating a new release
Verify that the Source alias is the last available one, add a Release description, and then click Create. In a short time, you should receive an email for release approval. Click the link it contains and go to the approval page:

Figure 8.18: Approving a release
Click the Approve button to approve the release. Wait for the deployment to complete. You should have all the tasks successfully completed, as shown in the following screenshot:
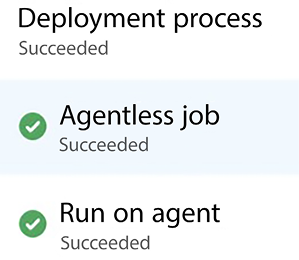
Figure 8.19: Release deployed
You have run your first successful release pipeline!
In a real-life project, the release pipeline would contain more tasks. In fact, applications (before being deployed in the actual production environment) are deployed in a staging environment where they are beta-tested. Hence, after this first deployment, there would probably be some manual tests, manual authorization for the deployment in production, and the final deployment in production.
Considering the multistage scenario, you can set up the pipeline in a way where only with defined authorizations will you be able to move from one stage to another:

Figure 8.20: Defining pre-deployment conditions
As you can see in the preceding screenshot, it is quite simple to set up pre-deployment conditions, and there is more than a single option to customize the authorization method. This allows you to refine the CD approach, exactly meeting the needs of the project you are dealing with.
The following screenshot shows the options provided by Azure DevOps for pre-deployment approval. You can define the people who can approve the stage and set policies for them, that is, revalidate the approver identity before completing the process. You, as a software architect, will need to identify the configuration that fits the project you are creating with this approach:

Figure 8.21: Pre-deployment approval options
It is worth mentioning that although this approach is far better than a single-stage deployment, a DevOps pipeline will direct you, as a software architect, to another stage of monitoring. App Insights, which will be presented later, is an incredible tool for this.
GitHub
Since GitHub’s acquisition by Microsoft, many features have evolved and new options have been delivered, enhancing the power of this powerful tool. These integrations can be explored using the Azure portal and, particularly, GitHub Actions.
GitHub Actions is a set of tools that helps with the automation of software development. It enables a fast CI/CD service on any platform, using YAML files to define its workflows. You can consider GitHub Actions a new approach presented by Microsoft as a substitute for Azure DevOps Pipelines. You can automate any GitHub event using GitHub Actions, with thousands of actions available on GitHub Marketplace:

Figure 8.22: GitHub Actions
Creating a workflow to build a .NET web app is quite simple via the GitHub Actions interface. As you can see in the preceding screenshot, there are some workflows that have already been created to help us out.
The YAML we have below was generated by clicking the Set up this workflow option in the Configure options under .NET:
name: .NET
on:
  push:
    branches: [ main ]
  pull_request:
    branches: [ main ]
jobs:
  build:
    runs-on: ubuntu-latest
    steps:
    - uses: actions/checkout@v2
    - name: Setup .NET
      uses: actions/setup-dotnet@v1
      with:
        dotnet-version: 8.0.x
    - name: Restore dependencies
      run: dotnet restore
    - name: Build
      run: dotnet build --no-restore
    - name: Test
      run: dotnet test --no-build --verbosity normal
With the adaptations made below, it can build the application specifically created for this chapter:
name: .NET 8 Chapter 08
on:
  push:
    branches:
    - main
env:
  DOTNET_CORE_VERSION: 8.0.x
jobs:
  build:
    runs-on: ubuntu-latest
    steps:
      - uses: actions/checkout@v2
      - name: Setup .NET 8
        uses: actions/setup-dotnet@v1
        with:
          include-prerelease: True
          dotnet-version: ${{ env.DOTNET_CORE_VERSION }}
      - name: Install dependencies
        run: dotnet restore ./ch08
      - name: Build
        run: dotnet build ./ch08 --configuration Release --no-restore
      - name: Test
        run: dotnet test ./ch08 --no-restore --verbosity normal
As you can see below, once the script is updated, it is possible to check the result of the workflow. It is also possible to enable CD if you want to. It is just a matter of defining the correct script:

Figure 8.23: Simple application compilation using GitHub Actions
Microsoft provides documentation specifically covering Azure and GitHub integration. Check this out at https://docs.microsoft.com/en-us/azure/developer/github.
As a software architect, you need to understand which tool best fits your development team. Azure DevOps has a wonderful environment for enabling CI/CD, and so does GitHub. The key point here is that no matter the option you decide on, there are risks and challenges that you will face once CI/CD is enabled. Let’s check them out in the next topic.
Application Insights
Application Insights is a feature that any software architect must have for continuous feedback on their solution. Application Insights is part of Azure Monitor, a wider suite of monitoring features that also includes alerting, dashboards, and workbooks. As soon as you connect your app to it, you start receiving feedback on each request made to the software. This enables you to monitor not only the requests made but also your database performance, the errors that the application may be suffering from, and the calls that take the most time to process.
Obviously, you will have costs relating to having this tool plugged into your environment, but the facilities that the tool provides will be worth it. It might be worth noting that, for simple applications, it could even be free because you pay for data ingested, for which there is a free quota. Aside from financial cost, you need to understand that there is a very small performance cost, since all the requests to store data in Application Insights run in a separate thread.
Several services, such as App Services, Functions, and so on, will give you the option to add Application Insights as part of the initial creation process, so you may have already created it while following along with this book.
The following screenshot shows how easily you can create a tool in your environment:

Figure 8.24: Creating Application Insights resources in Azure
For instance, let’s suppose you need to analyze the requests that are taking more time in your application. The process of attaching Application Insights to your web app is quite simple: it can be done as soon as you set it up. If you are not sure whether Application Insights is configured for your web app, you can find out using the Azure portal. Navigate to App Services and look at the Application Insights settings, as shown in the following screenshot:
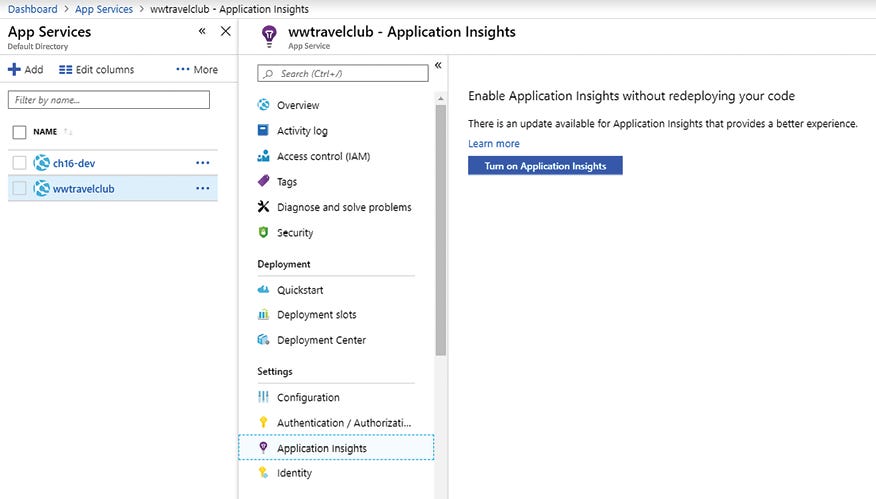
Figure 8.25: Enabling Application Insights in App Services
The interface will give you the opportunity to create or attach an already-created monitoring service to your web app. You can connect more than one web app to the same Application Insights component.
The following screenshot shows how to add a web app to an already-created Application Insights resource:

Figure 8.26: Enabling App Insights in App Services
Once you have Application Insights configured for your web app, you will see the following screen in App Services:

Figure 8.27: Application Insights in App Services
Once it is connected to your solution, the data collection will happen continuously, and you will see the results in the dashboard provided by the component. You can find this screen in two places:
In the same place where you configured Application Insights, inside the web app portal
In the Azure portal, after navigating through the Application Insights resource

Figure 8.28: Application Insights in action
This dashboard gives you an idea of failed requests, server response time, and server requests. You can also turn on the availability check, which will make requests to your selected URL from any of the Azure data centers.
The beauty of Application Insights is in how deeply it analyzes your system. In the following screenshot, for instance, it gives you feedback on the number of requests made on the website. You can analyze this feedback by ranking the requests by the ones that took more time to process or the ones that were called more often.

Figure 8.29: Analyzing app performance using Application Insights
Considering this view can be filtered in different ways and you receive the information just after it happens in your web app, this is certainly a tool that defines continuous feedback. This is one of the best ways you can use DevOps principles to achieve exactly what your customer needs.
Test and Feedback
Another useful tool in the process of continuous feedback is the Test and Feedback tool, designed by Microsoft to help product owners and quality assurance users with the process of analyzing new features.
Using Azure DevOps, you can ask for feedback from your team by selecting an option inside each work item, as you can see in the following screenshot:

Figure 8.30: Requesting feedback using Azure DevOps
Once someone receives a feedback request, they can use the Test and Feedback tool to analyze and give the correct feedback to the team. They will be able to connect the tool to your Azure DevOps project, giving you more features while analyzing the feedback request.
You can download this tool from https://marketplace.visualstudio.com/items?itemName=ms.vss-exploratorytesting-web.
This tool is a web browser extension that you will need to install before use. The following screenshot shows how to set up an Azure DevOps project URL for the Test and Feedback tool:

Figure 8.31: Connecting Test and Feedback to an Azure DevOps organization
The tool is quite simple. You can take screenshots, record a process, or even make a note. The following screenshot shows how easily you can write a message inside a screenshot:

Figure 8.32: Giving feedback with the Test and Feedback tool
The good thing is that you record all this analysis in a session timeline. As you can see in the next screenshot, you can have multiple pieces of feedback in the same session, which is good for the analysis process:

Figure 8.33: Giving feedback with the Test and Feedback tool
Once you have done the analysis and you are connected to Azure DevOps, you will be able to report a bug (as shown in the following screenshot), create a task, or even start a new test case:

Figure 8.34: Opening a bug in Azure DevOps
The result of the bug created can be checked on the Work items board in Azure DevOps. It is worth mentioning that you do not need an Azure DevOps developer license to have access to this area of the environment. This enables you, as a software architect, to share this basic and useful tool with as many key users of the solution as you have.
The following screenshot shows the bug created by the tool once you have connected it to your Azure DevOps project:
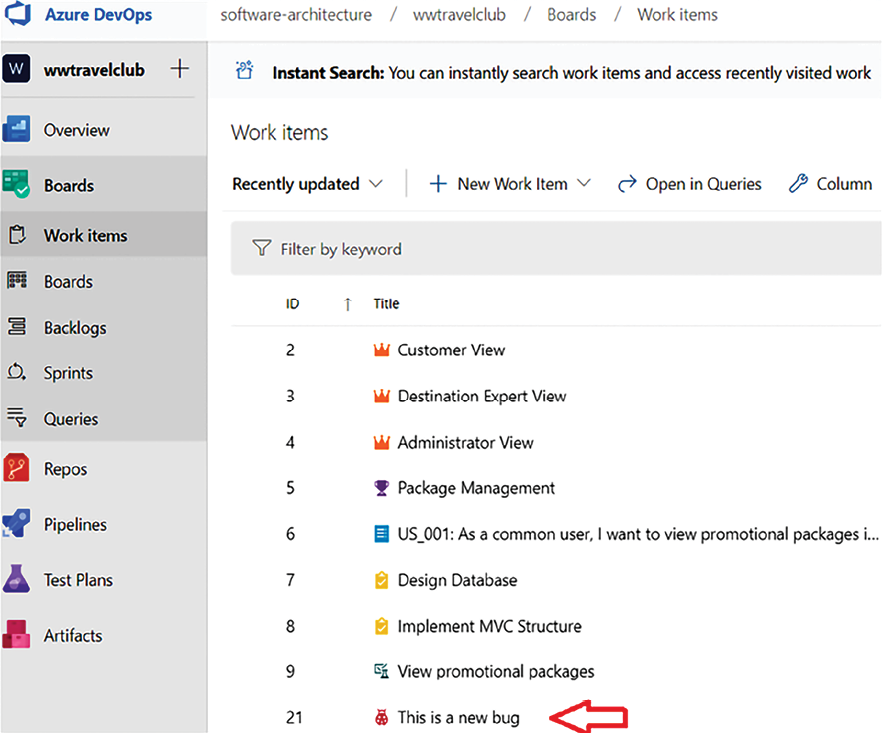
Figure 8.35: New reported bug in Azure DevOps
It is important to have a tool like this to get good feedback on your project. But, as a software architect, you may have to find the best solutions to hasten the feedback process.
Summary
In this chapter, we have learned that DevOps is not only a bunch of techniques and tools used together to deliver software continuously but also a philosophy to enable continuous delivery of value to the end user of the project you are developing.
Considering this approach, we saw how CI/CD and continuous feedback are essential to the purpose of DevOps. We also saw how Azure, Azure DevOps, GitHub, and Microsoft tools help you to achieve your goals.
The chapter also covered the importance of understanding when you can enable CI/CD in the software development life cycle, considering the risks and challenges you will take as a software architect once you decide to use it for your solution.
Additionally, the chapter introduced some solutions and concepts that can make this process easier, such as multi-stage environments, PR reviews, feature flags, peer reviews, and automated tests. Understanding these techniques and processes will enable you to guide your project toward safer behavior when it comes to CI/CD in a DevOps scenario.
We also described service design thinking principles. Now, you should be able to analyze all the implications of these approaches for an organization, and you should be able to adapt pre-existing software development processes and hardware/software architectures to take advantage of the opportunities they offer.
We also explained the need for, and the techniques involved in, the automation of the software cycle, cloud hardware infrastructure configuration, and application deployment.
Once you have implemented the examples shown, you should be able to use Azure Pipelines to automate infrastructure configuration and application deployment. This chapter elucidated this approach using WWTravelClub as an example, enabling CI/CD inside Azure DevOps, and using Application Insights and the Test and Feedback tool for both technical and functional feedback. In real life, these tools will enable you to understand the current behavior of the system you are developing more quickly, as you will have continuous feedback on it.
In the next chapter, we will see how automation for software testing works.
Questions
What is DevOps?
What is continuous integration (CI)?
What is continuous delivery (CD)?
Can you have DevOps without CI/CD?
What are the risks of enabling CI/CD in a non-mature team?
How can a multi-stage environment help CI/CD?
How can automated tests help CI/CD?
How can PRs help CI/CD?
Do PRs only work with CI/CD?
What is continuous feedback?
What is the difference between the build and release pipelines?
What is the main purpose of Application Insights in the DevOps approach?
How can the Test and Feedback tool help in the process of DevOps?
What is the main goal of service design thinking?
What is the preferred Azure tool for the automation of the whole application life cycle?
Learn more on Discord
To join the Discord community for this book – where you can share feedback, ask questions to the authors, and learn about new releases – follow the QR code below:
https://packt.link/SoftwareArchitectureCSharp12Dotnet8
To learn how to build scalable enterprise systems with microservices, apply architectural patterns like Domain-Driven Design, and prepare .NET applications for Kubernetes and cloud-native deployments—check out Software Architecture with C# 12 and .NET 8 by Gabriel Baptista and Francesco Abbruzzese, available from Packt. Now in its fourth edition, the book combines design fundamentals with hands-on .NET practices, covering everything from EF Core and DevOps pipelines to Blazor, OpenTelemetry, and a complete case study centered on a real-world travel agency system.

Here is what some readers have said:


 | A guest post by
|
 | A guest post by
|