

Security Practices and User Management
The complete "Chapter 15: Security Practices and User Management" from the book, GitHub Foundations Certification Guide (Packt, 2025), by Ayodeji Ayodele

Welcome to Chapter 15, where we explore the essentials of GitHub security and user management! By now, you’re familiar with the essentials, you have collaborated effectively, and you’ve started leveraging GitHub for your career. Now, it’s time to focus on protecting your work. In this chapter, we’ll explore GitHub’s built-in security features – such as setting up two-factor authentication, managing user permissions, and securing your CI/CD pipelines. These practices are critical for maintaining repository integrity and will also help you prepare for the certification exam.
We will cover the following main topics:
GitHub security features
Managing access and permissions
Best practices for repository security
GitHub security features
In this section, we’ll explore the various security features GitHub offers to help you protect your repositories and manage user access effectively.
Two-Factor Authentication (2FA)
Two-factor authentication adds an extra layer of security to your GitHub account beyond just your password. By requiring a second form of verification, it ensures that even if someone gets hold of your password, they won’t be able to access your account without the second factor.
2FA is crucial for securing your account for enhanced security, mitigating against credential theft, protecting against phishing, and complying with security standards in many organizations and projects. Which 2FA methods are configurable on GitHub?
Available 2FA methods
GitHub offers several methods for enabling Two-Factor Authentication (2FA) to enhance the security of your account. Here are the available 2FA methods:
Time-Based One-Time Password (TOTP) authenticator apps:
Use apps such as Google Authenticator, Authy, or Microsoft Authenticator to generate a time-based code
Recommended for its reliability and security
Short Message Service (SMS):
Receive a verification code via text message
Less secure compared to TOTP apps, but still an option
Physical security keys:
Use hardware devices such as YubiKeys that support FIDO U2F or WebAuthn standards
Provide a high level of security by requiring physical possession of the key
Virtual security keys:
Utilize built-in security features of personal devices, such as Windows Hello, Face ID, or Touch ID
Convenient and secure, leveraging device-specific authentication
GitHub Mobile:
Use the GitHub Mobile app to authenticate using public-key cryptography
Does not rely on TOTP and provides a seamless experience

These methods offer flexibility and varying levels of security, allowing you to choose the one that best fits your needs. For the highest security, it’s recommended to use TOTP apps or physical security keys. Let’s take a look at how to set this up.
Certification tip
The GitHub Foundations exam often includes questions on 2FA setup and best practices. Make sure you understand both how to enable 2FA and how to use recovery methods.
Setting up 2FA on GitHub
To add an extra layer of security to your GitHub account, enable two-factor authentication (2FA) by following these steps:
Go to your GitHub individual account settings by clicking on your avatar in the top-right-hand corner and clicking on Settings.
In the left sidebar, under Access, click on Password and authentication.
If not enabled yet, select Enable two-factor authentication.
Under Two-factor authentication, click Add next to the 2FA method of choice.
Follow the prompts to set up 2FA using the method selected.
Optionally, you could set your preferred 2FA method if you enrolled in more than one.
That’s it! You’re all set up.
You will also notice Recovery codes under the Recovery options section (this section will appear only if the 2FA method is set).
Recovery codes are essential for regaining access to your GitHub account if you lose access to your 2FA credentials. These codes act as a backup method, allowing you to log in even if you can’t use your primary 2FA method, such as an authentication app or SMS. When you enable 2FA, GitHub provides a set of recovery codes that you should store securely, such as in a password manager or a safe place. If you ever lose access to your 2FA device, you can use one of these recovery codes to regain entry to your account, ensuring you are not permanently locked out.
GitHub gives you 8 recovery codes. Store them securely. You can regenerate these if needed, but old ones will be invalidated.
Branch protection rules
We discussed branch protection rules extensively in Chapter 5, Branching and Merging Strategies. Be sure to read this in preparation for your exam.
Branch protection rules help you enforce certain workflows and requirements before changes can be merged into your protected branches. This ensures that your codebase remains stable and secure. You can configure branch protection rules and, among many other measures, enforce code reviews, ensuring that all changes are reviewed and approved before they are merged.
Certification tip
You’ll need to know how to configure branch protection rules and enable Dependabot alerts for the exam.
Security configurations
GitHub provides various security settings as a collection that you can configure to enhance the security of the repositories in your organization. You can create a customized security configuration from scratch or choose the GitHub-recommended configuration that already comes preset with its settings.
GitHub-recommended security configurations are predefined settings that follow best practices to enhance security, such as enabling Dependabot alerts and secret scanning by default. Custom configurations, on the other hand, allow you to tailor security settings to meet specific needs or requirements of your project or organization, providing flexibility to adjust features such as branch protection rules and access controls.
To manage security settings at the organization level:
Go to your organization’s main page on GitHub (remember that this is an organization, not a repo). For more information on how to create an organization, review Lab 2.1 in Chapter 2, Navigating the GitHub Interface.
Click on Settings.
In the left sidebar, under Security, click Advanced Security to expand.
Then click on Configurations.
Choose to edit the GitHub-recommended security configuration by clicking on the edit (

) icon. Alternatively, you can click on New configuration to customize a new one.
Configure the security settings as needed.

To manage repository-specific security settings:
Navigate to the repository’s main page on GitHub.
Click on Settings.
In the left sidebar, under Security, click Advanced Security.
Enable or configure security features such as Dependabot alerts, secret scanning, and code scanning. The latter two may be missing from your view if the repository is private or internal.
Secret scanning and code scanning are GitHub Advanced Security features and are only available as a paid subscription for private or internal repositories, or free if your repository is open source, that is, visibility is Public.
Optionally, if you wish to configure secret scanning or code scanning, click on General from the left sidebar and scroll down to Danger Zone. Next to Change repository visibility, click on Change visibility and select Change to public. Be sure to follow the instructions.
Certification tip
Questions may come up regarding changing the visibility of a repository from public to private, or vice versa. Be sure to understand the implications of making a repo public. Read more about public repositories in Chapter 2, Navigating the GitHub Interface and Chapter 11, Contributing to Open Source Projects.
Dependabot, secret scanning, and code scanning are all examples of security features that GitHub offers. Some of these features require a paid subscription, some are free only for public repositories, while others are completely free out of the box.
What is Dependabot?
Dependabot is a feature on GitHub that helps keep your project’s dependencies up to date automatically. It works by regularly checking your project’s dependency files (such as package.json, requirements.txt, etc.) for outdated packages and then creating pull requests to update them to the latest versions.
Key features of Dependabot include the following:
Automated dependency updates: It scans your project and creates pull requests to update dependencies
Security alerts: It integrates with GitHub’s security features to alert you about vulnerabilities in your dependencies and can automatically fix them
Customizable configuration: You can configure how often it checks for updates, which dependencies to ignore, and more, using a
dependabot.ymlfileSupports multiple languages: Works with JavaScript, Python, Ruby, Java, PHP, and more
Here is an example flow:
You enable Dependabot in your GitHub repository.
It checks for outdated or vulnerable dependencies.
It creates a pull request with the updated version.
You review and merge the pull request.
Now let’s talk about managing alerts and vulnerabilities.
Security alerts and vulnerability management
GitHub helps you stay on top of potential security issues with automated alerts and tools to manage vulnerabilities. Let’s examine some of these:
Dependabot alerts and security updates:
Dependabot alerts: Automatically scans your dependencies for known vulnerabilities and notifies you if any are found
Dependabot security updates: Automatically generates pull requests to update vulnerable dependencies to secure versions
How can you enable and manage Dependabot alerts?
Go to the repository’s main page on GitHub.
Click on Settings.
In the left sidebar, under Security, click Advanced Security.
Under Dependabot alerts, click Enable if not already enabled.
Afterward, you can review and manage alerts from the Security tab of the repository.
Code scanning:
CodeQL: A powerful code analysis engine that scans your code for security vulnerabilities and coding errors. It integrates with GitHub Actions to run scans on every push or pull request.
Autofix: Uses AI to suggest fixes for detected vulnerabilities, streamlining the remediation process.
Secret scanning: Detects and alerts you if sensitive information, such as API keys or passwords, is accidentally committed to your repository. This helps prevent unauthorized access and potential security breaches.
Security overview dashboard: Provides a centralized view of your security alerts and vulnerabilities across all repositories. This dashboard helps you prioritize and manage security issues more effectively.
Vulnerability management integrations: Integrates with third-party vulnerability management tools to consolidate and prioritize vulnerabilities, automate risk mitigation, and visualize alerts within your existing security posture.
Talking about third-party integrations, GitHub supports receiving Static Analysis Results Interchange Format (SARIF) reports from various third-party security tools. Some of the commonly used tools include the following:
ESLint: A popular tool for identifying and reporting on patterns found in ECMAScript/JavaScript code
Bandit: A tool designed to find common security issues in Python code
Brakeman: A static analysis tool that checks Ruby on Rails applications for security vulnerabilities
Checkmarx: A comprehensive Static Application Security Testing (SAST) tool
Fortify: A suite of tools for static and dynamic application security testing
SonarQube: An open source platform for continuous inspection of code quality
Veracode: A cloud-based service for static and dynamic application security testing
These tools generate SARIF files that can be uploaded to GitHub, allowing you to view and manage security alerts directly within your repository.
To handle security advisories and alerts, navigate to the Security tab of the repository (you will find this tab on both the organization and the repository levels). Examine the difference between the Security tabs of both levels. You will notice a stark difference in what you see. This is because the security overview at the organization level rolls up all the security advisories across all its repos, whereas the scope of the repo level is limited to only vulnerability findings of that repo.

These tools and features help you maintain a robust security posture by automating the detection and management of vulnerabilities, ensuring your codebase remains secure.
In the next section, we will talk about how permissions and authorization can help in securing your code.
Managing access and permissions
Effective management of access and permissions is crucial for maintaining the security and integrity of your GitHub repositories. This section delves into the various methods GitHub provides to control who has access to your repositories and what they can do.
User roles and permissions
GitHub offers a range of user roles to help you manage access and permissions effectively. Understanding these roles is key to maintaining a secure and organized workflow.
Overview of different user roles
User roles on GitHub come in three tiers: roles at the Enterprise level, Organization level, and Repository level. Here are the default roles at the Enterprise and Organization levels:
Owner: The owner has full administrative access to the organization and its repositories. This role can manage settings, users, and billing.
Member: Members have basic access to repositories, typically for contributing code. They can create issues, submit pull requests, and review code.
Billing manager: Billing managers can manage billing settings such as changing billing plans, managing payment methods, downloading and receiving receipts, or managing sponsorships.
When inviting new collaborators to your organization for the first time, you choose one of these three.
Certification tip
Be prepared to identify role-based use cases. The exam may ask you to match specific user scenarios with appropriate GitHub roles.
Assigning roles to users
To manage access within your organization, you can assign specific roles to members by following these steps:
Navigate to your organization’s main page on GitHub.
Click on the People tab in the organization’s navigation bar.
If the user doesn’t already exist in the organization, you can invite them by clicking on Invite member.
Supply the user’s GitHub handle and click on Invite.
For an existing member, locate the user you want to assign a role to and click on the ellipsis dropdown next to their name and select Change role….
Select the appropriate role and click on Send invitation (for new invitations) or Change role (existing members).

Click on Change role…
Select the appropriate role (Owner or Member) from the list displayed.
Click on Change role.
Alternatively, if the user only needs to be a billing manager, click on the Invite a billing manager link at the bottom of the user invitation screen (Step 3), or go to the organization’s settings and select Billing and licensing from the left navigation bar and invite them.

In addition to these three, GitHub provides some more granular roles that help you define granular permissions to what a member can or cannot do at the different levels.
Here is a table of additional pre-defined roles that can be used:
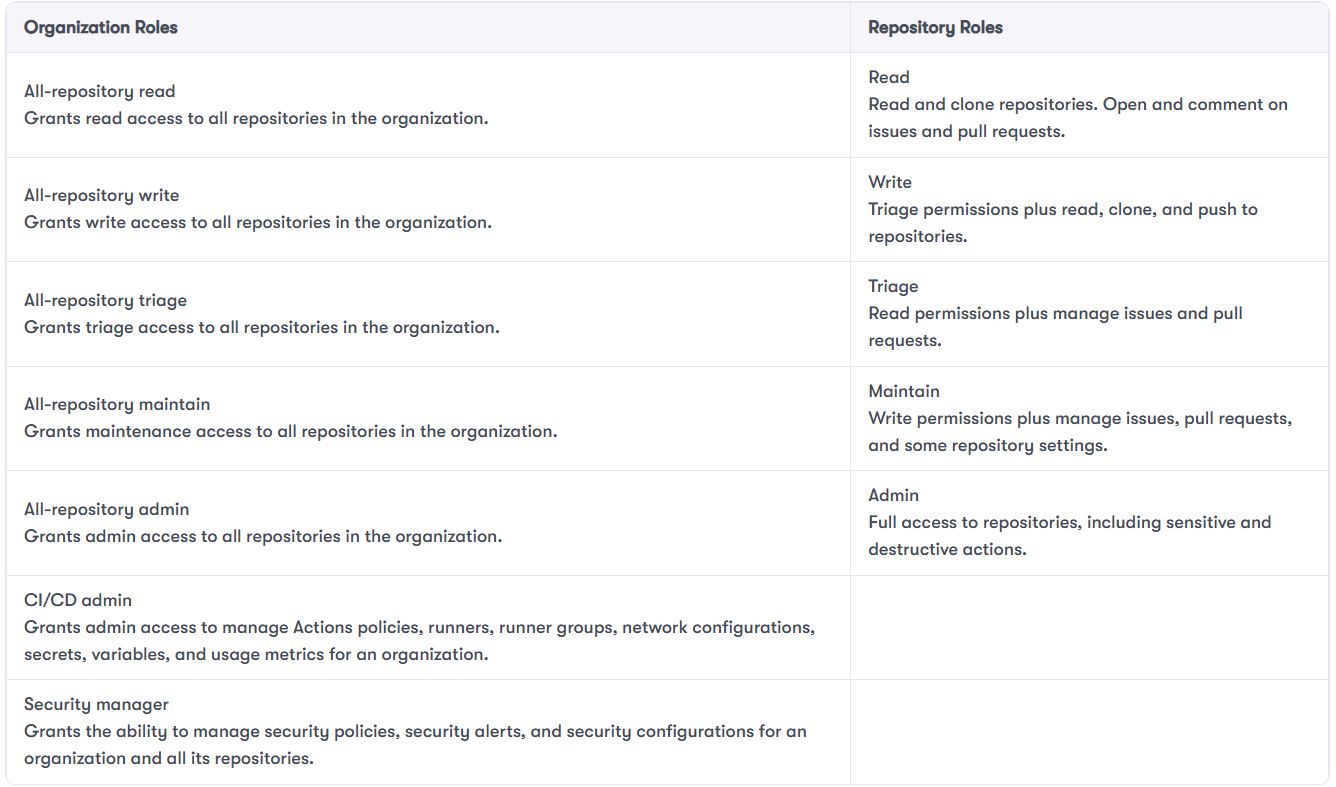
In addition to these predefined roles, you can create custom roles with a select combination of permissions if one of these predefined roles doesn’t exactly fit your needs. This can be done at the Enterprise, Organization, and Repository levels.
The custom role feature is only available on GitHub Enterprise. In addition, the custom role at the Enterprise level is only available for preview as of early 2025. Refer to GitHub Docs for the latest availability.
Now let’s move on to using teams for access control.
Team management
Teams allow you to group users and manage their access to repositories more efficiently. This is particularly useful for larger organizations with multiple projects. A team can either be visible or secret.
Visible teams can be seen and @mentioned by members of the organization, while secret teams can only be seen by their members. This will be specified during team creation. Teams can also be nested, with one team being the parent of another team.

Let’s see how we create teams.
Creating and managing teams
Here’s how to create a team:
Go to your organization’s main page on GitHub.
Click on Teams in the organization’s navigation bar.
Click New team to create a new team.
Enter the team name and description, then click Create team.
Add members to the team by clicking Add a member and selecting users from the list.
Here are some important use cases for team visibility and notifications:
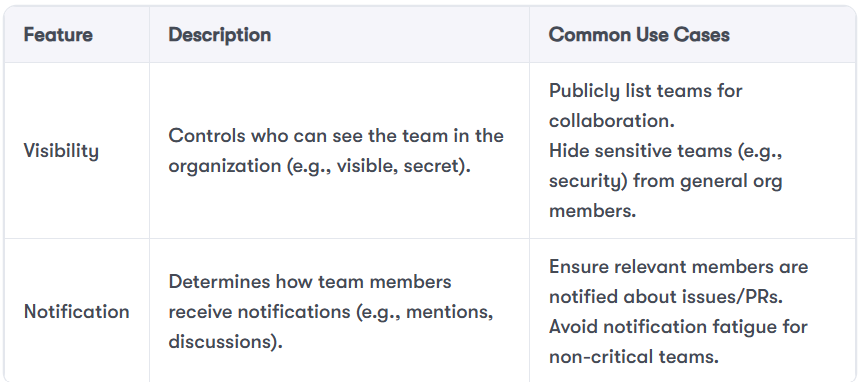
Assigning repository access to teams
To assign access to repositories to teams, do the following:
Navigate to the team’s page on GitHub.
Click on the Repositories tab in the team’s navigation bar.
Click Add a repository and select the repository you want to grant access to.
Set the desired permission level (Read, Triage, Write, or others) for the team. More roles and the ability to create custom roles are available if you have a paid GitHub Enterprise subscription.
Collaborator access control
Collaborators are individuals who are granted access to specific repositories. This is useful for managing external contributors or contractors.
Adding collaborators to repositories:
To give others access to a specific repository without adding them to the entire organization, you can add them as collaborators:
Navigate to the repository’s main page on GitHub.
Click on Settings in the repository’s navigation bar.
In the left sidebar, click Collaborators and teams (org-owned repos) or Collaborators (user-owned repos).
Click Add people and start typing the username of the person you want to add.
Select their name and set the appropriate permission level (Read, Triage, Write, Maintain, Admin) for the collaborator.
Setting permissions for collaborators:
Once collaborators are added, you can adjust their access levels using the following steps:
In the Collaborators and teams section, find the collaborator you want to manage.
Click on their permission dropdown and select the desired permission level.
One common pitfall is misconfigured roles or permissions, which can inadvertently expose sensitive code. For example, imagine a scenario where a developer creates a private repository for an internal tool but mistakenly assigns a Read role to an external contractor at the organization level. Because the repository inherits permissions from the organization, the contractor now has unintended access to the private repository. This kind of oversight can lead to accidental data leaks or unauthorized code access.
To prevent such incidents, always follow the principle of least privilege, regularly audit repository access, and use fine-grained personal access tokens for automation and integrations.
Another great feature to manage access and permissions is tokens. Two examples of tokens on GitHub are OAuth and Personal Access Tokens (PAT).
OAuth and personal access tokens
OAuth and personal access tokens provide secure ways to authenticate and authorize access to your GitHub account and repositories. These methods are essential for integrating third-party applications and services, that is, when you are not using an interactive login of a person. Here’s where you’ll find each of these on GitHub:
Managing OAuth applications
To review and manage third-party applications connected to your GitHub account, follow these steps:
Go to your GitHub account settings.
In the left sidebar, click Developer settings.
Click OAuth Apps to view and manage your OAuth applications.
Review the list of authorized applications and revoke access if necessary.
Creating and using personal access tokens
To authenticate non-interactive scripts or services, you can generate a personal access token as shown below:
Go to your GitHub account settings.
In the left sidebar, click Developer settings.
Click Personal access tokens.
Select either Fine-grained tokens or Tokens (classic) in the submenu.
Click Generate new token (for fine-grained tokens) or select Token (classic) again for the classic token option.
Select the scopes or permissions you want to grant this token, such as repo,
admin:org, or user.Click Generate token and copy the token for use in your applications. Store it securely, as it will not be displayed again.
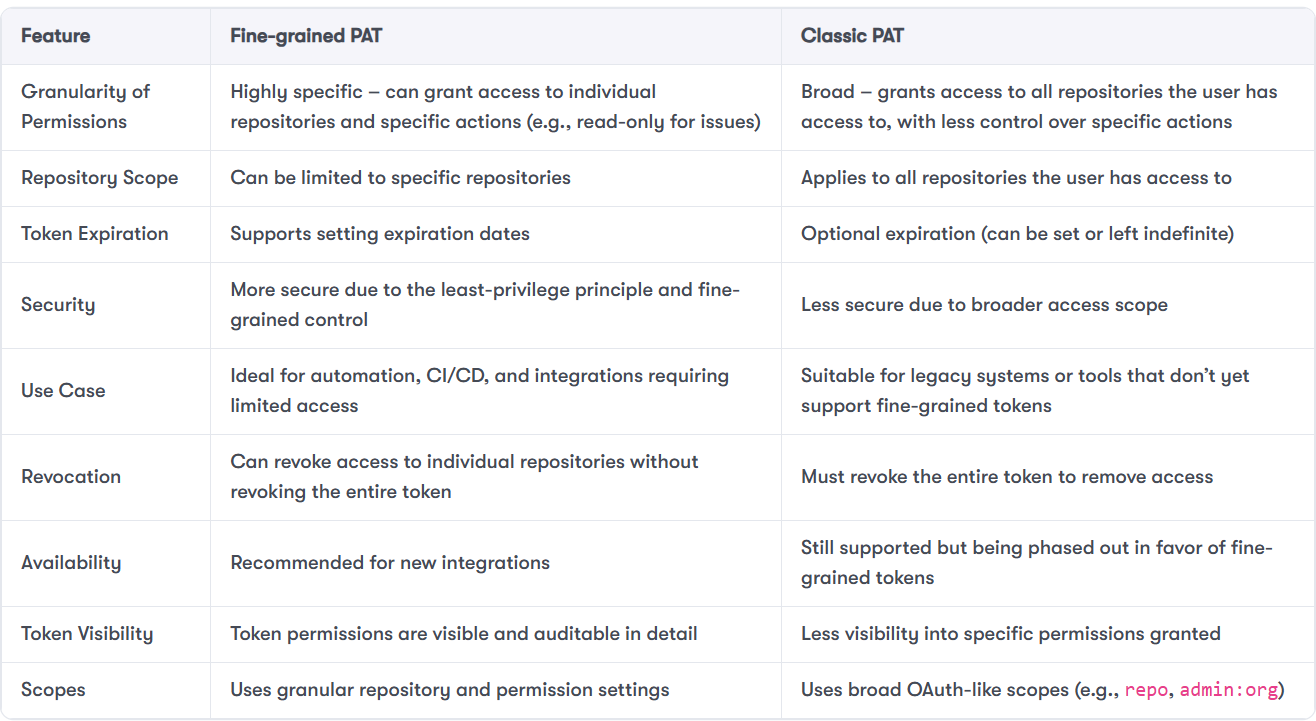
You would notice by now that there are two types of personal access tokens on GitHub: classic and fine-grained.
Both types co-exist, with classic being the older. It is expected that GitHub will deprecate classic PAT in favour of fine-grained PAT in the future, but both of them can be used interchangeably today. Let’s quickly enumerate the differences between the two.
In summary, GitHub offers a range of measures to manage access and grant permissions to users and third-party applications and services. It is important to know which ones to combine to ensure the security of your code. Up next, let’s consider some good security practices for repo security.
Best practices for repository security
Ensuring the security of your repositories is paramount to protecting your code and maintaining the integrity of your projects. In this section, we’ll cover best practices for securing your repositories on GitHub.
Code scanning with Static Application Security Testing (SAST) tools
Static Application Security Testing (SAST) tools help identify security vulnerabilities in your codebase before they become issues in production. GitHub has a code scanning product. It is sold separately but can be integrated natively into your repos and organizations. It’s labelled GitHub Advanced Security (GHAS). GHAS is a paid subscription product, an add-on that you can purchase in addition to your GitHub subscription. If your codebase is open source, most of GHAS’s security features are free for use.
Here’s how to integrate and use these tools. You have to do this on a public repo if you haven’t purchased GHAS:
Integrating SAST tools in your workflow: Here’s how to set up code scanning with SAST tools:
Navigate to the repository’s main page on GitHub.
Click on Security in the repository’s navigation bar.
Click Set up code scanning.
Choose a code scanning tool, such as CodeQL, and follow the prompts to configure it.
Examples of SAST tools include the following:
CodeQL: A powerful code analysis engine that scans your code for security vulnerabilities and coding errors
Dependabot Alerts: Automatically scans your dependencies for known vulnerabilities and notifies you if any are found
Interpreting scan results: To review and act on scan results, take the following steps:
Go to the Security tab of the repository.
Click on Code scanning alerts to view the results.
Review the alerts and take appropriate action to fix the identified issues.
CI/CD pipeline security measures
Securing your Continuous Integration/Continuous Deployment (CI/CD) pipelines is crucial to ensure that your code remains secure throughout the development lifecycle. Follow these steps to secure your pipelines:
Securing CI/CD Pipelines Using GitHub Actions: To secure your CI/CD pipelines, take these steps:
Navigate to the repository’s main page on GitHub.
Click on Actions in the repository’s navigation bar.
Set up workflows to include security checks, such as running SAST tools or dependency checks.
Mini-case example
A development team noticed that their CI/CD pipeline was deploying code with outdated dependencies that had known vulnerabilities. The issue stemmed from a missing dependency scanning step in their GitHub Actions workflow. To mitigate this, they integrated Dependabot and added a step in their workflow to run
npm auditduring each build. This change helped catch vulnerable packages early and prevented insecure code from reaching production.
Implementing secrets management in workflows: To manage secrets securely in your workflows, take these steps:
Go to the repository’s main page on GitHub.
Click on Settings.
In the left sidebar, click Secrets and variables.
Then, select Actions from the submenu.
Click New repository secret to add secrets, such as API keys or tokens, securely.
Reference these secrets in your GitHub Actions workflows to avoid exposing sensitive information.
Monitoring and auditing activities
Regular monitoring and auditing of repository activities help you detect and respond to suspicious actions promptly. Here’s how to monitor and audit activities:
Using audit logs to monitor repository activities: To monitor repository activities, take these steps:
Go to your organization’s main page on GitHub.
Click on Settings.
In the left sidebar, under the Archive section, click Logs,
Then, select Audit log from the submenu.
Review the audit log entries to monitor activities such as user logins, repository changes, and permission updates.
Setting up alerts for suspicious activities: To set up alerts for suspicious activities, take these steps:
Use GitHub’s built-in security alerts to notify you of potential security issues.
Integrate with third-party monitoring tools to receive real-time alerts for suspicious activities.
Incident response and recovery
Being prepared for security incidents and having a plan for recovery is essential for minimizing the impact of security breaches. Follow these steps for incident response and recovery:
Preparing for security incidents: To prepare for security incidents, take these steps:
Develop an incident response plan that outlines the steps to take in case of a security breach.
Ensure that all team members are aware of the plan and their roles in the response process.
Steps for incident response and recovery: To respond to and recover from security incidents, take these steps:
Identify and contain the breach to prevent further damage.
Investigate the cause of the breach and assess the impact.
Remediate the vulnerabilities that led to the breach.
Communicate with stakeholders and provide updates on the incident and recovery efforts.
Review and update security policies and practices to prevent future incidents.
Et voila! This concludes the basics when it comes to security on GitHub. Let’s summarize what we learned.
Summary
In this chapter, we delved into the intricacies of security practices and user management on GitHub. We had already mastered the essentials of effective collaboration, but we know that with great code comes great responsibility. We explored the robust security features GitHub offers, such as two-factor authentication, which added an extra layer of security to our accounts. We learned about the various methods available for 2FA, including authenticator apps, SMS, physical security keys, and GitHub Mobile.
We also discussed branch protection rules, which ensured our codebase remained stable and secure by enforcing workflows and requirements before changes could be merged. Additionally, we examined security configurations, both GitHub-recommended and custom, to enhance the security of our repositories. We looked at the management of security alerts and vulnerabilities through tools such as Dependabot, CodeQL, and secret scanning, which helped us stay on top of potential security issues.
Managing access and permissions was another crucial aspect we covered. We understood the importance of user roles and permissions at different levels, from enterprise to repository, and how to assign these roles effectively. We also explored the use of teams for access control, creating and managing teams to streamline our workflow. Finally, we looked at OAuth and personal access tokens, which provided secure ways to authenticate and authorize access to our GitHub account and repositories.
Overall, this chapter equipped us with the knowledge and tools to maintain a robust security posture and manage user access effectively on GitHub.
Let’s do a short quiz.
Test your knowledge
Review all GitHub security and user management features, especially permission models, 2FA, and CI/CD hardening techniques – they appear frequently on the certification.
Which of the following methods is considered the most secure for enabling Two-Factor Authentication (2FA) on GitHub?
Short Message Service (SMS)
Time-Based One-Time Password (TOTP) authenticator apps
Virtual security keys
Physical security keys
What is the primary purpose of Dependabot Security Updates in GitHub?
To scan your code for security vulnerabilities and coding errors
To automatically generate pull requests to update vulnerable dependencies to secure versions
To detect and alert you if sensitive information is accidentally committed to your repository
To provide a centralized view of your security alerts and vulnerabilities across all repositories
Which role in GitHub is best suited to managing security policies, security alerts, and security configurations for an organization and all its repositories?
Owner
Security manager
Admin
CI/CD admin
Useful links
Authentication documentation: https://docs.github.com/en/enterprise-cloud@latest/authentication
About GitHub security features: https://docs.github.com/en/enterprise-cloud@latest/code-security/getting-started/github-security-features#about-githubs-security-features
About GitHub Advanced Security: https://docs.github.com/en/enterprise-cloud@latest/get-started/learning-about-github/about-github-advanced-security
To build practical mastery of Git and GitHub— from version control basics to collaborative workflows, secure automation, and AI-assisted productivity—check out GitHub Foundations Certification Guide by Ayodeji Ayodele (Packt, 2025). Through step-by-step labs, real-world projects, and exam strategies, it helps you prepare for the GitHub Foundations certification while adopting best practices for issues and pull requests, GitHub Projects, privacy and security controls, and GitHub Copilot—so you can level up your skills and ship better software, faster.

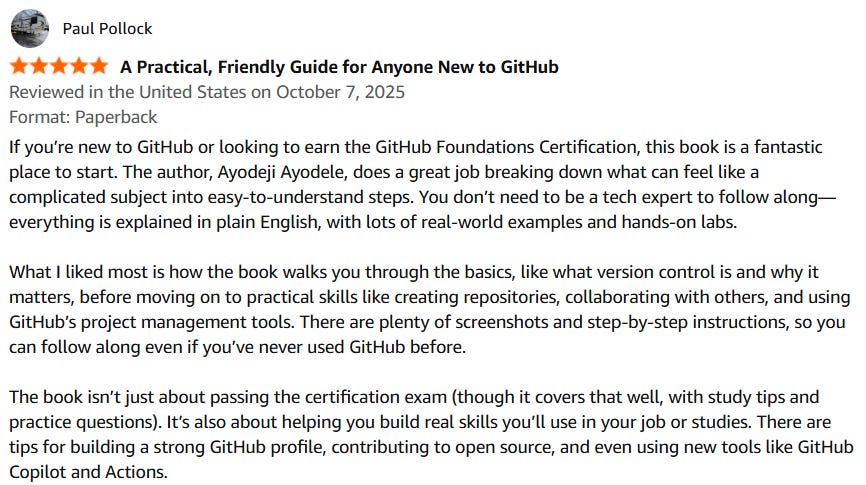
Here’s what some readers have said:
 | A guest post by
|