

Go Concurrency
The complete “Chapter 8: Go Concurrency” from the book Mastering Go, Fourth Edition by Mihalis Tsoukalos (Packt, March 2024).

The key component of the Go concurrency model is the goroutine, which is the minimum executable entity in Go. To create a new goroutine, we must use the go keyword followed by a function call or an anonymous function—the two methods are equivalent. For a goroutine or a function to terminate the entire Go application, it should call os.Exit() instead of return. However, most of the time, we exit a goroutine or a function using return because what we really want is to exit that specific goroutine or function and not stop the entire application.
Everything in Go is executed as a goroutine, either transparently or consciously. Each executable Go program has at least one goroutine, which is used for running the main() function of the main package. Each goroutine is executed on a single OS thread according to the instructions of the Go scheduler, which is responsible for the execution of goroutines—the developer has no control over the amount of memory allocated to a goroutine. The OS scheduler does not dictate how many threads the Go runtime is going to create because the Go runtime will spawn enough threads to ensure that GOMAXPROCS threads are available to run the Go code.
However, goroutines cannot communicate with each other directly. Data sharing in Go is implemented using either channels, local sockets, or shared memory. Channels act as the glue that connects multiple goroutines. On the other hand, channels cannot process data or execute code but they can send data to and receive data from goroutines and have a special purpose like acting as signals or specifying the order of execution for goroutines.
When I first learned about channels, I thought that they were a great idea, much better than shared memory, and I wanted to use channels everywhere! However, nowadays I only use channels when I have no other alternative. Look at the implementation of the concurrent statistical application at the end of the chapter to realize that there exist designs that do not require the use of channels.
Although the use of channels to communicate and synchronize between goroutines is very typical and expected, channels might introduce deadlocks, overhead, and complexity to the design, as well as performance considerations, especially when low-latency communication is a priority.
When you combine multiple channels and goroutines, you can create data flows, which, in Go terminology, are called pipelines. So, you might have a goroutine that reads data from a database and sends it to a channel and a second goroutine that reads from that channel, processes that data, and sends it to another channel to be read from another goroutine, before making modifications to the data and storing it in another database.
This chapter covers:
Processes, threads, and goroutines
The Go scheduler
Goroutines
Channels
Race conditions are bad
The
selectkeywordTiming out a goroutine
Go channels revisited
Handling UNIX signals
Shared memory and shared variables
Closured variables and the
gostatementThe
contextpackageThe
semaphorepackageMaking the statistics application concurrent
Go Concurrency
The key component of the Go concurrency model is the goroutine, which is the minimum executable entity in Go. To create a new goroutine, we must use the go keyword followed by a function call or an anonymous function—the two methods are equivalent. For a goroutine or a function to terminate the entire Go application, it should call os.Exit() instead of return. However, most of the time, we exit a goroutine or a function using return because what we really want is to exit that specific goroutine or function and not stop the entire application.
Everything in Go is executed as a goroutine, either transparently or consciously. Each executable Go program has at least one goroutine, which is used for running the main() function of the main package. Each goroutine is executed on a single OS thread according to the instructions of the Go scheduler, which is responsible for the execution of goroutines—the developer has no control over the amount of memory allocated to a goroutine. The OS scheduler does not dictate how many threads the Go runtime is going to create because the Go runtime will spawn enough threads to ensure that GOMAXPROCS threads are available to run the Go code.
However, goroutines cannot communicate with each other directly. Data sharing in Go is implemented using either channels, local sockets, or shared memory. Channels act as the glue that connects multiple goroutines. On the other hand, channels cannot process data or execute code but they can send data to and receive data from goroutines and have a special purpose like acting as signals or specifying the order of execution for goroutines.
When I first learned about channels, I thought that they were a great idea, much better than shared memory, and I wanted to use channels everywhere! However, nowadays I only use channels when I have no other alternative. Look at the implementation of the concurrent statistical application at the end of the chapter to realize that there exist designs that do not require the use of channels.
Although the use of channels to communicate and synchronize between goroutines is very typical and expected, channels might introduce deadlocks, overhead, and complexity to the design, as well as performance considerations, especially when low-latency communication is a priority.
When you combine multiple channels and goroutines, you can create data flows, which, in Go terminology, are called pipelines. So, you might have a goroutine that reads data from a database and sends it to a channel and a second goroutine that reads from that channel, processes that data, and sends it to another channel to be read from another goroutine, before making modifications to the data and storing it in another database.
This chapter covers:
Processes, threads, and goroutines
The Go scheduler
Goroutines
Channels
Race conditions are bad
The
selectkeywordTiming out a goroutine
Go channels revisited
Handling UNIX signals
Shared memory and shared variables
Closured variables and the
gostatementThe
contextpackageThe
semaphorepackageMaking the statistics application concurrent
Processes, threads, and goroutines
A process is an OS representation of a running program, while a program is a binary file on a disk that contains all the information necessary for creating an OS process. The binary file is written in a specific format and contains all the instructions the CPU is going to run, as well as a plethora of other required sections. That program is loaded into memory and the instructions are executed, creating a running process. So, a process carries with it additional resources such as memory, opened file descriptions, and user data, as well as other types of resources that are obtained during runtime.
A thread is a smaller and lighter entity than a process. Processes consist of one or more threads that have their own flow of control and stack. A quick and simplistic way to differentiate a thread from a process is to consider a process as the running binary file and a thread as a subset of a process.
A goroutine is the minimum Go entity that can be executed concurrently. The use of the word minimum is very important here, as goroutines are not autonomous entities like UNIX processes—goroutines live in OS threads that live in OS processes. The good thing is that goroutines are lighter than threads, which, in turn, are lighter than processes—running thousands or hundreds of thousands of goroutines on a single machine is not a problem. Among the reasons that goroutines are lighter than threads are that they have a smaller stack that can grow, they have a faster startup time, and they can communicate with each other through channels with low latency. In practice, this means that a process can have multiple threads and lots of goroutines, whereas a goroutine needs the environment of a process to exist. So, to create a goroutine, you need to have a process with at least one thread. The OS takes care of the process and thread scheduling, while Go creates the necessary threads and the developer creates the desired number of goroutines.
Now that you know the basics of processes, programs, threads, and goroutines, let us talk a little bit about the Go scheduler.
The Go scheduler
The OS kernel scheduler is responsible for the execution of the threads of a program. Similarly, the Go runtime has its own scheduler, which is responsible for the execution of the goroutines using a technique known as m:n scheduling, where m goroutines are executed using n OS threads using multiplexing. The Go scheduler is the Go component responsible for the way and the order in which the goroutines of a Go program get executed. This makes the Go scheduler a really important part of the Go programming language. The Go scheduler is also executed as a goroutine.
Be aware that as the Go scheduler only deals with the goroutines of a single program, its operation is much simpler, cheaper, and faster than the operation of the OS kernel scheduler.
Go uses the fork-join concurrency model. The fork part of the model, which should not be confused with the fork(2) system call, states that a child branch can be created at any point of a program. Analogously, the join part of the Go concurrency model is where the child branch ends and joins with its parent. Keep in mind that both sync.Wait() statements and channels that collect the results of goroutines are join points, whereas each new goroutine creates a child branch.
The fair scheduling strategy shares all load evenly among the available processors. At first, this might look like the perfect strategy because it does not have to take many things into consideration while keeping all processors equally occupied. However, it turns out that this is not exactly the case because most distributed tasks usually depend on other tasks. Therefore, some processors are underutilized or, equivalently, some processors are utilized more than others.
A goroutine is a task, whereas everything after the calling statement of a goroutine is a continuation. In the work-stealing strategy used by the Go scheduler, a (logical) processor that is underutilized looks for additional work from other processors. When it finds such jobs, it steals them from the other processor or processors, hence the name. Additionally, the work-stealing algorithm of Go queues and steals continuations. A stalling join, as is suggested by its name, is a point where a thread of execution stalls at a join and starts looking for other work to do.
Although both task stealing and continuation stealing have stalling joins, continuations happen more often than tasks; therefore, the Go scheduling algorithm works with continuations rather than tasks. The main disadvantage of continuation stealing is that it requires extra work from the compiler of the programming language. Fortunately, Go provides that extra help and, therefore, uses continuation stealing in its work-stealing algorithm. One of the benefits of continuation stealing is that you get the same results when using function calls instead of goroutines or a single thread with multiple goroutines. This makes perfect sense, as only one thing is executed at any given point in both cases.
The Go scheduler works using three main kinds of entities: OS threads (M), which are related to the OS in use, goroutines (G), and logical processors (P). The number of processors that can be used by a Go program is specified by the value of the GOMAXPROCS environment variable—at any given time, there are, at most, GOMAXPROCS processors. Now, let us return to the m:n scheduling algorithm used in Go. Strictly speaking, at any time, you have m goroutines that are executed and, therefore, scheduled to run, on n OS threads using, at most, GOMAXPROCS number of logical processors. You will learn more about GOMAXPROCS shortly.
Each goroutine can be in one of the following three stages: executing, runnable, or waiting. In the executing stage, the instructions of the goroutine are executed on an OS thread. In the runnable stage, the goroutine waits to be assigned to an OS thread for execution. Finally, in the waiting stage, the goroutine is blocked for some reason like waiting for a resource or a mutex to become available to go into one of the other two stages.
The following figure shows that there are two different kinds of queues—a global run queue and a local run queue—attached to each logical processor. Goroutines from the global queue are assigned to the queue of a logical processor in order to get executed at some point in the future.
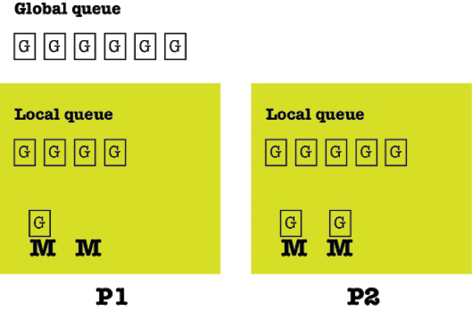
Figure 8.1: The operation of the Go scheduler
Each logical processor can have multiple threads, and the stealing occurs between the local queues of the available logical processors. Finally, keep in mind that the Go scheduler is allowed to create more OS threads when needed. OS threads are expensive in terms of resources and going from one status to another (context switching), which means that dealing too much with OS threads might slow down your Go applications.
Next, we discuss the meaning and the use of GOMAXPROCS.
The GOMAXPROCS environment variable
The GOMAXPROCS environment variable allows you to set the number of OS threads that can execute user-level Go code simultaneously; this does not limit the number of threads created but it does limit the number of threads that are actively running. Starting with Go version 1.5, the default value of GOMAXPROCS should be the number of logical cores available in your machine. There is also the runtime.GOMAXPROCS() function, which allows you to set and get the value of GOMAXPROCS programmatically.
If you decide to assign a value to GOMAXPROCS that is smaller than the number of cores in your machine, you might affect the performance of your program. However, using a GOMAXPROCS value that is larger than the number of available cores does not necessarily make your Go programs run faster due to the context switching of threads.
As mentioned earlier in this subsection, you can programmatically set and get the value of the GOMAXPROCS environment variable—this is illustrated in maxprocs.go, which will also show additional capabilities of the runtime package. The main() function is implemented as follows:
func main() {
    fmt.Print("You are using ", runtime.Compiler, " ")
    fmt.Println("on a", runtime.GOARCH, "machine")
    fmt.Println("Using Go version", runtime.Version())
The runtime.Compiler variable holds the compiler toolchain used for building the running binary. The two most well-known values are gc and gccgo. The runtime.GOARCH variable holds the current architecture and runtime.Version() returns the current version of the Go compiler. This information is not necessary for using runtime.GOMAXPROCS() but it is good to have a better knowledge of your system.
    fmt.Printf("GOMAXPROCS: %d\n", runtime.GOMAXPROCS(0))
}
What happens with the runtime.GOMAXPROCS(0) call? It always returns the previous value of the maximum number of CPUs that can be executed simultaneously. When the parameter of runtime.GOMAXPROCS() is equal to or bigger than 1, then runtime.GOMAXPROCS() also changes the current setting. As we are using 0, our call does not alter the current setting.
Running maxprocs.go produces the following output:
You are using gc on a arm64 machine
Using Go version go1.21.0
GOMAXPROCS: 10
You can change the value of GOMAXPROCS on the fly using the following technique:
$ GOMAXPROCS=100; go run maxprocs.go
You are using gc on a amd64 machine
Using Go version go1.21.0
GOMAXPROCS: 100
The previous command temporarily changes the value of GOMAXPROCS to 100 and runs maxprocs.go.
Apart from testing the performance of your code using fewer cores, you will most likely not need to change GOMAXPROCS. The next subsection will explain the similarities and differences between concurrency and parallelism.
Concurrency and parallelism
It is a common misconception that concurrency is the same thing as parallelism—this is not true! Parallelism is the simultaneous execution of multiple entities of some kind, whereas concurrency is a way of structuring your components so that they can be executed independently when possible.
It is only when you build software components concurrently that you can safely execute them in parallel, when and if your OS and your hardware permit it. The Erlang programming language did this a long time ago—long before CPUs had multiple cores and computers had lots of RAM.
In a valid concurrent design, adding concurrent entities makes the whole system run faster because more things can be executed in parallel. So, the desired parallelism comes from a better concurrent expression and implementation of the problem. The developer is responsible for taking concurrency into account during the design phase of a system and will benefit from a potential parallel execution of the components of the system. So, the developer should not think about parallelism but about breaking things into independent components that solve the initial problem when combined.
Even if you cannot run your functions in parallel on your machine, a valid concurrent design still improves the design, data flow, and maintainability of your programs. In other words, concurrency is better than parallelism! Let us now talk about goroutines before looking into channels, which are the main components of the Go concurrency model.
Goroutines
You can define, create, and execute a new goroutine using the go keyword followed by a named function or an anonymous function call. The go keyword makes the function call return immediately, while the function starts running in the background as a goroutine and the rest of the program continues its execution. You cannot control or make any assumptions about the order in which your goroutines are going to be executed because that depends on the scheduler of the OS, the Go scheduler, and the load of the OS.
Creating a goroutine
In this subsection, you will learn how to create goroutines. The program that illustrates the technique is called create.go. The implementation of the main() function is as follows:
func main() {
    go func(x int) {
        fmt.Printf("%d ", x)
    }(10)
This is how you run an anonymous function as a goroutine. The (10) at the end is how you pass a parameter to an anonymous function. The previous anonymous function just prints a value. In general, it is more readable to pass parameters explicitly than to have the function close over the variables it uses.
go printme(15)This is how you execute a function as a goroutine. As a rule of thumb, the functions that you execute as goroutines should not return any values directly. Exchanging data with goroutines happens via the use of shared memory or channels or some other mechanism.
    time.Sleep(time.Second)
    fmt.Println("Exiting...")
}
As a Go program does not wait for its goroutines to end before exiting, we need to delay it manually, which is the purpose of the time.Sleep() call. We correct that shortly in order to wait for all goroutines to finish before exiting.
Running create.go produces the following output:
$ go run create.go
10 * 15
Exiting...
The 10 part in the output is from the anonymous function, whereas the * 15 part is from the go printme(15) statement. However, if you run create.go more than once, you might get a different output because the two goroutines are not always executed in the same order, as this depends on the Go scheduler:
$ go run create.go
* 15
10 Exiting...
The next subsection shows how to run a variable number of goroutines.
Creating multiple goroutines
In this subsection, you will learn how to create a variable number of goroutines. The program that illustrates the technique is called multiple.go. The number of goroutines is given as a command line argument to the program. The important code from the implementation of the main() function is the following:
fmt.Printf("Going to create %d goroutines.\n", count)
for i := 0; i < count; i++ {
There is nothing prohibiting you from using a for loop to create multiple goroutines, especially when you want to create lots of them.
    go func(x int) {
        fmt.Printf("%d ", x)
    }(i)
}
time.Sleep(time.Second)
fmt.Println("\nExiting...")
Once again, time.Sleep() prevents the main() function from exiting immediately.
Running multiple.go generates the following kind of output:
$ go run multiple.go 15
Going to create 15 goroutines.
3 0 8 4 5 6 7 11 9 12 14 13 1 2 10
Exiting...
If you run multiple.go many times, you are going to get different outputs. So, there is still room for improvement. The next subsection shows how to remove the call to time.Sleep() and make your programs wait for the goroutines to finish.
Waiting for all goroutines to finish
It is not enough to create multiple goroutines—you also need to wait for them to finish before the main() function ends. Therefore, this subsection shows a very popular technique that improves the code of multiple.go—the improved version is called varGoroutines.go. But first, we need to explain how this works.
The synchronization process begins by defining a sync.WaitGroup variable and using the Add(), Done(), and Wait() methods. If you look at the source code of the sync Go package, and more specifically at the waitgroup.go file, you see that the sync.WaitGroup type is nothing more than a structure with two fields:
type WaitGroup struct {
    noCopy noCopy
    state1 [3]uint32
}
Each call to sync.Add() increases a counter in the state1 field, which is an array with three uint32 elements. Notice that it is really important to call sync.Add() before the go statement in order to prevent any race conditions—we will learn about race conditions in the Race conditions are bad section. When each goroutine finishes its job, the sync.Done() function should be executed in order to decrease the same counter by one. Behind the scenes, sync.Done() runs an Add(-1) call. The Wait() method waits until that counter becomes 0 in order to return. The return of Wait() inside the main() function means that main() is going to return and the program ends.
You can call Add() with a positive integer value other than 1 in order to avoid calling Add(1) multiple times. This can be handy when you know the number of goroutines you are going to create in advance. Done() does not support that functionality.
The important part of varGoroutines.go is the following:
var waitGroup sync.WaitGroup
fmt.Printf("%#v\n", waitGroup)
This is where you create a sync.WaitGroup variable that you are going to use. The fmt.Printf() call prints the contents of the sync.WaitGroup structure—you do not usually do that but it is good for learning more about the sync.WaitGroup structure.
for i := 0; i < count; i++ {
    waitGroup.Add(1)
We call Add(1) just before we create the goroutine in order to avoid race conditions.
    go func(x int) {
        defer waitGroup.Done()
The Done() call is going to be executed just before the anonymous function returns because of the defer keyword.
        fmt.Printf("%d ", x)
    }(i)
}
fmt.Printf("%#v\n", waitGroup)
waitGroup.Wait()
The Wait() function waits for the counter in the waitGroup variable to become 0 before it returns, which is what we want to achieve.
fmt.Println("\nExiting...")When the Wait() function returns, the fmt.Println() statement is executed. No need to call time.Sleep() any more!
Running varGoroutines.go produces the following output:
$ go run varGoroutines.go 15
Going to create 10 goroutines.
sync.WaitGroup{noCopy:sync.noCopy{}, state:atomic.Uint64{_:atomic.noCopy{}, _:atomic.align64{}, v:0x0}, sema:0x0}
sync.WaitGroup{noCopy:sync.noCopy{}, state:atomic.Uint64{_:atomic.noCopy{}, _:atomic.align64{}, v:0xa00000000}, sema:0x0}
14 8 9 10 11 5 0 4 1 2 3 6 13 12 7
Exiting...
Remember that using more goroutines in a program is not a panacea for performance, as more goroutines, in addition to the various calls to sync.Add(), sync.Wait(), and sync.Done(), might slow down your program due to the extra housekeeping that needs to be done by the Go scheduler and the Go garbage collector.
What if the number of Add() and Done() calls differ?
When the number of sync.Add() calls and sync.Done() calls are equal, everything is going to be fine in your programs. However, this subsection tells you what happens when these two numbers do not agree with each other.
Without giving any command line parameters to addDone.go, the number of Add() calls is going to be smaller than the number of Done() calls. With at least one command line argument, the number of Done() calls is going to be smaller than the number of Add() calls. You can look at the Go code of addDone.go on your own. What is important is the output it generates. Running addDone.go without any command line arguments produces the following error message:
$ go run addDone.go
Going to create 20 goroutines.
sync.WaitGroup{noCopy:sync.noCopy{}, state:atomic.Uint64{_:atomic.noCopy{}, _:atomic.align64{}, v:0x0}, sema:0x0}
sync.WaitGroup{noCopy:sync.noCopy{}, state:atomic.Uint64{_:atomic.noCopy{}, _:atomic.align64{}, v:0x1300000000}, sema:0x0}
19 3 4 5 6 7 8 9 10 11 12 13 14 15 16 2 1 17 18 0
Exiting...
panic: sync: negative WaitGroup counter
goroutine 20 [running]:
sync.(*WaitGroup).Add(0x1?, 0x1?)
    /opt/homebrew/Cellar/go/1.21.0/libexec/src/sync/waitgroup.go:62 +0x108
sync.(*WaitGroup).Done(0x0?)
    /opt/homebrew/Cellar/go/1.21.0/libexec/src/sync/waitgroup.go:87 +0x20
main.main.func1(0x0?)
    ~/go/src/github.com/mactsouk/mGo4th/ch08/addDone.go:26 +0x9c
created by main.main in goroutine 1
    ~/go/src/github.com/mactsouk/mGo4th/ch08/addDone.go:23 +0xec
exit status 2
The cause of the error message can be found in the output: panic: sync: negative WaitGroup counter.
Sometimes, addDone.go does not produce any error messages and terminates just fine—this mainly happens when the system is already busy. This is an issue with concurrent programs in general—they do not always crash or misbehave as the order of execution can change, which might change the behavior of the program. This makes the debugging of concurrent software even more difficult.
Running addDone.go with one command line argument produces the following error message:
$ go run addDone.go 1
Going to create 20 goroutines.
sync.WaitGroup{noCopy:sync.noCopy{}, state:atomic.Uint64{_:atomic.noCopy{}, _:atomic.align64{}, v:0x0}, sema:0x0}
sync.WaitGroup{noCopy:sync.noCopy{}, state:atomic.Uint64{_:atomic.noCopy{}, _:atomic.align64{}, v:0x1500000000}, sema:0x0}
19 1 2 11 12 13 14 15 16 17 18 6 3 4 5 8 7 9 0 10 fatal error: all goroutines are asleep - deadlock!
goroutine 1 [semacquire]:
sync.runtime_Semacquire(0x0?)
    /opt/homebrew/Cellar/go/1.21.0/libexec/src/runtime/sema.go:62 +0x2c
sync.(*WaitGroup).Wait(0x14000128030)
    /opt/homebrew/Cellar/go/1.21.0/libexec/src/sync/waitgroup.go:116 +0x78
main.main()
    ~/go/src/github.com/mactsouk/mGo4th/code/ch08/addDone.go:38 +0x230
exit status 2
Once again, the reason for the crash is printed on the screen: fatal error: all goroutines are asleep - deadlock!. This means that the program should wait indefinitely for a goroutine to finish—that is, for a Done() call that is never going to happen.
Creating multiple files with goroutines
As a practical example of the use of goroutines, this subsection presents a command line utility that creates multiple files populated with randomly generated data—such files can be used for testing file systems or generating data for testing. The crucial code of randomFiles.go is the following:
var waitGroup sync.WaitGroup
for i := start; i <= end; i++ {
    waitGroup.Add(1)

    go func(n int) {
        filepath := filepath.Join(path, fmt.Sprintf("%s%d", filename, n))
        defer waitGroup.Done()
        createFile(filepath)
    }(i)
}
waitGroup.Wait()
We first create a sync.WaitGroup variable in order to wait for all goroutines to finish in the right way. Each file is created by a single goroutine only. What is important here is that each file has a unique filename—this is implemented with the filepath variable that contains the value of the for loop counter. Multiple createFile() functions executed as goroutines create the files. This is a simple yet very efficient way of creating multiple files. Running randomFiles.go generates the following output:
$ go run randomFiles.go
Usage: randomFiles firstInt lastInt filename directory
So, the utility requires four parameters, which are the first and last values of the for loop as well as the filename and the directory in which the files are going to be written. So, let us run the utility with the correct number of parameters:
$ go run randomFiles.go 3 5 masterGo /tmp
/tmp/masterGo3 created!
/tmp/masterGo5 created!
/tmp/masterGo4 created!
Everything looks fine, and four files have been created according to our instructions! Now that we know about goroutines, let us continue with channels.
Channels
A channel is a communication mechanism that, among other things, allows goroutines to exchange data. Firstly, each channel allows the exchange of a particular data type, which is also called the element type of the channel, and secondly, for a channel to operate properly, you need someone to receive what is sent via the channel. You should declare a new channel using make() and the chan keyword (make(chan int)), and you can close a channel using the close() function. You can declare the size of a channel by writing something similar to make(chan int, 1). This statement creates a buffered channel that has a different use—buffered channels are explained later in this chapter.
Just because we can use channels, it does not mean that we should. If a simpler solution exists that allows goroutines to get executed and save the generated information, we should also consider that. The purpose of every developer should be to create a simple design, not to use all the features of a programming language.
A pipeline is a virtual method for connecting goroutines and channels so that the output of one goroutine becomes the input of another goroutine using channels to transfer your data. One of the benefits that you get from using pipelines is that there is a constant data flow in your program, as no goroutine or channel has to wait for everything to be completed in order to start their execution. Additionally, you use fewer variables and, therefore, less memory space because you do not have to save everything as a variable. Finally, the use of pipelines simplifies the design of the program and improves its maintainability.
Writing to and reading from a channel
Writing a value (val) to a channel (ch) is as easy as writing ch <- val. The arrow shows the direction of the value, and you will have no problem with this statement as long as both var and ch are of the same data type.
You can read a single value from a channel named c by executing <-c. In this case, the direction is from the channel to the outer world. You can save that value into a new variable using aVar := <-c.
Both channel reading and writing are illustrated in channels.go, which comes with the following code:
package main
import (
    "fmt"
    "sync"
)
func writeToChannel(c chan int, x int) {
    c <- x
    close(c)
}
This function just writes a value to the channel and immediately closes it.
func printer(ch chan bool) {
    ch <- true
}
This function just sends the true value to a bool channel.
func main() {
    c := make(chan int, 1)
This channel is buffered with a size of 1. This means that as soon as we fill that buffer, we can close the channel and the goroutine is going to continue its execution and return. A channel that is unbuffered has a different behavior: when you try to send a value to that channel, it blocks forever because it is waiting for someone to fetch that value. In this case, we definitely want a buffered channel in order to avoid any blocking.
    var waitGroup sync.WaitGroup
    waitGroup.Add(1)
    go func(c chan int) {
        defer waitGroup.Done()
        writeToChannel(c, 10)
        fmt.Println("Exit.")
    }(c)
    fmt.Println("Read:", <-c)
Here, we read from the channel and print the value without storing it in a separate variable.
    _, ok := <-c
    if ok {
        fmt.Println("Channel is open!")
    } else {
        fmt.Println("Channel is closed!")
    }
The previous code shows a technique for determining whether a channel is closed or not. In this case, we are ignoring the read value—if the channel was open, then the read value would be discarded.
    waitGroup.Wait()
    var ch chan bool = make(chan bool)
    for i := 0; i < 5; i++ {
        go printer(ch)
    }
Here, we make an unbuffered channel and create five goroutines without any synchronization as we do not use any Add() calls.
    // Range on channels
    // IMPORTANT: As the channel ch is not closed,
    // the range loop does not exit on its own.
    n := 0
    for i := range ch {
The range keyword works with channels! However, a range loop on a channel only exits when the channel is closed or uses the break keyword.
        fmt.Println(i)
        if i == true {
            n++
        }
        if n > 2 {
            fmt.Println("n:", n)
            close(ch)
            break
        }
    }
We close the ch channel when a condition is met and exit the for loop using break. Note that it is never a good idea to close a channel on the receiving end—this is presented here for the sake of the example. You are going to see the consequences of this decision in a while.
    for i := 0; i < 5; i++ {
        fmt.Println(<-ch)
    }
}
When trying to read from a closed channel, we get the zero value of its data type, so this for loop works just fine and does not cause any issues.
Running channels.go generates the following output:
Exit.
Read: 10
After writing the value 10 to the channel using writeToChannel(c, 10), we read that value back.
Channel is closed!
true
true
true
The for loop with the range exits after three iterations—each iteration prints true on screen.
n: 3
false
false
false
false
false
These five false values are printed by the last for loop of the program.
Although everything looks fine with channels.go, there is a logical issue with it, which we will explain and resolve in the Race conditions are bad section. Additionally, if we run channels.go multiple times, it might crash. However, most of the time, it does not, which makes debugging even more challenging.
Receiving from a closed channel
Reading from a closed channel returns the zero value of its data type. However, if you try to write to a closed channel, your program is going to crash in a bad way (panic). These two situations are explored in readCloseCh.go and, more specifically, in the implementation of the main() function:
func main() {
    willClose := make(chan complex64, 10)
If you make that an unbuffered channel, the program is going to crash.
    // Write some data to the channel
    willClose <- -1
    willClose <- 1i
We write two values to the willClose channel.
    // Read data and empty channel
    <-willClose
    <-willClose
    close(willClose)
Then, we read and discard these two values and we close the channel.
    // Read again - this is a closed channel
    read := <-willClose
    fmt.Println(read)
}
The last value that we read from the channel is the zero value of a complex64 data type. Running readCloseCh.go generates the following output:
(0+0i)So, we got back the zero value of the complex64 data type. Now let us continue and discuss how to work with functions that accept channels as parameters.
Channels as function parameters
When using a channel as a function parameter, you can specify its direction—that is, whether it is going to be used for sending or receiving data only. In my opinion, if you know the purpose of a channel in advance, you should use this capability because it makes your programs more robust. You will not be able to send data accidentally to a channel from which you should only receive data, or receive data from a channel to which you should only be sending data.
If you declare that a channel function parameter is going to be used for reading only and you try to write to it, you are going to get a compile error message that will most likely save you from nasty bugs in the future. This is the major benefit of this approach!
All these are illustrated in channelFunc.go—the implementation of the functions that accept channel parameters are the following:
func printer(ch chan<- bool) {
    ch <- true
}
The above function accepts a channel parameter that is available for writing only.
func writeToChannel(c chan<- int, x int) {
    fmt.Println("1", x)
    c <- x
    fmt.Println("2", x)
}
The channel parameter of the above function is available for reading only.
func f2(out <-chan int, in chan<- int) {
    x := <-out
    fmt.Println("Read (f2):", x)
    in <- x
    return
}
The last function accepts two channel parameters. However, out is available for reading, whereas in is offered for writing. If you try to perform an operation on a channel parameter that is not allowed, the Go compiler is going to complain. This happens even if the function is not being used.
The subject of the next section is race conditions—read it carefully in order to avoid undefined behaviors and unpleasant situations when working with multiple goroutines.
Race conditions are bad
A data race condition is a situation where two or more running elements, such as threads and goroutines, try to take control of or modify a shared resource or shared variable of a program. Strictly speaking, a data race occurs when two or more instructions access the same memory address, where at least one of them performs a write (change) operation. If all operations are read operations, then there is no race condition. In practice, this means that you might get different output if you run your program multiple times, and that is a bad thing.
Using the -race flag when running or building Go source files executes the Go race detector, which makes the compiler create a modified version of a typical executable file. This modified version can record all accesses to shared variables as well as all synchronization events that take place, including calls to sync.Mutex and sync.WaitGroup, which are presented later on in this chapter. After analyzing the relevant events, the race detector prints a report that can help you identify potential problems so that you can correct them.
The Go race detector
You can run the race detector tool with go run -race. If we test channels.go using go run -race, we are going to get the following output:
$ go run -race channels.go
Exit.
Read: 10
Channel is closed!
true
true
true
n: 3
==================
WARNING: DATA RACE
Write at 0x00c000094010 by main goroutine:
  runtime.recvDirect()
      /opt/homebrew/Cellar/go/1.21.0/libexec/src/runtime/chan.go:348 +0x7c
  main.main()
      ~/go/src/github.com/mactsouk/mGo4th/ch08/channels.go:54 +0x444
Previous read at 0x00c000094010 by goroutine 10:
  runtime.chansend1()
      /opt/homebrew/Cellar/go/1.21.0/libexec/src/runtime/chan.go:146 +0x2c
  main.printer()
      ~/go/src/github.com/mactsouk/mGo4th/ch08/channels.go:14 +0x34
  main.main.func3()
      ~/go/src/github.com/mactsouk/mGo4th/ch08/channels.go:40 +0x34
Goroutine 10 (running) created at:
  main.main()
      ~/go/src/github.com/mactsouk/mGo4th/ch08/channels.go:40 +0x2b8
==================
false
false
false
false
false
panic: send on closed channel
goroutine 36 [running]:
main.printer(0x0?)
    ~/go/src/github.com/mactsouk/mGo4th/ch08/channels.go:14 +0x38
created by main.main in goroutine 1
    ~/go/src/github.com/mactsouk/mGo4th/ch08/channels.go:40 +0x2bc
exit status 2
Therefore, although channels.go looks fine at first, there is a race condition waiting to happen. Let us now discuss where the problem with channels.go lies based on the previous output. There is a closing of a channel at channels.go on line 54, and there is a write to the same channel on line 14 that looks to be the root of the race condition situation.
Line 54 is close(ch), whereas line 14 is ch <- true. The issue is that we cannot be sure about what is going to happen and in which order—this is the race condition. If you execute channels.go without the race detector, it might work, but if you try it multiple times, you might get a panic: send on closed channel error message—this mainly has to do with the order in which the Go scheduler is going to run the goroutines of the program. So, if the closing of the channel happens first, then writing to that channel is going to fail—race condition!
Fixing channels.go requires changing the code and, more specifically, the implementation of the printer() function. The corrected version of channels.go is named chRace.go and comes with the following code:
func printer(ch chan<- bool, times int) {
    for i := 0; i < times; i++ {
        ch <- true
    }
    close(ch)
}
func main() {
    // This is an unbuffered channel
    var ch chan bool = make(chan bool)
    // Write 5 values to channel with a single goroutine
    go printer(ch, 5)
    // IMPORTANT: As the channel ch is closed,
    // the range loop is going to exit on its own.
    for val := range ch {
        fmt.Print(val, " ")
    }
    fmt.Println()
    for i := 0; i < 15; i++ {
        fmt.Print(<-ch, " ")
    }
    fmt.Println()
}
The first thing to notice is that instead of using multiple goroutines for writing to the desired channel, we use a single goroutine. A single goroutine writing to a channel followed by the closing of that channel cannot create any race conditions because things happen sequentially.
Running go run -race chRace.go produces the following output, which means that there is no longer a race condition:
true true true true true
false false false false false false false false false false false false false false false
The next section is about the important and powerful select keyword.
The select keyword
The select keyword is really important because it allows you to listen to multiple channels at the same time. A select block can have multiple cases and an optional default case, which mimics the switch statement. It is good for select blocks to have a timeout option just in case. Lastly, a select without any cases (select{}) waits forever.
In practice, this means that select allows a goroutine to wait on multiple communication operations. So, select gives you the power to listen to multiple channels using a single select block. Consequently, you can have non-blocking operations on channels, provided that you have implemented your select blocks appropriately.
A select statement is not evaluated sequentially, as all of its channels are examined simultaneously. If none of the channels in a select statement are ready, the select statement blocks (waits) until one of the channels is ready. If multiple channels of a select statement are ready, then the Go runtime makes a random selection from the set of these ready channels.
The code in select.go presents a simple use of select running in a goroutine that has three cases. But first, let us see how the goroutine that contains select is executed:
    wg.Add(1)
    go func() {
        gen(0, 2*n, createNumber, end)
        wg.Done()
    }()
The previous code tells us that for wg.Done() to get executed, gen() should return first. So, let us see the implementation of gen():
func gen(min, max int, createNumber chan int, end chan bool) {
    time.Sleep(time.Second)
    for {
        select {
        case createNumber <- rand.Intn(max-min) + min:
        case <-end:
            fmt.Println("Ended!")
            // return
The right thing to do here is to add the return statement for gen() to finish. Let us imagine that you have forgotten to add the return statement. This means that the function is not going to finish after the select branch associated with the end channel parameter is executed—createNumber is not going to end the function as it has no return statement. Therefore, the select block keeps waiting for more. The solution can be found in the code that follows:
        case <-time.After(4 * time.Second):
            fmt.Println("time.After()!")
            return
        }
    }
}
So, what is really happening in the code of the entire select block? This particular select statement has three cases. As stated earlier, select does not require a default branch. You can consider the third branch of the select statement as a clever default branch. This happens because time.After() waits for the specified duration (4 * time.Second) to elapse and then prints a message and properly ends gen() with return. This unblocks the select statement in case all of the other channels are blocked for some reason. Although omitting return from the second branch is a bug, this shows that having an exit strategy is always a good thing.
Running select.go produces the following output:
$ go run select.go 10
Going to create 10 random numbers.
13 0 2 8 12 4 13 15 14 19 Ended!
time.After()!
Exiting...
We are going to see select in action in the remainder of the chapter, starting from the next section, which discusses how to time out goroutines. What you should remember is that select allows us to listen to multiple channels from a single point.
Timing out a goroutine
There are times when goroutines take more time than expected to finish—in such situations, we want to time out the goroutines so that we can unblock the program. This section presents two such techniques.
Timing out a goroutine inside main()
This subsection presents a simple technique for timing out a goroutine. The relevant code can be found in the main() function of timeOut1.go:
func main() {
    c1 := make(chan string)
    go func() {
        time.Sleep(3 * time.Second)
        c1 <- "c1 OK"
    }()
The time.Sleep() call is used for emulating the time it normally takes for a function to finish its operation. In this case, the anonymous function that is executed as a goroutine takes about three seconds before writing a message to the c1 channel.
    select {
    case res := <-c1:
        fmt.Println(res)
    case <-time.After(time.Second):
        fmt.Println("timeout c1")
    }
The purpose of the time.After() call is to wait for the desired time before being executed—if another branch is executed, the waiting time resets. In this case, we are not interested in the actual value returned by time.After() but in the fact that the time.After() branch was executed, which means that the waiting time has passed. In this case, as the value passed to the time.After() function is smaller than the value used in the time.Sleep() call that was executed previously, you will most likely get a timeout message. The reason for saying “most likely” is that Linux is not a real-time OS and, sometimes, the OS scheduler plays strange games, especially when it has to deal with a high load and has to schedule lots of tasks—this means that you should not make any assumptions about the operation of the OS scheduler.
    c2 := make(chan string)
    go func() {
        time.Sleep(3 * time.Second)
        c2 <- "c2 OK"
    }()
    select {
    case res := <-c2:
        fmt.Println(res)
    case <-time.After(4 * time.Second):
        fmt.Println("timeout c2")
    }
}
The preceding code executes a goroutine that takes about three seconds to execute because of the time.Sleep() call and defines a timeout period of four seconds in select using time.After(4 * time.Second). If the time.After(4 * time.Second) call returns after you get a value from the c2 channel found in the first case of the select block, then there will be no timeout; otherwise, you will get a timeout. However, in this case, the value of the time.After() call provides enough time for the time.Sleep() call to return, so you will most likely not get a timeout message here.
Let us now verify our thoughts. Running timeOut1.go produces the following output:
$ go run timeOut1.go
timeout c1
c2 OK
As expected, the first goroutine timed out, whereas the second one did not. The subsection that follows presents another timeout technique.
Timing out a goroutine outside main()
This subsection illustrates another technique for timing out goroutines. The select statement can be found in a separate function. Additionally, the timeout period is given as a command line argument.
The interesting part of timeOut2.go is the implementation of timeout():
func timeout(t time.Duration) {
    temp := make(chan int)
    go func() {
        time.Sleep(5 * time.Second)
        defer close(temp)
    }()
    select {
    case <-temp:
        result <- false
    case <-time.After(t):
        result <- true
    }
}
In timeout(), the time duration that is used in the time.After() call is a function parameter, which means that it can vary. Once again, the select block supports the logic of the timeout. Any timeout period longer than 5 seconds will most likely give the goroutine enough time to finish. If timeout() writes false to the result channel, then there is no timeout, whereas if it writes true, there is a timeout. Running timeOut2.go produces the following output:
$ go run timeOut2.go 100
Timeout period is 100ms
Time out!
The timeout period is 100 milliseconds, which means that the goroutine did not have enough time to finish, hence the timeout message.
$ go run timeOut2.go 5500
Timeout period is 5.5s
OK
This time, the timeout is 5,500 milliseconds, which means that the goroutine had enough time to finish.
The next section revisits and presents advanced concepts related to channels.
Go channels revisited
So far, we have seen the basic usages of channels—this section presents the definition and the usage of nil channels, signal channels, and buffered channels.
Although channels seem like an interesting concept, they are not the answer to every concurrency problem as there exist times when they can be replaced by mutexes and shared memory. So, do not force the use of channels.
It helps to remember that the zero value of the channel type is nil, and if you send a message to a closed channel, the program panics. However, if you try to read from a closed channel, you get the zero value of the type of that channel. So, after closing a channel, you can no longer write to it but you can still read from it. To be able to close a channel, the channel must not be receive-only.
Additionally, a nil channel always blocks, which means that both reading and writing from nil channels block. This property of channels can be very useful when you want to disable a branch of a select statement by assigning the nil value to a channel variable. Finally, if you try to close a nil channel, your program is going to panic. This is best illustrated in the closeNil.go program:
package main
func main() {
    var c chan string
The previous statement defines a nil channel named c of the type string.
    close(c)
}
Running closeNil.go generates the following output:
panic: close of nil channel
goroutine 1 [running]:
main.main()
    ~/go/src/github.com/mactsouk/mGo4th/ch08/closeNil.go:5 +0x20
exit status 2
The previous output shows the message you are going to get if you try to close a nil channel. Let us now discuss buffered channels.
Buffered channels
Unlike unbuffered channels, which have a capacity of 0 and require a sender to have a corresponding receiver ready at the other end, buffered channels allow a certain number of values to be sent into the channel before a receiver is needed.
These channels allow us to put jobs in a queue quickly to be able to deal with more requests and process requests later on. Moreover, you can use buffered channels as semaphores to limit the throughput of your application.
The presented technique works as follows: all incoming requests are forwarded to a channel, which processes them one by one. When the channel is done processing a request, it sends a message to the original caller saying that it is ready to process a new one. So, the capacity of the buffer of the channel restricts the number of simultaneous requests that it can keep. Bear in mind that it is not the channel that processes the requests or sends the messages.
Also, bear in mind that a buffered channel keeps accepting data until it blocks due to its limited capacity. However, in the presented example, the implementation is what cancels remaining requests after the channel buffer is full due to the select statement, not the channel itself. The source file that implements the technique is named bufChannel.go and contains the following code:
package main
import (
    "fmt"
)
func main() {
    numbers := make(chan int, 5)
The numbers channel can store up to five integers because it is a buffer channel with a capacity of 5.
    counter := 10
    for i := 0; i < counter; i++ {
        select {
        // This is where the processing takes place
        case numbers <- i * i:
            fmt.Println("About to process", i)
        default:
            fmt.Print("No space for ", i, " ")
        }
We begin putting data into numbers—however, when the channel is full, it is not going to store more data and the default branch is going to be executed. This is not because of the way channels work but because of the specific implementation with select.
    }
    fmt.Println()
    for {
        select {
        case num := <-numbers:
            fmt.Print("*", num, " ")
        default:
            fmt.Println("Nothing left to read!")
            return
        }
    }
}
Similarly, we try to read data from numbers using a for loop. When all data from the channel is read, the default branch is going to be executed and will terminate the program with its return statement—when main() returns, the entire program will be terminated.
Running bufChannel.go produces the following output:
$ go run bufChannel.go
About to process 0
. . .
About to process 4
No space for 5 No space for 6 No space for 7 No space for 8 No space for 9
*0 *1 *4 *9 *16 Nothing left to read!
Let us now discuss nil channels.
nil channels
nil channels always block! Therefore, you should use them when you want that behavior on purpose! The code that follows illustrates nil channels:
package main
import (
    "fmt"
    "math/rand"
    "sync"
    "time"
)
var wg sync.WaitGroup
We are making wg a global variable in order to be available from anywhere in the code and avoid passing it to every function that needs it as a parameter. This is not idiomatic Go and some people might dislike that approach, despite its simpler implementation. An alternative would be to declare wg in main() and pass a pointer to each function that needs it—you can implement that as an exercise.
func add(c chan int) {
    sum := 0
    t := time.NewTimer(time.Second)
    for {
        select {
        case input := <-c:
            sum = sum + input
        case <-t.C:
            c = nil
            fmt.Println(sum)
            wg.Done()
        }
    }
}
The send() function keeps sending random numbers to channel c. Do not confuse channel c, which is a (channel) function parameter, with channel t.C, which is part of timer t—you can change the name of the c variable but not the name of the C field of a timer. When the time of timer t expires, the timer sends a value to the t.C channel.
This triggers the execution of the relevant branch of the select statement, which assigns the value nil to channel c and prints the value of the sum variable, and wg.Done() is executed, which is going to unblock wg.Wait() found in the main() function. Additionally, as c becomes nil, it stops/blocks send() from sending more data to it.
func send(c chan int) {
    for {
        c <- rand.Intn(10)
    }
}
func main() {
    c := make(chan int)
    rand.Seed(time.Now().Unix())
    wg.Add(1)
    go add(c)
    go send(c)
    wg.Wait()
}
Running nilChannel.go produces the following output:
$ go run nilChannel.go
11168960
Since the number of times that the first branch of the select statement in add() is going to be executed is not fixed, you get different results each time you execute nilChannel.go.
The next subsection discusses worker pools.
Worker pools
A worker pool is a set of threads that process jobs assigned to them. The Apache web server and the net/http package of Go more or less work this way: the main process accepts all incoming requests, which are forwarded to worker processes to get served. Once a worker process has finished its job, it is ready to serve a new client.
As Go does not have threads, the presented implementation is going to use goroutines instead of threads. Additionally, threads do not usually die after serving a request because the cost of ending a thread and creating a new one is too high, whereas goroutines do die after finishing their job. Worker pools in Go are implemented with the help of buffered channels, as they allow you to limit the number of goroutines running at the same time.
The presented utility implements a simple task: it processes integers and prints their square values using a single goroutine for serving each request. The code of wPools.go is as follows:
package main
import (
    "fmt"
    "os"
    "runtime"
    "strconv"
    "sync"
    "time"
)
type Client struct {
    id      int
    integer int
}
The Client structure is used for keeping track of the requests that the program is going to process.
type Result struct {
    job    Client
    square int
}
The Result structure is used for keeping the data of each Client as well as the results generated by the client. Put simply, the Client structure holds the input data of each request, whereas Result holds the results of a request—if you want to process more complex data, you should modify these structures.
var size = runtime.GOMAXPROCS(0)
var clients = make(chan Client, size)
var data = make(chan Result, size)
The clients and data buffered channels are used to get new client requests and write the results, respectively. If you want your program to run faster, you can increase the value of size.
func worker(wg *sync.WaitGroup) {
    for c := range clients {
        square := c.integer * c.integer
        output := Result{c, square}
        data <- output
        time.Sleep(time.Second)
    }
    wg.Done()
}
The worker() function processes requests by reading the clients channel. Once the processing is complete, the result is written to the data channel. The delay that is introduced with time.Sleep() is not necessary but it gives you a better sense of the way that the generated output is printed.
func create(n int) {
    for i := 0; i < n; i++ {
        c := Client{i, i}
        clients <- c
    }
    close(clients)
}
The purpose of the create() function is to create all requests properly and then send them to the clients buffered channel for processing. Note that the clients channel is read by worker().
func main() {
    if len(os.Args) != 3 {
        fmt.Println("Need #jobs and #workers!")
        return
    }
    nJobs, err := strconv.Atoi(os.Args[1])
    if err != nil {
        fmt.Println(err)
        return
    }
    nWorkers, err := strconv.Atoi(os.Args[2])
    if err != nil {
        fmt.Println(err)
        return
    }
In the preceding code, you read the command line parameters that define the number of jobs and workers. If the number of jobs is greater than the number of workers, the jobs are served in smaller chunks.
go create(nJobs)The create() call mimics the client requests that you are going to process.
finished := make(chan interface{})The finished channel is used for blocking the program and, therefore, needs no particular data type.
    go func() {
        for d := range data {
            fmt.Printf("Client ID: %d\tint: ", d.job.id)
            fmt.Printf("%d\tsquare: %d\n", d.job.integer, d.square)
        }
        finished <- true
The finished <- true statement is used for unblocking the program as soon as the for range loop ends. The for range loop ends when the data channel is closed, which happens after wg.Wait(), which means after all workers have finished.
    }()
    var wg sync.WaitGroup
    for i := 0; i < nWorkers; i++ {
        wg.Add(1)
        go worker(&wg)
    }
    wg.Wait()
    close(data)
The purpose of the previous for loop is to generate the required number of worker() goroutines to process all requests.
    fmt.Printf("Finished: %v\n", <-finished)
}
The <-finished statement in fmt.Printf() blocks until the finished channel is closed.
Running wPools.go creates the following kind of output:
$ go run wPools.go 8 5
Client ID: 0    int: 0    square: 0
Client ID: 1    int: 1    square: 1
Client ID: 2    int: 2    square: 4
Client ID: 3    int: 3    square: 9
Client ID: 4    int: 4    square: 16
Client ID: 5    int: 5    square: 25
Client ID: 6    int: 6    square: 36
Finished: true
The previous output shows that all requests were processed. This technique allows you to serve a given number of requests, which saves you from server overload. The price you pay for that is having to write more code.
The next subsection introduces signal channels and shows a technique for using them to define the order of execution for a small number of goroutines.
Signal channels
A signal channel is one that is used just for signaling. Put simply, you can use a signal channel when you want to inform another goroutine about something. Signal channels should not be used for data transferring. You are going to see signal channels in action in the next subsection where we specify the order of execution of goroutines.
Specifying the order of execution for your goroutines
This subsection presents a technique for specifying the order of execution of goroutines using signal channels. However, keep in mind that this technique works best when you are dealing with a small number of goroutines. The presented code example has four goroutines that we want to execute in the desired order—first, the goroutine for function A(), then function B(), then C(), and finally, D().
The code of defineOrder.go without the package statement and import block is the following:
var wg sync.WaitGroup
func A(a, b chan struct{}) {
    <-a
    fmt.Println("A()!")
    time.Sleep(time.Second)
    close(b)
}
Function A() is going to be blocked until channel a, which is passed as a parameter, is closed. Just before it ends, it closes channel b, which is passed as a parameter. This is going to unblock the next goroutine, which is going to be function B().
func B(a, b chan struct{}) {
    <-a
    fmt.Println("B()!")
    time.Sleep(3 * time.Second)
    close(b)
}
Similarly, function B() is going to be blocked until channel a, which is passed as a parameter, is closed. Just before B() ends, it closes channel b, which is passed as a parameter. As before, this is going to unblock the following function:
func C(a, b chan struct{}) {
    <-a
    fmt.Println("C()!")
    close(b)
}
As it happened with functions A() and B(), the execution of function C() is blocked by channel a. Just before it ends, it closes channel b.
func D(a chan struct{}) {
    <-a
    fmt.Println("D()!")
    wg.Done()
}
This is the last function that is going to be executed. Therefore, although it is blocked, it does not close any channels before exiting. Additionally, being the last function means that it can be executed more than once, which is not true for functions A(), B(), and C() because a channel can be closed only once.
func main() {
    x := make(chan struct{})
    y := make(chan struct{})
    z := make(chan struct{})
    w := make(chan struct{})
We need to have as many channels as the number of functions we want to execute as goroutines.
    wg.Add(1)
    go func() {
        D(w)
    }()
This proves that the order of execution dictated by the Go code does not matter as D() is going to be executed last.
    wg.Add(1)
    go func() {
        D(w)
    }()
    go A(x, y)
    wg.Add(1)
    go func() {
        D(w)
    }()
    go C(z, w)
    go B(y, z)
Although we run C() before B(), C() is going to finish after B() has finished.
    wg.Add(1)
    go func() {
        D(w)
    }()
    // This triggers the process
    close(x)
The closing of the first channel is what triggers the execution of the goroutines because this unblocks A().
    wg.Wait()
}
Running defineOrder.go produces the following output:
$ go run defineOrder.go
A()!
B()!
C()!
D()! D()! D()! D()!
So, the four functions, which are executed as goroutines, are executed in the desired order, and, in the case of the last function, the desired number of times.
Handling UNIX signals
UNIX signals offer a very handy way of interacting asynchronously with applications and server processes. UNIX signal handling in Go requires the use of channels that are used exclusively for this task. The presented program handles SIGINT (which is called syscall.SIGINT in Go) and SIGINFO separately and uses a default case in a switch block for handling the remaining signals. The implementation of that switch block allows you to differentiate between the various signals according to your needs.
There exists a dedicated channel that receives all signals, as defined by the signal.Notify() function. Go channels can have a capacity—the capacity of this particular channel is 1 in order to be able to receive and keep one signal at a time. This makes perfect sense as a signal can terminate a program and there is no need to try to handle another signal at the same time. There is usually an anonymous function that is executed as a goroutine and performs the signal handling and nothing else. The main task of that goroutine is to listen to the channel for data. Once a signal is received, it is sent to that channel, read by the goroutine, and stored into a variable—at this point, the channel can receive more signals. That variable is processed by a switch statement.
Some signals cannot be caught, and the operating system cannot ignore them. So, the SIGKILL and SIGSTOP signals cannot be blocked, caught, or ignored; the reason for this is that they allow privileged users as well as the UNIX kernel to terminate any process they desire.
Create a text file by typing the following code—a good filename for it would be signals.go.
package main
import (
    "fmt"
    "os"
    "os/signal"
    "syscall"
    "time"
)
func handleSignal(sig os.Signal) {
    fmt.Println("handleSignal() Caught:", sig)
}
handleSignal() is a separate function for handling signals. However, you can also handle signals inline, in the branches of a switch statement.
func main() {
    fmt.Printf("Process ID: %d\n", os.Getpid())
    sigs := make(chan os.Signal, 1)
We create a channel with data of the type os.Signal because all channels must have a type.
signal.Notify(sigs)The previous statement means handling all signals that can be handled.
    start := time.Now()
    go func() {
        for {
            sig := <-sigs
Wait until you read data (<-) from the sigs channel and store it in the sig variable.
switch sig {Depending on the read value, act accordingly. This is how you differentiate between signals.
            case syscall.SIGINT:
                duration := time.Since(start)
                fmt.Println("Execution time:", duration)
For the handling of syscall.SIGINT, we calculate the time that has passed since the beginning of the program execution and print it on the screen.
            case syscall.SIGINFO:
                handleSignal(sig)
The code of the syscall.SIGINFO case calls the handleSignal() function—it is up to the developer to decide on the details of the implementation.
On Linux machines, you should replace syscall.SIGINFO with another signal such as syscall.SIGUSR1 or syscall.SIGUSR2 because syscall.SIGINFO is not available on Linux (https://github.com/golang/go/issues/1653).
                // do not use return here because the goroutine exits
                // but the time.Sleep() will continue to work!
                os.Exit(0)
            default:
                fmt.Println("Caught:", sig)
            }
If there is no match, the default case handles the rest of the values and just prints a message.
        }
    }()
    for {
        fmt.Print("+")
        time.Sleep(10 * time.Second)
    }
}
The endless for loop at the end of the main() function is for emulating the operation of a real program. Without an endless for loop, the program exits almost immediately.
Running signals.go and interacting with it creates the following kind of output:
$ go run signals.go
Process ID: 70153
+^CExecution time: 631.533125ms
+Caught: user defined signal 1
+Caught: urgent I/O condition
+signal: killed
The second line of output was generated by pressing Ctrl + C on the keyboard, which, on UNIX machines, sends the syscall.SIGINT signal to the program. The third line of output was caused by executing kill -USR1 74252 on a different terminal. The last line of the output was generated by the kill -9 74252 command. As the KILL signal (which is also represented by the number 9) cannot be handled, it terminates the program, and the shell prints the killed message.
Handling two signals
If you want to handle a limited number of signals instead of all of them, you should replace the signal.Notify(sigs) statement with a statement like the following:
signal.Notify(sigs, syscall.SIGINT, syscall.SIGINFO)After that, you need to make the appropriate changes to the code of the goroutine responsible for signal handling in order to identify and handle syscall.SIGINT and syscall.SIGINFO—the current version (signals.go) already handles both of them.
The next section talks about shared memory and shared variables, which is a very handy way of making goroutines communicate with each other with the use of channels.
Shared memory and shared variables
Shared memory and shared variables are huge topics in concurrent programming and the most common ways for UNIX threads to communicate with each other. The same principles apply to Go and goroutines, which is what this section is about. A mutex variable, which is the abbreviation for a mutual exclusion variable, is mainly used for thread synchronization and for protecting shared data when multiple writes or a write and a read can occur at the same time. A mutex works like a buffered channel with a capacity of one, which allows, at most, one goroutine to access a shared variable at any given time. This means that there is no way for two or more goroutines to be able to update that variable simultaneously. Go offers the sync.Mutex and sync.RWMutex data types.
A critical section of a concurrent program is the code that cannot be executed simultaneously by all processes, threads, or, in this case, goroutines. It is the code that needs to be protected by mutexes. Therefore, identifying the critical sections of your code makes the whole programming process so much simpler that you should pay particular attention to this task. A critical section cannot be embedded into another critical section when both critical sections use the same sync.Mutex or sync.RWMutex variable. However, avoid at almost any cost the spreading of mutexes across functions because that makes it really hard to see whether you are embedding or not.
The sync.Mutex type
The sync.Mutex type is the Go implementation of a mutex. Its definition, which can be found in the mutex.go file of the sync directory, is as follows (you do not need to know the definition of sync.Mutex in order to use it):
type Mutex struct {
    state int32
    sema  uint32
}
The definition of sync.Mutex is nothing special. All of the interesting work is done by the sync.Lock() and sync.Unlock() functions, which can lock and unlock a sync.Mutex variable, respectively. Locking a mutex means that nobody else can lock it until it has been released using the sync.Unlock() function. All these are illustrated in mutex.go, which contains the following code:
package main
import (
    "fmt"
    "os"
    "strconv"
    "sync"
    "time"
)
var m sync.Mutex
var v1 int
func change() {
    m.Lock()
    defer m.Unlock()
This function makes changes to the value of v1. The critical section begins here.
    time.Sleep(time.Second)
    v1 = v1 + 1
    if v1 == 10 {
        v1 = 0
        fmt.Print("* ")
    }
This is the end of the critical section. Now, another goroutine can lock the mutex.
}
func read() int {
    m.Lock()
    a := v1
    defer m.Unlock()
    return a
}
This function is used for reading the value of v1—therefore, it should use a mutex to make the process concurrently safe. Most specifically, we want to make sure that nobody is going to change the value of v1 while we are reading it. The rest of the program contains the implementation of the main() function—feel free to see the entire code of mutex.go in the GitHub repository of the book.
Running mutex.go produces the following output:
$ go run -race mutex.go 10
0 -> 1-> 2-> 3-> 4-> 5-> 6-> 7-> 8-> 9* -> 0-> 0
The previous output shows that due to the use of a mutex, goroutines cannot access shared data and, therefore, there are no hidden race conditions.
The next subsection shows what could happen if we forget to unlock a mutex.
What happens if you forget to unlock a mutex?
Forgetting to unlock a sync.Mutex mutex creates a panic situation, even in the simplest kind of a program. The same applies to the sync.RWMutex mutex, which is presented in the next section. Let us now see a code example to understand this unpleasant situation a lot better—this is part of forgetMutex.go:
var m sync.Mutex
var w sync.WaitGroup
func function() {
    m.Lock()
    fmt.Println("Locked!")
}
Here, we lock a mutex without releasing it afterward. This means that if we run function() as a goroutine more than once, all instances after the first one are going to be blocked waiting to Lock() the shared mutex. In our case, we run two goroutines—feel free to see the entire code of forgetMutex.go for more details. Running forgetMutex.go generates the following output:
Locked!
fatal error: all goroutines are asleep - deadlock!
goroutine 1 [semacquire]:
sync.runtime_Semacquire(0x140000021a0?)
    /opt/homebrew/Cellar/go/1.21.0/libexec/src/runtime/sema.go:62 +0x2c
sync.(*WaitGroup).Wait(0x100fa1710)
    /opt/homebrew/Cellar/go/1.21.0/libexec/src/sync/waitgroup.go:116 +0x74
main.main()
    ~/go/src/github.com/mactsouk/mGo4th/ch08/forgetMutex.go:29 +0x5c
goroutine 34 [sync.Mutex.Lock]:
sync.runtime_SemacquireMutex(0x0?, 0x0?, 0x0?)
    /opt/homebrew/Cellar/go/1.21.0/libexec/src/runtime/sema.go:77 +0x28
sync.(*Mutex).lockSlow(0x100fa1520)
    /opt/homebrew/Cellar/go/1.21.0/libexec/src/sync/mutex.go:171 +0x174
sync.(*Mutex).Lock(...)
    /opt/homebrew/Cellar/go/1.21.0/libexec/src/sync/mutex.go:90
main.function()
    ~/go/src/github.com/mactsouk/mGo4th/ch08/forgetMutex.go:12 +0x84
main.main.func1()
    ~/go/src/github.com/mactsouk/mGo4th/ch08/forgetMutex.go:20 +0x50
created by main.main in goroutine 1
    ~/go/src/github.com/mactsouk/mGo4th/ch08/forgetMutex.go:18 +0x34
exit status 2
As expected, the program crashes because of the deadlock. To avoid such situations, always remember to unlock any mutexes created in your program as soon as possible.
Let us now discuss sync.RWMutex, which is an improved version of sync.Mutex.
The sync.RWMutex type
The sync.RWMutex data type is an improved version of sync.Mutex and is defined in the rwmutex.go file of the sync directory of the Go Standard library as follows:
type RWMutex struct {
    w           Mutex
    writerSem   uint32
    readerSem   uint32
    readerCount int32
    readerWait  int32
}
In other words, sync.RWMutex is based on sync.Mutex with the necessary additions and improvements. So, you might ask, how does sync.RWMutex improve sync.Mutex? Although a single function is allowed to perform write operations with a sync.RWMutex mutex, you can have multiple readers owning a sync.RWMutex mutex—this means that read operations are usually faster with sync.RWMutex. However, there is one important detail that you should be aware of: until all of the readers of a sync.RWMutex mutex unlock it, you cannot lock it for writing, which is the small price you have to pay for the performance improvement you get for allowing multiple readers.
The functions that can help you work with sync.RWMutex are RLock() and RUnlock(), which are used for locking and unlocking the mutex for reading purposes, respectively. The Lock() and Unlock() functions used in sync.Mutex should still be used when you want to lock and unlock a sync.RWMutex mutex for writing purposes. Finally, it should be apparent that you should not make changes to any shared variables inside an RLock() and RUnlock() block of code.
All these are illustrated in rwMutex.go—the important code is the following:
var Password *secret
var wg sync.WaitGroup
type secret struct {
    RWM      sync.RWMutex
    password string
}
This is the shared variable of the program—you can share any type of variable you want.
func Change(pass string) {
    if Password == nil {
        fmt.Println("Password is nil!")
        return
    }
    fmt.Println("Change() function")
    Password.RWM.Lock()
This is the beginning of the critical section.
    fmt.Println("Change() Locked")
    time.Sleep(4 * time.Second)
    Password.password = pass
    Password.RWM.Unlock()
This is the end of the critical section.
    fmt.Println("Change() UnLocked")
}
The Change() function makes changes to the shared variable Password and, therefore, needs to use the Lock() function, which can be held by a single writer only.
func show () {
    defer wg.Done()
    defer Password.RWM.RUnlock()
    Password.RWM.RLock()
    fmt.Println("Show function locked!")
    time.Sleep(2 * time.Second)
    fmt.Println("Pass value:", Password.password)
}
The show() function reads the shared variable Password and therefore it is allowed to use the RLock() function, which can be held by multiple readers. Inside main(), three show() functions are executed as goroutines before a call to the Change() function, which also runs as a goroutine. The key point here is that no race conditions are going to happen. Running rwMutex.go produces the following output:
$ go run rwMutex.go
Change() function
The Change() function is executed but cannot acquire the mutex because it is already taken by one or more show() goroutines.
Show function locked!
Show function locked!
The previous output verifies that two show() goroutines have successfully taken the mutex for reading.
Change() functionHere, we can see a second Change() function running and waiting to get the mutex.
Pass value: myPass
Pass value: myPass
This is the output from the two show() goroutines.
Change() Locked
Change() UnLocked
Here we see that one Change() goroutine finishes its job.
Show function locked!
Pass value: 54321
After that another show() goroutine finishes.
Change() Locked
Change() UnLocked
Current password value: 123456
Lastly, the second Change() goroutine finishes. The last output line is for making sure that the password value has changed—please look at the full code of rwMutex.go for more details.
Bear in mind that the output you are going to get might be different due to the way the scheduler works. This is the nature of concurrent programming and these programs do not have any mechanism to ensure the show() function should be scheduled first.
The next subsection discusses the use of the atomic package for avoiding race conditions.
The atomic package
An atomic operation is an operation that is completed in a single step relative to other threads or, in this case, to other goroutines. This means that an atomic operation cannot be interrupted in the middle of it. The Go Standard library offers the atomic package, which, in some simple cases, can help you avoid using a mutex. With the atomic package, you can have atomic counters accessed by multiple goroutines without synchronization issues and without worrying about race conditions. However, mutexes are more versatile than atomic operations.
As illustrated in the code that follows, when using an atomic variable, all reading and writing operations of an atomic variable must be done using the functions provided by the atomic package in order to avoid race conditions.
The code in atomic.go is as follows, which is made smaller by hardcoding some values:
package main
import (
    "fmt"
    "sync"
    "sync/atomic"
)
type atomCounter struct {
    val int64
}
This is a structure for holding the desired int64 atomic variable.
func (c *atomCounter) Value() int64 {
    return atomic.LoadInt64(&c.val)
}
This is a helper function that returns the current value of an int64 atomic variable using atomic.LoadInt64().
func main() {
    X := 100
    Y := 4
    var waitGroup sync.WaitGroup
    counter := atomCounter{}
    for i := 0; i < X; i++ {
We are creating lots of goroutines that change the shared variable—as stated before, the use of the atomic package for working with the shared variable offers a simple way of avoiding race conditions when changing the value of the shared variable.
        waitGroup.Add(1)
        go func() {
            defer waitGroup.Done()
            for i := 0; i < Y; i++ {
                atomic.AddInt64(&counter.val, 1)
            }
The atomic.AddInt64() function changes the value of the val field of the counter structure variable in a safe way.
        }()
    }
    waitGroup.Wait()
    fmt.Println(counter.Value())
}
Running atomic.go while checking for race conditions produces the following kind of output:
$ go run -race atomic.go
400
So, the atomic variable is modified by multiple goroutines without any issues.
The next subsection shows how to share memory using goroutines.
Sharing memory using goroutines
This subsection illustrates how to share data using a dedicated goroutine. Although shared memory is the traditional way that threads communicate with each other, Go comes with built-in synchronization features that allow a single goroutine to own a shared piece of data. This means that other goroutines must send messages to this single goroutine that owns the shared data, which prevents the corruption of the data. Such a goroutine is called a monitor goroutine. In Go terminology, this is sharing by communicating instead of communicating by sharing.
Personally, I prefer to use a monitor goroutine instead of traditional shared memory techniques because the implementation with the monitor goroutine is safer, closer to the Go philosophy, and easier to understand.
The logic of the program can be found in the implementation of the monitor() function. More specifically, the select statement orchestrates the operation of the entire program. When you have a read request, the read() function attempts to read from the readValue channel, which is controlled by the monitor() function.
This returns the current value of the value variable. On the other hand, when you want to change the stored value, you call set(). This writes to the writeValue channel, which is also handled by the same select statement. As a result, no one can deal with the shared variable without using the monitor() function, which is in charge.
The code of monitor.go is as follows:
package main
import (
    "fmt"
    "math/rand"
    "os"
    "strconv"
    "sync"
    "time"
)
var readValue = make(chan int)
var writeValue = make(chan int)
func set(newValue int) {
    writeValue <- newValue
}
This function sends data to the writeValue channel.
func read() int {
    return <-readValue
}
When the read() function is called, it reads from the readValue channel—this reading happens inside the monitor() function.
func monitor() {
    var value int
    for {
        select {
        case newValue := <-writeValue:
            value = newValue
            fmt.Printf("%d ", value)
        case readValue <- value:
        }
    }
}
The monitor() function contains the logic of the program with the endless for loop and the select statement. The first case receives data from the writeValue channel, sets the value variable accordingly, and prints that new value. The second case sends the value of the value variable to the readValue channel. As all traffic goes through monitor() and its select block, there is no way to have a race condition because there is a single instance of monitor() running.
func main() {
    if len(os.Args) != 2 {
        fmt.Println("Please give an integer!")
        return
    }
    n, err := strconv.Atoi(os.Args[1])
    if err != nil {
        fmt.Println(err)
        return
    }
    fmt.Printf("Going to create %d random numbers.\n", n)
    rand.Seed(time.Now().Unix())
    go monitor()
It is important that the monitor() function is executed first because that is the goroutine that orchestrates the flow of the program.
    var wg sync.WaitGroup
    for r := 0; r < n; r++ {
        wg.Add(1)
        go func() {
            defer wg.Done()
            set(rand.Intn(10 * n))
        }()
    }
When the for loop ends, it means that we have created the desired number of random numbers.
    wg.Wait()
    fmt.Printf("\nLast value: %d\n", read())
}
Lastly, we wait for all set() goroutines to finish before printing the last random number.
Running monitor.go produces the following output:
$ go run monitor.go 10
Going to create 10 random numbers.
98 22 5 84 20 26 45 36 0 16
Last value: 16
So, 10 random numbers are created by 10 goroutines and all these goroutines send their output to the monitor() function, which is also executed as a goroutine. Apart from receiving the results, the monitor() function prints them on the screen, so all this output is generated by monitor().
The next section discusses the go statement in more detail.
Closured variables and the go statement
In this section, we are going to talk about closured variables, which are variables inside closures, and the go statement. Notice that closured variables in goroutines are evaluated when the goroutine actually runs and when the go statement is executed in order to create a new goroutine. This means that closured variables are going to be replaced by their values when the Go scheduler decides to execute the relevant code. This is illustrated in the main() function of goClosure.go:
func main() {
    for i := 0; i <= 20; i++ {
        go func() {
            fmt.Print(i, " ")
        }()
    }
    time.Sleep(time.Second)
    fmt.Println()
}
Running goClosure.go produces the following output:
$ go run goClosure.go
3 7 21 21 21 21 21 21 21 21 21 21 21 21 21 21 21 21 21 21 21
The program mostly prints the number 21, which is the last value of the variable of the for loop, and not the other numbers. As i is a closured variable, it is evaluated at the time of execution. As the goroutines begin but wait for the Go scheduler to allow them to get executed, the for loop ends, so the value of i that is being used is 21. Lastly, the same issue also applies to Go channels, so be careful.
Running goClosure.go with the Go race detector reveals the issue:
$ go run -race goClosure.go
5 4 5 5 ==================
WARNING: DATA RACE
Read at 0x00c00011e028 by goroutine 6:
  main.main.func1()
      ~/go/src/github.com/mactsouk/mGo4th/ch08/goClosure.go:11 +0x34
Previous write at 0x00c00011e028 by main goroutine:
  main.main()
      ~/go/src/github.com/mactsouk/mGo4th/ch08/goClosure.go:9 +0x5c
Goroutine 6 (running) created at:
  main.main()
      ~/go/src/github.com/mactsouk/mGo4th/ch08/goClosure.go:10 +0x44
==================
8 8 6 10 12 11 15 15 15 18 20 20 21 15 21 21 21
Found 1 data race(s)
exit status 66
Now, let us correct goClosure.go and present it to you—the new name is goClosureCorrect.go and its main() function is as follows:
func main() {
    for i := 0; i <= 20; i++ {
        i := i
        go func() {
            fmt.Print(i, " ")
        }()
    }
This is one way of correcting the issue. The valid yet bizarre i := i statement creates a new instance of the variable for the goroutine that holds the correct value. Although this is a valid approach, this kind of variable shadowing is not considered a good practice.
Variable shadowing in Go occurs when a variable declared in a nested scope has the same name as a variable in an outer scope. While variable shadowing can be intentional and useful in certain situations, it can also lead to confusion and introduce subtle bugs. In practice, it is recommended to avoid unnecessary variable shadowing and choose meaningful variable names that minimize the likelihood of unintentional shadowing.
    time.Sleep(time.Second)
    fmt.Println()
    for i := 0; i <= 20; i++ {
        go func(x int) {
            fmt.Print(x, " ")
        }(i)
    }
This is a totally different way of correcting the race condition: pass the current value of i to the anonymous function as a parameter and everything is OK. As explained in Chapter 15, Changes in Recent Go Versions, this issue does not exist in Go 1.22.
    time.Sleep(time.Second)
    fmt.Println()
}
Testing goClosureCorrect.go with the race detector generates the expected output:
$ go run -race goClosureCorrect.go
0 1 2 4 3 5 6 9 8 7 10 11 13 12 14 16 15 17 18 20 19
0 1 2 3 4 5 6 7 8 10 9 12 13 11 14 15 16 17 18 19 20
The next section presents the functionality of the context package.
The context package
The main purpose of the context package is to define the Context type and support cancellation. Yes, you heard that right; there are times when, for some reason, you want to abandon what you are doing. However, it would be very helpful to be able to include some extra information about your cancellation decisions. The context package allows you to do exactly that.
If you take a look at the source code of the context package, you will realize that its implementation is pretty simple—even the implementation of the Context type is pretty simple, yet the context package is very important.
The Context type is an interface with four methods: Deadline(), Done(), Err(), and Value(). The good news is that you do not need to implement all of these functions of the Context interface—you just need to modify a Context variable using methods such as context.WithCancel(), context.WithDeadline(), and context.WithTimeout().
All three of these methods return a derived Context (the child) and a CancelFunc() function. Calling the CancelFunc() function removes the parent’s reference to the child and stops any associated timers. As a side effect, this means that the Go garbage collector is free to garbage collect the child goroutines that no longer have associated parent goroutines. For garbage collection to work correctly, the parent goroutine needs to keep a reference to each child goroutine. If a child goroutine ends without the parent knowing about it, then a memory leak occurs until the parent is canceled as well.
The example that follows showcases the use of the context package. The program contains four functions, including the main() function. Functions f1(), f2(), and f3() each require just one parameter (which is a time delay) because everything else they need is defined inside their function body. In this example, we use context.Background() to initialize an empty Context. The other function that can create an empty Context is context.TODO(), which is presented later on in this chapter.
package main
import (
    "context"
    "fmt"
    "os"
    "strconv"
    "time"
)
func f1(t int) {
    c1 := context.Background()
    c1, cancel := context.WithCancel(c1)
    defer cancel()
The WithCancel() method returns a copy of the parent context with a new Done channel. Notice that the cancel variable, which is a function, is one of the return values of context.CancelFunc(). The context.WithCancel() function uses an existing Context and creates a child with cancellation. The context.WithCancel() function also returns a Done channel that can be closed, either when the cancel() function is called, as shown in the preceding code, or when the Done channel of the parent context is closed.
    go func() {
        time.Sleep(4 * time.Second)
        cancel()
    }()
    select {
    case <-c1.Done():
        fmt.Println("f1() Done:", c1.Err())
        return
    case r := <-time.After(time.Duration(t) * time.Second):
        fmt.Println("f1():", r)
    }
    return
}
The f1() function creates and executes a goroutine. The time.Sleep() call simulates the time it would take a real goroutine to do its job. In this case, it is 4 seconds, but you can put any time period you want. If the c1 context calls the Done() function in less than 4 seconds, the goroutine will not have enough time to finish.
func f2(t int) {
    c2 := context.Background()
    c2, cancel := context.WithTimeout(c2, time.Duration(t)*time.Second)
    defer cancel()
The cancel variable in f2() comes from context.WithTimeout(), which requires two parameters: a Context parameter and a time.Duration parameter. When the timeout period expires, the cancel() function is called automatically.
    go func() {
        time.Sleep(4 * time.Second)
        cancel()
    }()
    select {
    case <-c2.Done():
        fmt.Println("f2() Done:", c2.Err())
        return
    case r := <-time.After(time.Duration(t) * time.Second):
        fmt.Println("f2():", r)
    }
    return
}
func f3(t int) {
    c3 := context.Background()
    deadline := time.Now().Add(time.Duration(2*t) * time.Second)
    c3, cancel := context.WithDeadline(c3, deadline)
    defer cancel()
The cancel variable in f3() comes from context.WithDeadline(), which requires two parameters: a Context variable and a time in the future that signifies the deadline of the operation. When the deadline passes, the cancel() function is called automatically.
    go func() {
        time.Sleep(4 * time.Second)
        cancel()
    }()
    select {
    case <-c3.Done():
        fmt.Println("f3() Done:", c3.Err())
        return
    case r := <-time.After(time.Duration(t) * time.Second):
        fmt.Println("f3():", r)
    }
    return
}
The logic of f3() is the same as in f1() and f2()—the select block orchestrates the process.
func main() {
    if len(os.Args) != 2 {
        fmt.Println("Need a delay!")
        return
    }
    delay, err := strconv.Atoi(os.Args[1])
    if err != nil {
        fmt.Println(err)
        return
    }
    fmt.Println("Delay:", delay)
    f1(delay)
    f2(delay)
    f3(delay)
}
The three functions are executed in sequence by the main() function. Running useContext.go produces the following kind of output:
$ go run useContext.go 3
Delay: 3
f1(): 2023-08-28 16:23:22.300595 +0300 EEST m=+3.001225751
f2(): 2023-08-28 16:23:25.302122 +0300 EEST m=+6.002730959
f3(): 2023-08-28 16:23:28.303326 +0300 EEST m=+9.00391262
The long lines of the output are the return values of time.After() and show the times that After() sent the current time on the returned channel. All of them denote a normal operation of the program.
If you define a bigger delay, then the output is going to be similar to the following:
$ go run useContext.go 13
Delay: 13
f1() Done: context canceled
f2() Done: context canceled
f3() Done: context canceled
The point here is that the operation of the program is canceled when there are delays in its execution.
About context.WithCancelCause
The context.WithCancelCause() method was introduced in Go 1.21. Its main advantage is that it gives you customization capabilities, which are not offered by the other methods of the context package. Apart from that, it behaves like WithCancel().
Similar to context.WithCancelCause(), there exists context.WithTimeoutCause() and context.WithDeadlineCause().
The withCancelCause.go program illustrates the use of context.WithCancelCause().
func main() {
    ctx := context.Background()
    ctx, cancel := context.WithCancelCause(ctx)
    cancel(errors.New("Canceled by timeout"))
    err := takingTooLong(ctx)
    if err != nil {
        fmt.Println(err)
        return
    }
}
The implementation of main() contains two important elements. First, we call context.WithCancelCause(), which returns a context, and a CancelCauseFunc() function, which behaves like CancelFunc() while allowing us to define and customize the cancellation cause giving clearer context to the error situation—in this case, the cancellation cause is defined as errors.New("Canceled by timeout"). After that, we call takingTooLong() with the context that we have just defined. If takingTooLong() returns an error that is not nil, we print that error.
func takingTooLong(ctx context.Context) error {
    select {
    case <-time.After(3 * time.Second):
        fmt.Println("Done!")
        return nil
    case <-ctx.Done():
        fmt.Println("Canceled!")
        return context.Cause(ctx)
    }
}
The previous function returns either nil or context.Cause(ctx).
Running withCancelCause.go produces the following output:
$ go run withCancelCause.go
Canceled!
Canceled by timeout
So, as the second part of the select block is executed, takingTooLong() prints Canceled! and main() prints the cancellation reason according to the initialization of context.WithCancelCause().
We are not completely done with context as the next chapter is going to use it to timeout HTTP interactions on the client side of the connection. The next section discusses the semaphore package, which is not part of the standard library.
The semaphore package
This last section of this chapter presents the semaphore package, which is provided by the Go team. A semaphore is a construct that can limit or control the access to a shared resource. As we are talking about Go, a semaphore can limit the access of goroutines to a shared resource but, originally, semaphores were used for limiting access to threads. Semaphores can have weights that limit the number of threads or goroutines that can have access to a resource.
The process is supported via the Acquire() and Release() methods, which are defined as follows:
func (s *Weighted) Acquire(ctx context.Context, n int64) error
func (s *Weighted) Release(n int64)
The second parameter of Acquire() defines the weight of the semaphore. As we are going to use an external package, we need to put the code inside ~/go/src in order to use Go modules: ~/go/src/github.com/mactsouk/mGo4th/ch08/semaphore.
Now, let us present the code of semaphore.go, which shows an implementation of a worker pool using semaphores:
package main
import (
    "context"
    "fmt"
    "os"
    "strconv"
    "time"
    "golang.org/x/sync/semaphore"
)
var Workers = 4
The Workers variable specifies the maximum number of goroutines that can be executed by this program.
var sem = semaphore.NewWeighted(int64(Workers))This is where we define the semaphore with a weight identical to the maximum number of goroutines that can be executed concurrently. This means that no more than Workers goroutines can acquire the semaphore at the same time.
func worker(n int) int {
    square := n * n
    time.Sleep(time.Second)
    return square
}
The worker() function is run as part of a goroutine. However, as we are using a semaphore, there is no need to return the results to a channel.
func main() {
    if len(os.Args) != 2 {
        fmt.Println("Need #jobs!")
        return
    }
    nJobs, err := strconv.Atoi(os.Args[1])
    if err != nil {
        fmt.Println(err)
        return
    }
The previous code reads the number of jobs that we want to run.
    // Where to store the results
    var results = make([]int, nJobs)
    // Needed by Acquire()
    ctx := context.TODO()
    for i := range results {
        err = sem.Acquire(ctx, 1)
        if err != nil {
            fmt.Println("Cannot acquire semaphore:", err)
            break
        }
In this part, we try to acquire the semaphore as many times as the number of jobs defined by nJobs. If nJobs is bigger than Workers, then the Acquire() call is going to block and wait for Release() calls in order to unblock.
        go func(i int) {
            defer sem.Release(1)
            temp := worker(i)
            results[i] = temp
        }(i)
    }
This is where we run the goroutines that do the job and write the results to the results slice. As each goroutine writes to a different slice element, there are not any race conditions.
    err = sem.Acquire(ctx, int64(Workers))
    if err != nil {
        fmt.Println(err)
    }
This is a clever trick: we acquire all of the tokens so that the sem.Acquire() call blocks until all workers/goroutines have finished. This is similar in functionality to a Wait() call.
    for k, v := range results {
        fmt.Println(k, "->", v)
    }
}
The last part of the program is about printing the results. After writing the code, we need to run the following commands to get the required Go modules:
$ go mod init
$ go mod tidy
$ mod download golang.org/x/sync
Apart from the first command, these commands were indicated by the output of go mod init, so you do not have to remember anything.
Lastly, running semaphore.go produces the following output:
$ go run semaphore.go 3
0 -> 0
1 -> 1
2 -> 4
Each line in the output shows the input value and the output value separated by ->. The use of the semaphore keeps things in order.
Making the statistics application concurrent
In this section of this chapter, we are going to convert the statistics application into a concurrent application that uses goroutines. However, instead of using channels, we are going to use a different approach that prevents deadlocks, while making the overall design of the program much simpler. Apart from that, there is also a version of stats.go named statsNC.go that does not create any goroutines and processes the input files sequentially.
We are only going to present the implementation of the main() function of stats.go because this is where the logic of the utility is found. However, minor additional changes exist for taking advantage of goroutines. The most time-consuming part of stats.go is the normalization of the time series.
What is impressive is that we converted stats.go into a concurrent application using a minimal amount of changes that mainly have to do with goroutine synchronization—this is a good indication of great design.
The implementation of main() is the following:
func main() {
    if len(os.Args) == 1 {
        fmt.Println("Need one or more file paths!")
        return
    }
    var waitGroup sync.WaitGroup
    files = make(DFslice, len(os.Args))
So far, we have a sync.WaitGroup variable for synchronizing the goroutines. Additionally, we have a slice variable named files that has as many elements as the length of the os.Args slice—files[0] is not going to be used.
The remaining code of main() is the following:
    for i := 1; i < len(os.Args); i++ {
        waitGroup.Add(1)
        go func(x int) {
            process(os.Args[x], x)
            defer waitGroup.Done()
        }(i)
    }
    waitGroup.Wait()
}
What do we have here? There is an anonymous function that runs as a goroutine. That anonymous function requires a single parameter, which is the index of the command line argument that is being processed. There is a handy property that comes with that index: that index is unique, which means that we can use that unique index when we put data into the files slice—this process takes place inside process(). This resolves any potential race conditions as each goroutine uses a different place in files. Keep in mind that files[0] is not being used but we have decided to make files bigger than needed in order to put the data for the first command line argument in files[1], and so on.
Apart from that, we use sync to wait for all goroutines to finish before exiting the program.
In order to compare stats.go with statsNC.go, we are going to use bigger datasets, which are all stored in the ./ch08/dataset directory. The sizes of the three data files can be seen in the following output:
$ wc dataset/*
 1518653 1518653 4119086 dataset/1.5M
 2531086 2531086 6918628 dataset/2.5M
 4049739 4049739 11037714 dataset/4.0M
 8099478 8099478 22075428 total
A quick and dirty way to calculate the execution time of a program is using the time(1) UNIX utility. Using that utility, we are going to compare the execution time of ./ch05/stats.go with ./ch05/stats.go and see what happens:
$ time go run stats.go ./dataset/* ./dataset/* ./dataset/*
real    0m1.240s
user    0m6.259s
sys     0m0.528s
$ time go run statsNC.go ./dataset/* ./dataset/* ./dataset/*
real    0m3.267s
user    0m7.766s
sys     0m0.535s
What is important in the output is the values in the lines that begin with real. The concurrent version is about three times faster than the non-concurrent version when processing nine files. Imagine using even bigger datasets and having to process 1,000 datasets instead of just nine!
Summary
In this important chapter, we talked about Go concurrency, goroutines, channels, the select keyword, shared memory, and mutexes, as well as timing out goroutines and the use of the context package. Bear in mind that although goroutines can process data and execute commands, they cannot communicate with each other directly but they can communicate in other ways, including channels, local sockets, and shared memory.
Remember that OS threads are controlled by the OS scheduler, whereas goroutines executed in one or more OS threads are controlled by the Go runtime. The correct terminology for when a goroutine or an OS thread is executed and then paused is context-switched on and off, respectively. Keep in mind that the Go scheduler checks the global queue from time to time in order to find out whether there are any goroutines waiting to be assigned to a local queue. If both the global queue and a given local queue are empty, then work-stealing takes place.
The main advantage of concurrency is that it allows the splitting of bigger tasks into smaller ones and the execution of each smaller task concurrently. Additionally, concurrency does a great job in distributing multiple HTTP requests among different goroutines. Lastly, concurrency makes better use of modern CPUs with multiple cores and virtual environments. However, concurrency adds complexity to the software design and the code, which affects readability and maintainability. For that reason, you might need to add concurrency last in your code, as we did with the statistics application. One other concern of concurrency is the risk of consuming all available resources making other services unreliable or even unavailable. Lastly, concurrent code is harder to benchmark—if you want to compare two concurrent implementations, it is better to compare their sequential versions that tell more about the actual algorithms and code efficiency.
What is important to remember is that the rational use of concurrency and goroutines is going to allow you to write powerful Go applications. Feel free to experiment with the concepts and the examples of this chapter to better understand goroutines, channels, and shared memory.
The next chapter is all about web services and working with the HTTP protocol in Go. Among other things, we are going to convert the statistics application into a web service.
Exercises
Try to implement a concurrent version of
wc(1)that uses a buffered channel.Try to implement a concurrent version of
wc(1)that uses shared memory.Try to implement a concurrent version of
wc(1)that uses semaphores.Try to implement a concurrent version of
wc(1)that saves its output to a file.
To dive deeper into concurrency design, profiling techniques, generics, and Go’s evolving runtime, check out Mastering Go, Fourth Edition by Mihalis Tsoukalos, available from Packt. This 740-page guide is fully updated with coverage of web services, TCP/IP, REST APIs, fuzz testing, and observability, and pairs detailed explanations with real-world exercises to help you build high-performance servers, robust command-line tools, and production-grade Go systems.

Here is what some readers have said:


 | A guest post by
|