

Building a Distributed Key-Value Store in Go: From Single Node to Planet Scale
A build-to-learn exercise that walks through the architectural primitives behind Dynamo-style systems—without the abstractions.

Most of us have either used or at least heard of systems like Redis or DynamoDB. But, have you ever wondered what kind of engineering headaches their teams had to deal with while building these giants?
In this article, we’ll go through a hands-on journey to build a distributed key-value store in Go , starting from a simple single-node setup and gradually scaling it conceptually to something that could power a much larger system. Along the way, we’ll uncover the trade-offs real-world systems make: sacrificing some network bandwidth to achieve eventual consistency, accepting slightly slower reads and writes (via the quorum principle) to ensure data availability, and more.
We’ll also see how a seemingly simple idea — hashing — can solve two of the biggest challenges in building massively scalable systems. To handle node failures and keep data in sync, we’ll touch on techniques such as consistent hashing, the quorum principle, vector clocks, gossip protocols, and Merkle trees.
By the end of this tutorial, you will learn how to:
Implement consistent hashing in Go to distribute (shard) data across multiple nodes
Add data redundancy to your key-value store to prevent data loss
Handle temporary network partitions and still maintain high availability using the Quorum Principle
Resolve data inconsistencies caused by network partitions using Vector Clocks, and implement them in Go
Deal with permanent node failures and build a self-healing system using Gossip Protocol, Merkle Trees, and Anti-Entropy mechanisms
And yes, this is a build-to-learn exercise.
Step 1: Building a Basic Key-Value Store
“It all starts with a simple map… and somehow ends up running the planet.”
In Go, a map is just a built-in dictionary that stores key-value pairs. Our journey begins with one of those — map[string]string — to represent a single-node, in-memory key-value store. But as we scale, this simple little map will evolve into a fault-tolerant, distributed system.
We’ll begin with the simplest possible version: an in-memory key-value store in Go. This first version uses a map[string]string, wrapped with methods for Put, Get, and Delete, plus TTL support so keys expire automatically. A lightweight CLI lets us interact with the store.
Here’s the core store implementation with the simplest possible foundation: an in-memory key-value store built on Go’s map type, with basic concurrency control and time-to-live support. This gives us the essential CRUD interface while keeping the implementation small enough to reason about:
type Store struct {
    data map[string]item
    mu   sync.RWMutex
}

type item struct {
    value     string
    expiresAt time.Time
}

func (s *Store) Put(key, value string, ttl int) {
    s.mu.Lock()
    defer s.mu.Unlock()
    s.data[key] = item{value, time.Now().Add(time.Duration(ttl) * time.Second)}
}

func (s *Store) Get(key string) (string, error) {
    s.mu.RLock()
    defer s.mu.RUnlock()
    it, ok := s.data[key]
    if !ok || time.Now().After(it.expiresAt) {
        s.mu.RUnlock()
        s.mu.Lock()
        delete(s.data, key)
        s.mu.Unlock()
        s.mu.RLock()
        return "", errors.New("key not found or expired")
    }
    return it.value, nil
}

func (s *Store) Delete(key string) error {
    s.mu.Lock()
    defer s.mu.Unlock()

    if _, exists := s.data[key]; !exists {
        return errors.New("key not found")
    }
    delete(s.data, key)
    return nil
}
The Store struct wraps a plain Go map with read/write locks to handle concurrent access. Put inserts a key with a TTL, Get retrieves it while cleaning up expired entries, and Delete removes it explicitly. This design works for a single-node, in-memory store, but it’s fragile—data is lost on crash, capacity is limited to one machine, and there’s no fault tolerance—making it the starting point for the distributed system we’ll build next.
You can find the full code (including the CLI) here:
Our basic key-value store is fine for experiments, but let’s be honest — no one would use this in production.
Why? Because it has the following limitations:
Memory-only storage: If the process crashes, everything is gone.
Single machine bottleneck: Limited RAM and CPU mean large datasets won’t fit, and traffic spikes can overwhelm it. What if the machine simply fails?
No replication: One node means one point of failure — downtime equals total unavailability.
Lock-based concurrency: Fine for small loads, but a bottleneck under real concurrency.
In short, To build a system that survives failures, scales across multiple machines, and keeps data safe, we need to distribute it. That’s where partitioning and replication come in.
Step 2: Partitioning with Consistent Hashing
Once we outgrow the simplicity of a single-node key-value store, the first real challenge emerges:
How do we scale the system horizontally without breaking the rules of consistency and performance?
This is where partitioning comes in.
🍰 What is Partitioning?
Partitioning is the process of splitting your data across multiple machines, so no single node is overwhelmed.
You can think of it like a bakery with multiple shelves. Instead of piling all cakes onto one shelf (which could eventually collapse with the weight), we distribute them across several.
But there’s a catch.
If we just use a simple hash(key) %n approach (where n is the number of nodes), then adding/removing a node changes the result for most keys. That would translate to chaos in production — everything would need to be reshuffled!
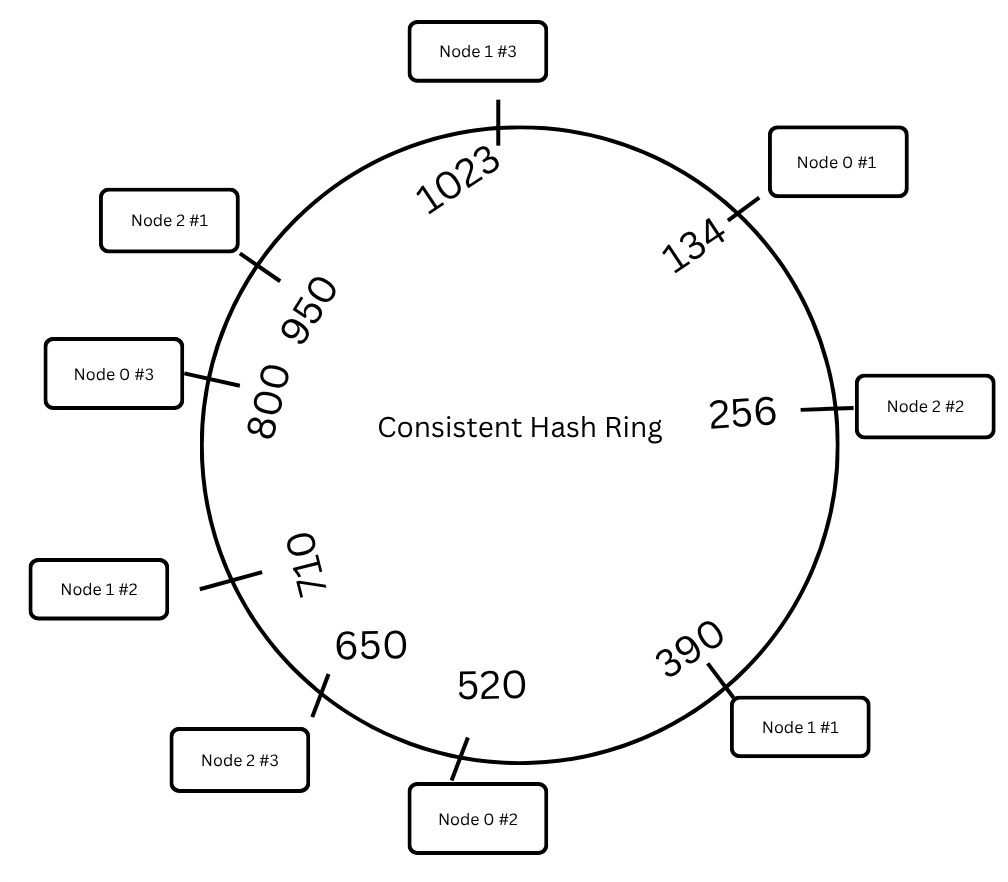
🎯 Enter Consistent Hashing
Consistent hashing prevents this chaos by organising keys and nodes on a circular hash ring.
Each node is placed on the ring based on its hash.
A key is also hashed and moves clockwise until it finds the first node with a greater hash value.
That node becomes the responsible owner for that key.
To avoid uneven distribution, we don’t stop with adding a node once—we give each node multiple “avatars” on the ring using virtual nodes.
Think of a single server showing up to the party in 10 different costumes. Why? To spread the load better and avoid creating hotspots!
Minimal Go Code for Consistent Hashing with Virtual Nodes
Here’s a minimal Go implementation that shows how consistent hashing with virtual nodes works in practice—both for placing nodes on the ring and for finding which node owns a given key:
// AddNode: places a physical node on the hash ring multiple times as virtual nodes.
func (ring *HashRing) AddNode(node ICacheNode) error {
    nodeID := node.GetIdentifier()
    for i := 0; i < ring.config.VirtualNodes; i++ {
        vNodeID := fmt.Sprintf("%s_%d", nodeID, i)
        hash := ring.hash(vNodeID)
        ring.vNodeMap[hash] = node
        ring.sortedKeys = append(ring.sortedKeys, hash)
    }
    sort.Slice(ring.sortedKeys, func(i, j int) bool { return ring.sortedKeys[i] < ring.sortedKeys[j] })
    return nil
}

// Get: finds which node should handle the given key.
func (ring *HashRing) Get(key string) ICacheNode {
    h := ring.hash(key)
    idx := sort.Search(len(ring.sortedKeys), func(i int) bool { return ring.sortedKeys[i] >= h })
    if idx == len(ring.sortedKeys) {
        idx = 0
    }
    return ring.vNodeMap[ring.sortedKeys[idx]]
}
The AddNode method ensures each physical node appears multiple times on the ring—its “virtual nodes”—to balance load. The Get method locates the first virtual node clockwise from the key’s hash, ensuring stable ownership. Together, they guarantee even key distribution and minimal key movement when scaling the cluster up or down.
✅ What We’ve Achieved So Far:
We've now partitioned our data across multiple nodes using consistent hashing.
Thanks to virtual nodes, data is evenly spread, reducing the risk of any one server becoming overloaded.
And most importantly, when nodes join or leave, only a minimal subset of keys are reassigned, keeping the system stable and predictable.
This lays a solid foundation for building a fault-tolerant, scalable distributed key-value store.
Step 3: Ensuring Data Durability via Replication
Partitioning spreads the load but introduces a risk:
What if a node dies?
Boom 💥— all the keys on that node are gone.
To avoid this nightmare, we introduce replication. The idea is simple: store each key on multiple nodes.
We define a replication factor (N) — say 3 — and for every key, we write it to its primary node plus N-1 successors (moving clockwise on the ring). This way, if the primary node fails, one of its replicas can step in like a stunt double in an action movie. No data loss. No drama.
Here’s how we fetch the responsible nodes for a given key.
func (ring *HashRing) GetNodesForKey(key string) ([]ICacheNode, error) {
    h, err := ring.generateHash(key)
    if err != nil {
        return nil, err
    }
    start := ring.search(h)
    seen := map[string]struct{}{}
    nodes := []ICacheNode{}

    for i := start; len(nodes) < ring.config.ReplicationFactor && i < start+len(ring.sortedKeys); i++ {
        vHash := ring.sortedKeys[i%len(ring.sortedKeys)]
        node, _ := ring.vNodeMap.Load(vHash)
        n := node.(ICacheNode)
        if _, ok := seen[n.GetIdentifier()]; !ok {
            nodes = append(nodes, n)
            seen[n.GetIdentifier()] = struct{}{}
        }
    }
    return nodes, nil
}
Let’s break the preceding code down real quick:
We hash the key and locate its position on the ring.
Then we scan clockwise, collecting distinct physical nodes (deduplicating virtual nodes) until we have
ReplicationFactorowners. This places the key on N separate nodes; as long as fewer than N of those replicas fail—and the write reached the surviving replicas—the data remains intact.To ensure each replica is placed on a different physical node, we track the node IDs we’ve already selected in a
seenmap. This way, even if several virtual nodes for the same machine appear during the clockwise scan, only the first one counts toward the replication factor.
Operational availability under failures, however, depends on your quorum settings (R and W), not just on replication alone.
You can find the full implementation with visuals and chaos-proof replication here:
➡ Level Up Your Distributed Cache in Go
Step 4: CAP Theorem — The Reality Check
Replication boosts durability, but it’s not the silver bullet. It introduces a dilemma:
What if nodes get partitioned (i.e., temporarily can’t talk to each other)?
Should we still serve data (Availability)?
Or wait until nodes reconcile (Consistency)?
This is where the CAP theorem comes in.
Quick Refresher on CAP
In any distributed system, especially during a network partition (P) — where parts of the system lose connectivity — you can only guarantee two out of three properties:
C (Consistency): Every read reflects the most recent write.
A (Availability): Every request receives a non-error response, even if it’s not the latest data.
P (Partition Tolerance): The system continues functioning even when network failures occur.
You must pick your trade-offs.
Let’s look at real systems:
Etcd → CP: Prefers strict consistency. If some nodes are unreachable, it may refuse requests.
DynamoDB → AP: Stays available even if replicas are temporarily inconsistent.
Redis → CP-ish: Leans toward consistency, especially with persistence and replication configs.
Our KV Store: Why AP?
Let’s say Node A gets a PUT user=42, but due to a partition, Node B hasn’t seen it yet.
If we choose AP, we'll serve data anyway. Node B might return stale values temporarily.
If we choose CP, we'll block reads/writes until the partition is healed — painful for systems needing high uptime.
💡 We’re picking AP because:
It ensures high availability — requests don’t fail even if nodes are isolated.
In real-world systems (like shopping carts or feed timelines), temporary staleness is acceptable.
We can always reduce staleness with clever strategies, which brings us to…
👀 Quorums!
Quorums allow us to serve reads and writes from a subset of nodes, while still maintaining a form of consistency. So, even in an AP system, we can be “eventually” smart.
Step 5: Making Things Consistent
Okay, so we’ve picked the AP route — we’re okay with availability and we’ll deal with consistency eventually. But eventually can’t mean never, right?
We still need a way to minimize staleness and make sure clients don’t keep reading garbage forever. That’s where quorum-based reads and writes step in like that one responsible teammate who actually updates the shared document.
Quorum Math 101 (No Headache, Promise)
Here’s the deal:
N = total number of replicas for a key (say 3)
W = number of nodes that must acknowledge a write
R = number of nodes to respond to a read
We follow a simple but powerful rule:
👉 R + W > N
This ensures that any read overlaps with at least one node that has the most recent write.
Think of it like this:
If 2 nodes confirm a write (W = 2), and you read from 2 nodes (R = 2), you’re guaranteed at least one read hits a node that saw the latest data. Magic? Nope — just smart math.
To make this more concrete, here’s a minimal example showing how a write operation checks if enough replicas have acknowledged it before being considered successful:
if ackCount >= W {
    fmt.Println("Write successful")
} else {
    fmt.Println("Write failed: insufficient replicas")
}
This check enforces the W part of our quorum rule. If the number of acknowledgments meets or exceeds the required write quorum, the write is accepted; otherwise, it fails, preventing partial writes from being treated as committed.
So even though we’re in an AP world, we still care about consistency—we just do it selectively.
But Wait, What If Nodes Disagree? Good question.
Let’s say a network partition happened (again) and two nodes accepted different values for the same key. Now the partition heals and it’s reunion time—but each node brings a different version to the party. Who’s right?
This is where vector clocks step in like version historians.
Conflict Resolution with Vector Clocks
Let’s first define them:
A vector clock is a mini journal that each node keeps to track how many times it has updated a key, along with updates it has seen from other nodes.
Each update increments a node-specific counter, and these counters are exchanged during replication.
To represent a vector clock in code, we can use a simple mapping from node identifiers to counters, which track how many updates each node has made or observed:
type VectorClock map[string]int
// Compare vc1 vs vc2 → newer, older, or concurrent (conflict)
This structure gives us a compact way to compare two versions of the same key. By checking whether one clock’s counters are all greater than or equal to the other’s, we can tell if it’s strictly newer; if neither dominates, we’ve found a concurrent update—a signal that conflict resolution is needed.
For example:
Node A might have {A: 2, B: 1}
Node B might have {A: 1, B: 2}
When syncing:
If one vector clock dominates the other (i.e., all its values are greater than or equal), then it's the newer version.
If neither dominates (some values are higher, others lower), the updates are concurrent—a conflict.
What do we do then?
Last write wins? Meh.
Custom merge logic? Better.
Ask the user to pick? Sometimes necessary.
This is the stuff we use to eventually reach consistency.
And just like that, our humble key-value store starts to feel like it knows what it’s doing in the face of chaos.
Want to dive deeper into how we implemented this?
➡ Mastering Data Consistency: Quorum Principle & Vector Clocks
Now, let’s pause for a second:
Have we built something production-ready?
Not quite.
Here’s a hint:
How do we track whether all five replicas of a key are still alive?
What if two machines go down ? How do we know, and how do we restore their missing data to new nodes?
And that’s the beauty of system design:
There’s no single magic concept that fixes everything. Each solution comes with trade-offs, which introduce new challenges. That’s what makes this field exciting — and endless.
And that is why, in the next sections, we’ll dive into failure detection and recovery:
How to detect dead nodes (Gossip protocol).
How to repair inconsistent replicas (Merkle trees).
How to handle temporary vs. permanent failures gracefully.
Let’s get started.
Step 6: Dealing with Failures
“Because stuff will break. It always does.”
A truly distributed system isn’t judged by how well it runs when everything’s perfect — it’s judged by how gracefully it recovers when things go sideways.
Our key-value store may look solid now, but sooner or later, the universe throws a wrench: machines crash, networks glitch, and nodes vanish without even saying goodbye.
So, how do we stay resilient?
Let’s break this down into two categories of failures — temporary ones we can ride out, and permanent ones we need to actively repair.
1. Temporary Failures: Don’t Panic Yet
Sometimes a node isn’t dead — it’s just slow or its network is acting up. We can handle these “soft” failures using:
Retries with Exponential Backoff
Instead of hammering the same request repeatedly, back off a bit each time.
To tolerate transient link or node hiccups, we retry the write with exponential backoff—waiting longer after each failed attempt to avoid amplifying congestion:
for attempt := 1; attempt <= maxRetries; attempt++ {
    err := sendToNode(node, data)
    if err == nil { break }
    time.Sleep(time.Duration(math.Pow(2, float64(attempt))) * time.Millisecond)
}
This loop stops on the first success and otherwise doubles the sleep each time, reducing pressure on a slow or flaky path. In production you’d typically add jitter and a max backoff, honor context cancellation/timeouts, and retry only on errors you’ve classified as transient—reserving hinted handoff for cases where the target remains unreachable.
💡 This pattern lets us tolerate transient failures without nuking the node or overloading the network. It’s like giving the system a breather before asking again.
Hinted Handoff
When a node is temporarily unreachable, we don’t just drop the write. Instead, another healthy node steps up and holds the data “on behalf” of the sick node — a feature known as hinted handoff. Once the target node is back online, the hint is delivered.It’s like asking a coworker to take notes for you in a meeting you’re late to. The data stays safe, and the system keeps humming.
2. Permanent Failures: Time to Repair
Now for the real disasters — disks fry, servers die, or someone yanks the wrong power cable.
🧠 First step? Detect the failure quickly.
🗣️ Gossip Protocol (a.k.a. Distributed Rumor Mill)
The Gossing Protocol is a neat trick inspired by how gossip spreads in an office.
To detect failures without a central coordinator, each node periodically “gossips” a heartbeat to a randomly chosen peer. Over time, this epidemic exchange spreads liveness information across the cluster:
func gossipHealth(nodeList []Node) {
    peer := pickRandomNode(nodeList)
    _ = sendHeartbeat(peer)
}
This toy loop shows the core idea—random peer selection and a heartbeat send—but real gossip runs on a timer with jitter, tracks per-member state (incarnation/version), and uses suspicion/timeout thresholds (e.g., φ-accrual) before declaring a node dead. Implementations typically piggyback membership deltas on heartbeats, use push/pull anti-entropy, and limit fan-out to keep bandwidth bounded while still achieving fast, probabilistic dissemination.
👉 This heartbeat-sharing helps identify dead nodes without a central coordinator. It’s fault-tolerant, fast, and wonderfully gossipy.
📚 To see how the Gossip Protocol is implemented in Go, Read:
➡ How to Implement Gossip Protocol in Go
When Nodes Come Back: Data Syncing
Okay, so a node is back from the dead (or replaced). Now we need to catch up with all the data it missed. But syncing everything between nodes is too expensive, and resolving each key using vector clocks is overkill.
So, how do we efficiently find the differences? The answer is Merkle Trees
Merkle Trees are not just for blockchains, folks.
🌳 What is a Merkle Tree?
A Merkle Tree is a tree of hashes. Each leaf node represents a hashed key-value pair. Parent nodes hash their children’s values. Eventually, the root hash represents the entire dataset.
This structure lets us compare large sets of data by comparing just a few hashes.
To resync a returning node without comparing every key, we build a Merkle tree: a deterministic tree of hashes over a sorted key range. Leaves typically hash a key’s identity and version (or value hash), parents hash the concatenation of their children, and the root serves as a compact digest of the whole range. Two replicas can compare roots first and only drill into subtrees that differ:
type MerkleNode struct {
    hash  []byte
    left  *MerkleNode
    right *MerkleNode
}
// Compare root hashes: if they differ, traverse down to find mismatched ranges.
Here’s how the code works:
Start by comparing the root hashes of two replicas.
If they match: ✅ All good.
If they differ: ⛔ Traverse down the tree.
Eventually, you pinpoint exactly which ranges differ — and sync only those.
🧠 Think of it as doing a diff between directories, but at scale and optimized with hashes.
In production you’ll want:
Canonical key ordering and fixed range partitioning so trees are comparable,
Leaves that hash something like
H(key || version || valueHash)to handle deletes/TTL via tombstones,A stable cryptographic hash (e.g., SHA-256),
Incremental rebuilds or rolling windows so the tree stays fresh without full recompute, and
Rate-limited, chunked transfer of the differing ranges. This turns “catch-up after outage” into a targeted, bounded anti-entropy pass rather than a full dataset diff.
So Why Are Merkle Trees Important?
Earlier, we mentioned hashing helps solve two hard scaling problems:
Distributing data across nodes → we used consistent hashing.
Reconciling data between replicas → Merkle Trees to the rescue.
Merkle Trees aren’t better than consistent hashing — they’re complementary. One spreads the load, the other keeps the data in sync.
Benefits of Merkle Trees in Repair
Space efficient: O(n)
Fast to detect differences: O(log n)
Efficient syncs: Transfer only what’s necessary
That’s why systems like Cassandra use them for anti-entropy repairs, and Bitcoin uses them for transaction validation.
📚 To see how Merkle Trees power scalable repair, read:
➡ How Merkle Trees Power Scalable Repair in Distributed Systems.
With that, our system is no longer just functional — it’s resilient.
Failures? Let them come.
We’ve got retries, handoffs, gossip, and trees on our side.
Step 7: Final Design Summary
We’ve come a long way from a simple map[string]string. Let’s connect the dots:
Hash Ring → Partitioning: Keys are evenly distributed across multiple nodes using consistent hashing (and virtual nodes), avoiding hotspots and enabling horizontal scaling.
Replication → Fault Tolerance: Each key is stored on multiple nodes. If one node fails, replicas ensure both the data and the system keep running.
Quorum → Consistency Control: By using quorum reads/writes (R + W > N), we avoid waiting for all replicas while still preventing our AP system from drifting too far into inconsistency.
Gossip → Failure Detection: Nodes exchange lightweight health updates, quickly spotting which peers are alive, slow, or permanently gone.
Merkle Trees → Repair: When failed nodes recover or new nodes join, Merkle Trees efficiently detect and sync only the out-of-date key ranges — no need to resend the entire dataset.
Here’s a high-level view of the final architecture:
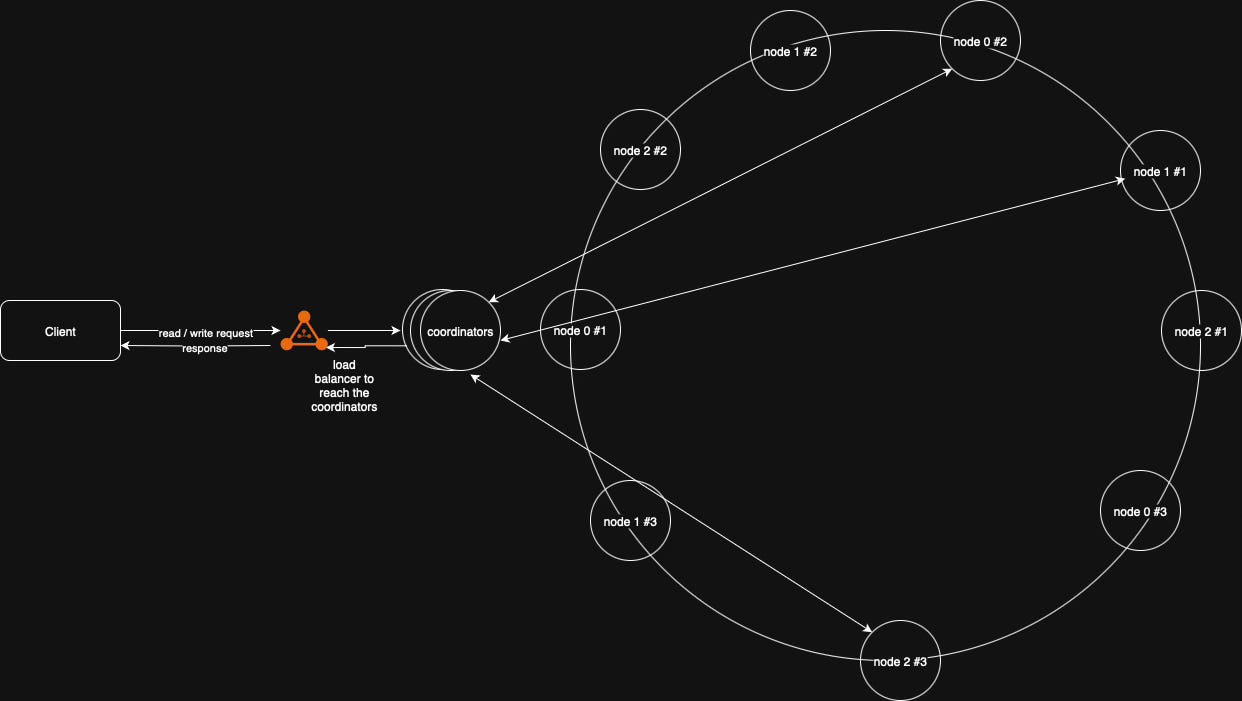
Key Responsibilities per Node:
Handle CRUD operations for its key range
Detect failures (via gossip)
Resolve version conflicts (vector clocks)
Repair missing data (Merkle Trees)
Maintain replication sets
Store and serve data
A small in-memory map has now evolved into a resilient, horizontally scalable distributed key-value store.
Conclusion
From a single in-memory map to a cluster powered by hashing, gossip, quorums, and Merkle Trees — you’ve just walked through the anatomy of a distributed key-value store.
This was a build-to-learn journey, not a production-ready blueprint, but the core ideas are the same ones that power DynamoDB, Cassandra, and other real-world giants.
To explore the detailed Go implementation, visuals, and deeper theory, check out the following GitHub repos:
The-Weekly-Golang-Journal/basic-key-value-cli
Implementation of Vector Clock
Implementation of Gossip protocol in Golang
About the Author:
Archit Agarwal is a Principal Member of Technical Staff at Oracle, where he engineers ultra-low latency authorization services in Golang. He is also the creator of The Weekly Golang Journal (“Mastering Golang, one issue at a time”), dedicated to translating advanced system design concepts into practical tools for engineers.
Archit’s focus is on elevating system performance and operational efficiency—whether by harnessing deep knowledge of programming language internals, optimizing SQL queries and backend logic for speed, or using modern DevOps practices to drive down infrastructure costs and boost developer productivity.
He actively explores and refines ways to make distributed systems not just theoretically robust, but highly efficient in production—emphasizing practical optimizations, smarter use of CI/CD pipelines, and leveraging cloud-native solutions for both scalability and cost-effectiveness.
If you enjoyed this deep dive and want more such content on distributed systems and Go, you can follow and connect with Archit Agarwal on the following platforms:
📬Newsletter: The Weekly Golang Journal
Bite-sized, practical reads on Go, backend engineering, and system design every Wednesday.💼LinkedIn: Archit Agarwal
I post on Go, distributed systems, and dev life stories.✍️ Medium – @architagr
More long-form reads and behind-the-scenes of my projects.🐦 Twitter (X) – @architagr
Quick thoughts, code snippets, and my dev brain at 2 AM.